Welcome to the 317th Metamorphosis Monday!
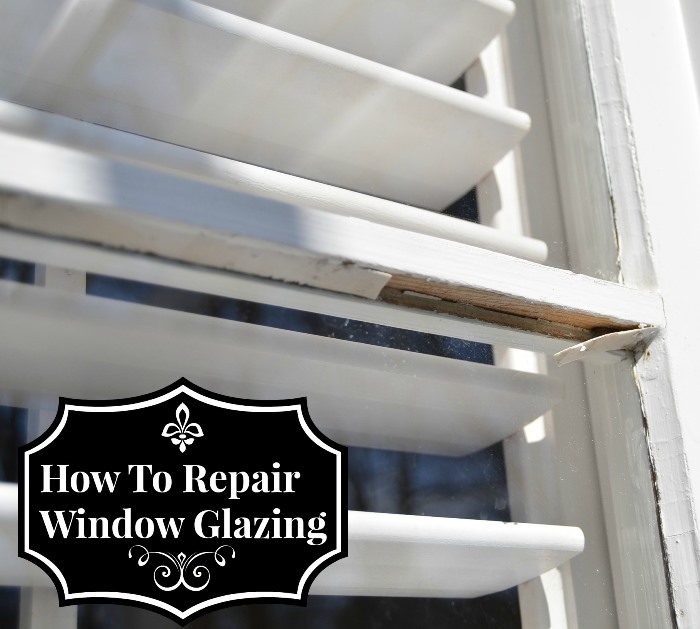
A few years ago I had the exterior of my home painted, actually it’s been about 6 years now. Wow, time has flown by! I was outside filling up my bird feeders recently and noticed something hanging down above one of the windowpanes in the bay window of my breakfast room.
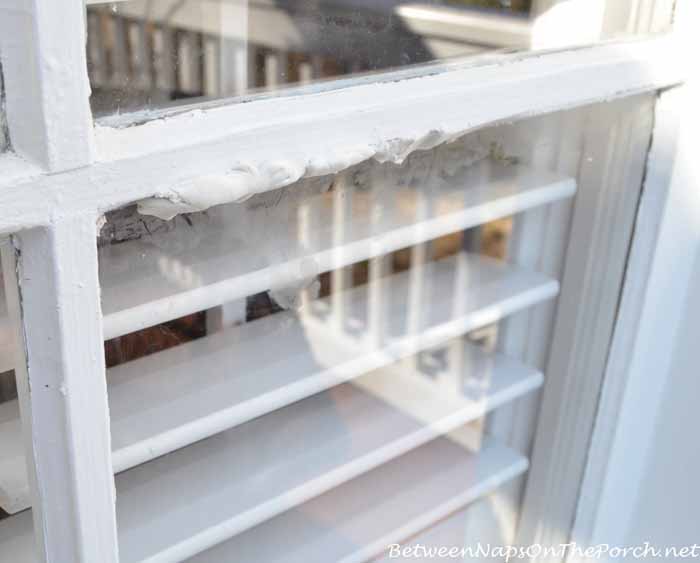
On closer inspection I could see the glazing had cracked away from the window. I still have all my original windows and don’t ever want to replace them if I can avoid it. I really love the looks of a true divided light window so when I had the house painted, the painters re-glazed the windows that needed new glazing.

I’m pretty sure I know why the glazing on this window didn’t last. Looking at it up close, it’s obvious it never got primed and painted after the glazing was repaired. The rest of the window was painted but the painter somehow missed the top part of the window.
I did a bit of research on glazing windows and decided this was a DIY I could handle myself. I headed to True Value and purchased several tools in preparation for repairing the window glazing.
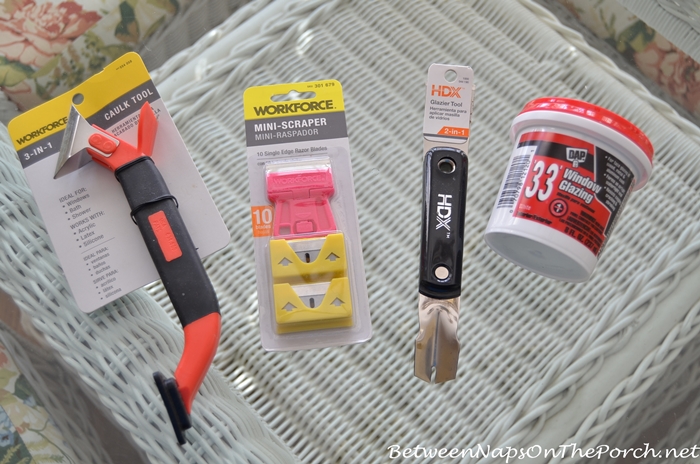
In the end, these were the only two tools I needed: Glazier Tool and Window Glazing Compound.

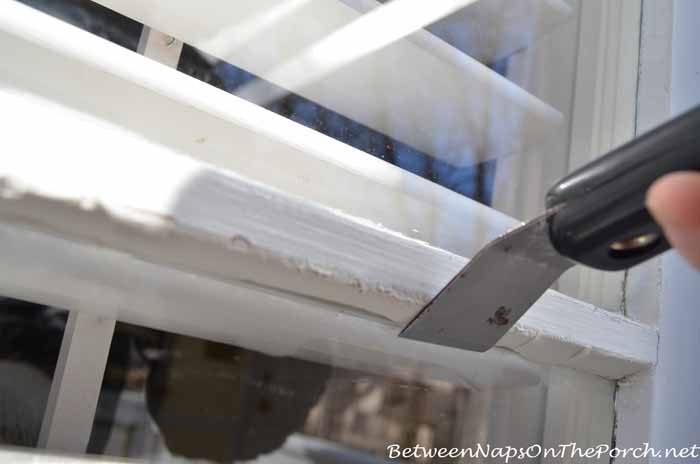
When glazing a window, one of the first things you’ll need to do is remove any old glazing that’s chipped or damaged. If the glazing is still in place and looks good for part of the window, it can stay, but it’s best to completely remove any glazing that looks chipped or loose because it can prevent the new glazing from adhering as it should.
Using the slanted end of the glazier tool, I scraped out the rest of the old glazing that ran along the top of the window. It’s important to work slowly and carefully when removing the old glazing to avoid breaking the glass. So don’t apply too much pressure, just not worth the risk.
Once I had all the old glazing removed, I wiped down the area with a cloth. You can use a stiff brush to do this, as well. This again just ensures there aren’t any little chips left behind that could interfere with how well the glazing adheres to the window.

This is a good time to point out something that you’ll want to be careful of while applying glazing. Notice how part of the wood window mullion on the other side is visible in the picture below since the glazing is missing. When applying the new glazing, be sure to not go below the bottom of the inside mullion because if the glazing extends too low, you’ll be able to see it from inside when looking out the window. The glazing you apply on the outside should not be visible to the eye from inside.

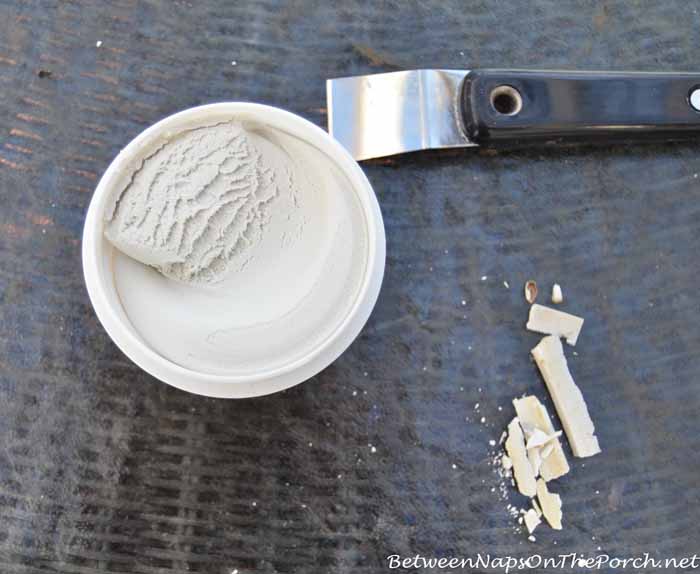
Here’s how glazing looks inside the container. Glazing also comes in a tube just like caulking. I decided to go old school and use the kind in the container. To start, I scooped out a good chuck of glazing compound with the glazier tool, around the size of a ping-pong ball. I rolled it around and around in my hands, letting the heat from my hands warm it up. You could probably wear those thin latex gloves for this part if you like. I did not and didn’t have any problems with the glazing sticking to my hands. Once the glazing was softened up, I applied it to the window with my glazier tool.
Tip: It’s best to glaze a window when the temperature outside is warm and comfortable. I found it a bit challenging to work with the glazing because it was in the low 50’s when I was doing the glazing and the windows were cold. So, I had almost no time to work with the glazing before it began to stiffen up again. Knowing what I know now, I probably should have waited until spring. So, keep that in mind and it will make the job go a bit easier.
Another thing that made the process a little trickier was the area I needed to apply the glaze was across the top of the windowpane. Applying glazing down the side or across the bottom of a window is a little easier. What I found worked best was after warming the glazing up in my hands, I rolled out a 4-5″ long section in a snake-like shape, kind of like we used to do with clay dough when we were kids. 🙂 Then I pressed the glazing snake up against the window pane where the old glazing had been. Don’t worry if it looks like there’s too much because it will get removed when you smooth out the glazing with the glazing tool.
In this previous picture, notice how the glazier tool is slanted.
That’s so you can press and smooth out the glazing, ensuring the glazing is slanting toward the window. This will help rain water run off the window and down the windowpane, plus, it just looks nicer. So, using my glazier tool, I pressed the glazing compound in place along the window, making my way down the window. Again, it’s best to do this when the temperature outside is a moderate temperature and not too cold because the glazing compound will stay pliable during the process.
Once the glazing compound was pressed smoothly again the window at an angle as shown below, I took my glazier tool and ran it along the glazing to smooth it out all the way down the length of the windowpane. If the edge of the glazing is a bit ragged against the windowpane, the edge of the glazier tool can be used to trim it so that it looks neat and tidy.
Since I was working in cold weather, I didn’t have time to smooth out the glazing compound quite as much as I would have liked before it began to harden, but I think it came out pretty well considering this was my first attempt at glazing. So you know what that means: if I can do this, you definitely can! After the glaze has had plenty of time to dry, I’ll prime it and paint it.
Glazing windows is just like anything else, the more you do it, the easier it will get. So don’t get frustrated if your first attempt doesn’t look very tidy. Just pull the glazing back out while it’s still soft, roll it around in your hands to warm it up again and press it back into the window again for a do over. The compound I was working with was pretty forgiving, despite the cold temperatures. So, this process should be even easier when done on a pretty day with more moderate temps.

Have you ever repaired or replaced old glazing in a window? Have any great tips to share? Would love to hear them!
I was one of the bloggers selected by True Value to work on the DIY Squad. I have been compensated for my time commitment to the program as well as writing about my experience. I have also been compensated for the materials needed for my DIY project. However, my opinions are entirely my own and I have not been paid to publish positive comments.
Looking forward to all the wonderful Before and Afters for this Met Monday!

If you are participating in Metamorphosis Monday, you will need to link up the “permalink” to your MM post and not your general blog address. To get your permalink, click on your post name, then just copy and paste the address that shows up in the address bar at the top of your blog, into the “url” box for InLinkz.
In order to link up, you’ll need to include a link in your MM post back to the party so the other participants will have an opportunity to receive visits from your wonderful blog readers.
Please observe these few rules:
Only link up Before and After posts that are home, gardening, crafting, painting, sewing, cooking, DIY related.
Do not link up if you’re doing so to promote a website or product.
Do not link up a post that was just linked last week since a lot of readers will have already seen that post.
Please do not link up more than 2 or 3 “Before/After” posts each week. Thanks!


Thank you for the party, have a wonder-filled week!
Blessings,
Pam (www.everydayliving.me)
Hi Susan! You are the smartest one in so many areas! This is probably a good thing and works on saving your window. Thank you for hosting your party and have a beautiful week.
Be a sweetie,
Shelia 😉
This type of repair seems like a never ending chore around our house. Glad that you spotted this and got it repaired before your window started to rot.
Thanks, Paula! I’m amazed it held for 6 years since it wasn’t primed or painted. lol Miracle it lasted that long.
Thanks so much for the party!
Hugs,
Debbie
I need to do that, too, Susan! Thanks for the great tutorial! Have a great week!…hugs…Debbie
Well, you’re just a regular Bob Villa, aren’t you? You never cease to amaze me, Susan. There are so many upkeeps for a home, you’re smart to tackle some yourself, as contractors certainly don’t seem to want the small jobs. But you’ve got a lot of windows. How many are you going to be re-glazing in total? Ugh, we have a lot of maintenance issues adding up, always the case with home ownership. Have a great week, thanks for the party.
Rita
Thanks, Rita! I was surprised at first to see that was the only window with loose glazing, figured if it was loose, others would be too. When I noticed none of the others on the bay window were loose or chipped, I looked closer and saw that one section of glazing across the top of the windowpane had never been primed or painted. When I had the house last painted, they reglazed several windows then. So, I think maybe that was a window that got reglazed but was somehow missed when they repainted. So, hopefully there aren’t anymore. I’m sure next time I have the house painted, there will be a few that need some work, but I don’t mind. I love the old windows so much, it’s worth it to me to have them reglazed at painting time.
Wow Susan, you never cease to amaze with your handy dandy skills! I would have never tackled something like that~ thanks for the party today, helps keep our minds off the weather!
Thanks, Jenna! It was a lot easier than I thought it would be. 🙂 Yes, it’s rainy here today. Do you rain or snow?
no fun when things weren’t done the first time, but at least it is now.
I am always amazed at the jobs you willing tackle. I usually can get my project apart, but then something goes horribly wrong when I attempt to put it back together. 🙂
Ha! I’ve felt like that before…not a good feeling! 🙂 Thanks, Madonna!
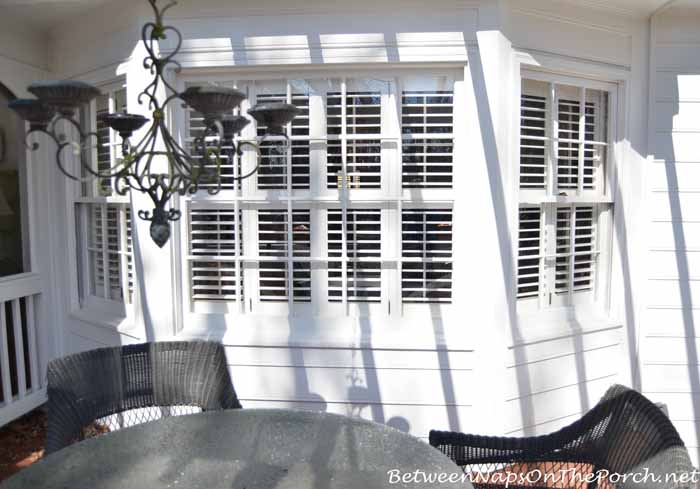
Thanks for another great link up party! I love the way your shutters in your bay window look from the outside. And good job on the repair!
Susan, such a good thing you caught it. You really do a wonderful job taking care of your home. Thanks for hosting! Toodles, Kathryn @TheDedicatedHouse
I love your bay window Susan…so beautiful. I have always admired how you research things and make repairs yourself when applicable. And then you share your research and tips with us!…thank you for always sharing!…and thanks for hosting Susan….have a most wonderful week!
That is a nifty tip, Susan. I have to pass that on to my sister! She needs this fix!
Every time you demo a home repair that you did yourself, it gives me confidence to tackle more of my own. Suspect you’ve saved many readers some money, or at least demystified processes so that they make better choices hiring someone. Thanks for sharing.
Oh, I’m so glad to hear that…that makes my day! 🙂
YOU are an amazing woman! You did a great job on this repair. TFS.
Thanks, Juanita!
Where were you last summer when I researched and re-glazed 3 windows in the July Georgia heat??? It was very intimidating. After removing the old glaze, I cleaned the windows really well with rubbing alcohol as not to leave the windows wet. (The rubbing alcohol also removed a lot of the tiny old paint splatters left by the painter) I used the glazing compound that comes in a tube and purchased a really nice caulk gun. I used painter’s tape where I didn’t want the glazing leaving just the crack exposed. I found my putty knife and my finger along with a cup of water was all I needed. I removed the tape after the glaze had time to set up, primed and painted. You make it sound so much easier with the compound in the tub. Good job!
The tub stuff was really easy to use but it definitely would have been easier if it wasn’t so cold out. My glazing was drying almost as fast as I could apply it. If I find anymore windows that need repairing, I’m definitely waiting until summer to repair it. Sounds like your’s turned out great, Kathy!
Okay, Susan you are just too smart! I would have never noticed it and if I did I wouldn’t have had a clue what to do!
Susan, your DIY courage amazes me! I truly believe you will tackle almost anything. I’m so impressed. Thank you for the linky party.
lol Thanks, Laurie! I’m not sure I could find a painter to fix one measly window…so had to go for it. 🙂
Susan, I learned something from you today. I’m pretty handy too but I had no idea what you were talking about with glazing a window. At first, I thought you meant tinted window film but soon figured glazing out by your descriptions. I’m sure that was a satisfying project to get completed.
@Linda: I thought the very same as you, which proves ‘one is never too old, to learn something new’ … ☺. Thanks Susan! -Brenda-
You did a great job on the window.
I don’t suppose you need to fix a crack or large chip out of an old enamel bath?
I have that problem & would love to see exactly how to fill it.
lol Not right now but you never know! I have some old bathrooms that definitely could use a renovation.
I needed this information. I really feel like I could do this to all of my windows this Summer. Thanks so much for the tutorial.
Great tips Susan! Thanks so much for sharing and for hosting. Hope you have a great week.
Love how you do some of your own maintenance like this! Self reliance is a good thing!
Susan…Did you paint the bare wood, before you glazed it?…I was always told, to paint the bare wood first…
No, but if it comes out again, I’ll do that next time. Thanks for the tip, Sharon!
Susan…I think the reasoning behind, painting before glazing, is…supposedly, the bare wood, soaks up the oil in the glazing compound….
They didn’t replace any wood when they glazed and painted 6 years ago so I guess it wasn’t primed or painted originally under there.
Don’t forget to use glazing points (tiny metal triangles) to keep loose window panes from falling out. They’re easy to push into the wood with a flat screwdriver. You would do that before adding the glazing compound. I live in a 1815 log house and I did this a LOT when I first moved in!
Not sure why, but there weren’t any glazing points across the top of my windowpane. I thought there would be so I purchased those, but I ended up not using them since I was only glazing that one top section and the glass wasn’t in danger of falling out.
Thanks for the post! I actually noticed this same thing around a few of my own windows. I’ve been meaning to fix it, but I’ve been too afraid to do it myself. I’ll definitely follow your tip about choosing the right tools. It really does seem like a DIY that I can handle now.