Over the past year I’ve gotten a lot of emails/comments asking if I would share some information about taking photographs for blogs. I’ve been a bit reluctant to write this post because I’m totally an amateur in every sense of the word when it comes to the subject of photography. But I’m happy to share what I have learned. Just please keep in mind, I’m still learning, too.
I’m writing this post as if I’m talking to a person who has just started blogging and has never really taken many pictures before, because that’s where I was three years ago when I began blogging. My husband had always been the picture-taker in the family so I was pretty lost when it came to photography. I still am for the most part, but I am trying to learn more with each passing day.
I hope these basic tips will inspire you and you’ll find them helpful as you take pictures for your blog.
1. Photography = Lighting.
If you only learn one thing about photography ever, just remember it’s all about the light. Photography begins and ends with lighting. Lighting will make or break your photographs. I didn’t know this when I first began taking pics to share on the site, Rate My Space, which was several months before I got brave enough to start blogging.
You know when it hit me…when I had my ah-Ha moment about the importance of lighting? I was taking pictures of this beach themed tablescape with an early digital Olympus camera that had “live view.” I took a photo and the photo looked okay. Then I tilted the camera the teeniest, tiniest bit, took another photo and the picture was brighter.

The only thing I had done differently was to just ever so slightly shift the angle of the camera. Why did that matter? Why did it make the second photo brighter? That’s when it hit me…it was all about the way the light had entered the camera…the way the camera had perceived the lighting on the porch.
That’s it! LIGHT! Light was the key, the deal breaker that determined if a picture would be bright and crisp, or dim and blurry. That was a HUGE moment for me. You may be shaking your head thinking everyone knows this, but I didn’t.
From then on, I would take a gazillion pics when I took photos for the blog because I never knew which pic would be THE one…the one that had been at just the right angle to capture the light streaming onto the porch or into the room. Since then I’ve acquired a much better camera and camera technology has come a long, long way, just as it has with computers. Cameras have sensors inside (think of the sensor as film) and the sensors in today’s cameras can handle lower lighting better than ever. Which leads me to another tip…
2. Buy the best camera you can afford…Save Up, it’s worth it.
If you want to take great pictures, buy the best camera you can afford. Save up a little while if you need to. Tell your children/husband/wife/boyfriend/friends in lieu of birthday gifts, Christmas gifts and flowers for Mother’s Day, you want a gift certificate to B & H or Amazon. Save up those gift certificates and when you have enough, buy a great camera and you’ll wonder how you ever lived without it.
I think it was Scott Kelby who said you could put Walmart golf clubs in the hands of Tiger Woods and he would still beat the pants off us if we were playing with the best clubs money could buy. But since most of us are not the Tiger Woods of photography, don’t handicap yourself. Give yourself the gift of an awesome camera and you’ll definitely have a leg up when it comes to taking pictures for your blog.
3. Never use the built- in flash on your camera.
I never use the built-in flash on my camera. I keep my Nikon camera on this setting below…the little lightning bolt setting. It’s basically an auto setting, but without the flash. (Update: As of mid February, I’m now shooting full time in manual. There are just times that auto won’t get it. It takes a little time and effort to learn to shoot in manual, but it is totally worth the effort to learn how. It’s actually easier to capture the pics you want once you began shooting in manual, so don’t be afraid of the big M.)

There’s a way to alter the strength of the built-in flash on a camera, but I don’t think it’s a very efficient or easy method for getting just the right lighting for your pictures. I’ve found when I’m taking photos inside my home, it’s easier to just take them during daylight hours, turn on lots of lights, open the shutters/curtains and use additional lighting like soft boxes to bring more light into the room. I also switch over to manual mode when necessary…more on that in a sec.
Here’s why you don’t want to use your built-in camera flash. Take a look at these next two pics taken of the porch decorated for the 4th of July. The first one was taken with the flash turned on. Feels washed out and kind of lifeless, doesn’t it? It has that “3rd degree-interrogated under the hanging light” look . I’m sure that tablescape is guilty of something and we are gonna get it out of it, one way or another.

Here’s the same scene, taken in “auto” mode in natural lighting, without the flash. It’s much more pleasing to view…more inviting. So unless you’re a professional photographer with one of those fancy flashes that you can meter (I don’t have one yet but would love one) don’t use a flash when taking photographs for your blog.

4. Movement is the enemy.
A lot of cameras today have a little switch you can turn on that helps to compensate for small movements of the camera when you’re taking a photo. On my Nikon, it’s called VR-Vibration Reduction. On a Canon, it’s called IS, which I think stands for Image Stabilization. No matter how hard you try, you’re going to slightly move the camera when you press down on the shutter button . So use that little switch if your camera has it. It will help a lot, especially in low lighting situations where any movement will lead to blurry pics.

Consider using a tripod for stability. If you can’t or don’t want to use a tripod, try to brace your hand on a chair back or against a wall or something to eliminate movement as much as possible. I confess, I almost never use a tripod because I’m just too impatient. I routinely pull a chair out from a table and brace my hand on the back of the chair for tablescape photography. I’ve also been known to lean against a wall to brace my body or arm. If there’s nothing to lean against or to brace your arm against, stand with your feet a little apart and tuck your elbows down into your body for more control.
If you take an overhead shot or something where you can’t brace your arm/body, take several pics in a row as fast as your camera will allow and chances are a few are going to be in focus. Also, you can place your camera strap around your neck and pull it forward until it’s taunt, and take the photo that way. That will also offer a bit of stability.
5. Take A LOT of pictures.
I used to feel bad about taking so many pictures of one scene or one craft project or one tablescape, to get 15-20 to share here on the blog. I would think to myself, if I were a better photographer, if I understood how to use my camera better, if… if…if… then I wouldn’t have to take so many photos.
One day I was listening to THIS interview between Tim Ferriss and Chase Jarvis, a professional photographer and guess what I discovered? I discovered professional photographers take a gazillion pics, too! What? Really? Chase said he takes lots of pictures when he’s photographing a subject or scene. In fact he said, “That’s the dirtiest secret in photography. You’ve got to take a h*ll-of-a-lotta of pictures to get the ones you want.”

Granted, Chase probably gets a lot more usable or fabulous photos than you and I do, but still, it’s nice to know that even great photographers have to take lots of pictures to capture those few we end up seeing in magazines or online.
If you wish to hear that part of the interview for yourself, click on THIS link and fast forward to around the 33 minute section of the interview. Listen for at least two minutes to around 35.10 to hear how many pics professional photographers take. He goes on to talk about taking pics with phones…fun listen. It will make you feel a lot better about all those pics you’re taking to get the few you actually end up using on your blog. Yes, it’s a pain to have to sort through them all later to ferret out those 10 or 15 you plan to use, but when you write and publish that post, you’re going to be so glad you took the time. And so will your readers.
6. Go for a surprise view.
Everything I’ve learned about photography, up until very recently, has been through trial and error. I think just reading my manual, reading tips online and getting out there taking photos is the only way to really learn the ropes. Update on 02-25-12: Check out the book, Understanding Exposure by Bryan Peterson. I’m reading it now and it’s very helpful
One day back in June 2009, I accidentally discovered how cool it was to try and capture a scene from a “different” angle, a surprise view. It was a beautiful, sunny day and I dashed home from work, wondering what tablescape I could quickly create for Tablescape Thursday. It was a Wednesday evening and TT would need to go up by 9PM. I had just over 3 hours to create the table setting, take the photographs, sort through the photographs, crop and edit them, put them in an order that made sense or told a story, load them to the post and write the post. The pressure was on.
It was so pretty out, I decided to create a table setting on the tiny bistro table out on the deck. I had never placed a tablescape on the deck before so this was going to be fun…and different. I remembered a tablecloth I had purchased at a thrift store a few weeks before, so I dashed upstairs, found it in the linen closet and decided to create an all white table since the table cloth itself had lots of pattern.
I was using my old Olympus which wasn’t the most sophisticated camera, but the lighting was nice that evening under the shade of the trees in the backyard. As I played with the table setting, I tried to figure out how to get some of the flowers on the deck into some of the pictures I would be taking. I wanted to give the viewers of this tablescape the feeling they were outside surrounded by flowers and had just come upon a pretty table all set and ready for a special dinner. There wasn’t enough room on the tiny table to add a vase of flowers. So, I moved some geraniums a bit closer and decided to crouch down behind them to take a few pictures, hopefully including them in the pics.
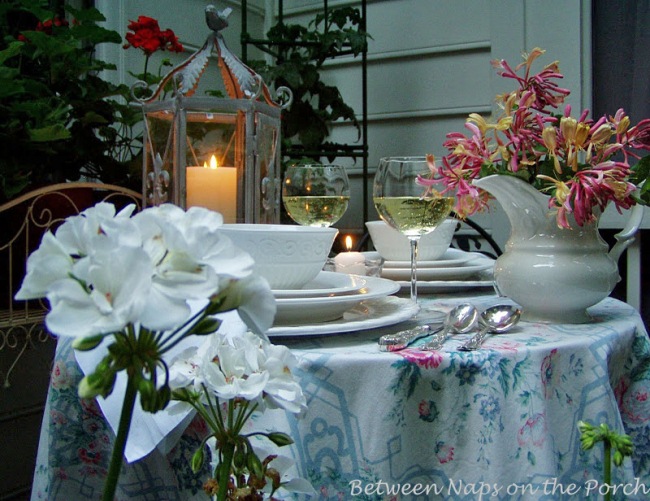
When I sat down at my computer to look at the photographs I’d captured, I loved this new perspective. The glimpses through the the flowers drew you in and made you want to come closer. It felt as if words would ruin the mood the pictures had created, so I searched online for a poem that would feel appropriate. I found the most enchanting poem about faeries called The Faerie Ball. You can see this tablescape HERE. That was the day I discovered the magic of taking photos from unusual perspectives.

I’ve had a lot of fun with this “capturing scenes from different angles” thing. For example…in this table setting…

I took a pic through the handle (monkey’s arms) on the pitcher. (View this table setting HERE.)

Different perspectives will draw out the personality of your subject. (View this table setting HERE.)

Give your readers an up-close view from a fun angle. (View this table setting HERE.)

Frame a view or a scene in an unexpected way.

Your reader will feel like they were there with you, peering through the gate into the beautiful back yard. (Take this historic home tour HERE.)

Capture a room from a different angle…peering over the shoulder of an old friend. 😉
7. Use the exposure or metering bar
Do your eyes glaze over when folks start talking f-stops, shutter speeds and ISO. Yeah, mine too. I understand the basics: a lower f-stop = a bigger aperture (the size of the opening of the lens) and thus, lets in more light. A slower shutter speed will keep the lens open longer, again letting in more light. And by raising the ISO setting, my camera will be more sensitive to the light that’s available, which unfortunately also compromises the quality of the photo by allowing for more “noise.” I get all that, but don’t ask me to walk into a room and immediately rattle off the ideal f-stop, shutter speed and ISO for the situation. Ain’t gonna happen. That will take time, experience…and lots of practice.
So in the meantime, until I get my Ansel Adams on (in my dreams) I’ve been using the “electronic analog exposure display.” Here’s how it looks on a Nikon camera…note the graduated line with the plus and minus sign.
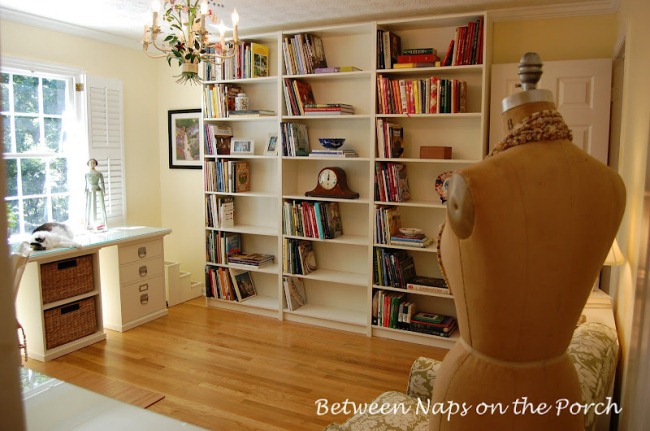
And here’s how it looks on a Canon camera. When I’m faced with a lighting challenge, like trying to take a photo of a room while facing directly into windows on a sunny day, I’ll switch over to “manual” mode and use the exposure bar for help in capturing the photo.

Before I discovered that little bar, when I took pics of my future office from this angle, the pictures always looked like this…dreary and dull. This is such a bright, sunny room, but you would never have known it from my photos. I was up to my eyeballs in wallpaper removal when this pic was taken, so learning to adjust settings on my camera wasn’t real high on the ole priority list. On the auto setting, my camera “saw” alllllll that sunshine coming in through the windows and compensated for what it thought was way too much light. Result: underexposed photo…just too dark.

Later, when life was a bit more under control and I was motivated to solve the exposure issue when taking pics of the office, that’s when I discovered the exposure/meter display. (When the student is ready, the teacher will appear.) It has allowed me to finally gain more control over the exposure of a photo in a difficult lighting situation without racking my brain with f-stops and shutter speeds. Do I hear an Amen?

So, here’s how I use the exposure bar. I take a picture in my usual auto/no flash mode. Then I look at the photo I took in the live view display. If it’s too bright/over exposed or too dark/underexposed, I’ll switch over to manual mode, which is the M setting on a Nikon.

Next I’ll adjust the setting on the “electronic analog exposure display” to a lower or higher setting so the indicator shows that the light is balanced. Looking at this pic below you can see the photo will be under-exposed if I don’t adjust it to compensate for the available light. Often I find having it balanced in the dead center is a bit too dark, so I’ll go up a notch or two and take a photo. If it looks over-exposed I’ll bump it down one notch and take the pic again. Just keep taking pics and adjusting/moving up or down the bar display until the photo exposure looks just right.
By the way, the method for adjusting the exposure setting on the exposure display (+ and -) on a Nikon is…
![]()
…by turning this little wheel shown below. It moves the exposure setting to the right or to the left. Not sure how you do it on Canons or other cameras, just check your manual for that. It should be a readily available control, nothing you have to go through the menu to accomplish.

Sometimes I’ll take several photos moving the indicator a little to the left or a little to the right because your picture can look very different in live view than it does once you download it to your computer. That way, I’ll have pictures taken with different exposures from which to choose. You can also accomplish this with bracketing…but I’m not ready to learn that just yet. It’s good enough for now that I know it exists. lol Baby steps, baby steps. This exposure adjusting method is not always fool proof for capturing the perfect photo, but it does help.
ISO
You can increase the ISO which will make the sensor in your camera more sensitive to the available light. So if you are in a room that’s a bit dim/dark, bump your ISO up a bit. Check your manual for directions on how to increase the ISO. Be aware, increasing the ISO a lot can lead to more “noise” (reduced quality) in your pictures. But increasing it a little doesn’t normally make a huge difference unless you have plans to enlarge the picture later for framing/hanging on a wall.
Hopefully using the analog exposure display will come in handy until you become more familiar with shooting in manual mode.
Bonus Info: If you’re curious, once you download the photo(s) you’ve taken to your computer, you can right click on a photo, select “Properties,” click on “Details” and you can see exactly what aperture (f-stop), ISO and shutter speed your camera chose for the photo you took. That might be a great way to eventually get a feel for what settings work in certain situations or rooms in your home.
8. Give your photos a feeling of balance: Rule of Thirds
In photography there’s this thing called the Rule of Thirds. You can read about the rule of thirds, HERE. Basically, you want your photographs to feel balanced. Have you ever looked at a grouping of items on a table in your home and it looked off balance…something just didn’t feel right? You move the lamp over, add another book to the vignette, shift a what-not to the left or right on the table and, Aaaah…balance. It’s a lovely thing and you know it when you see it. You also know it when it’s missing.
Photos can feel the same way…balanced or off kilter. When taking photos, put on your “table arranging” hat and look for balance as you peer into the viewfinder or live-view screen of your camera.
Here’s a photo I did not use when I posted this “Children’s Party Table” for Tablescape Thursday this week. See how out of balance it feels…downright top heavy, isn’t it?

This was the photo I used below. Often you can balance a photo out by doing a little cropping, but not always. That’s why you want to take plenty of photos so you’ll have plenty to work with.
When you look through the view finder, keep the “rule of thirds” in mind. Look for balance. Occasionally, when I’m moving around a table taking pictures for a tablescape post, I’ll lean down and a view will enter the viewfinder that I just know is going to make for a nice picture. Fill the frame and look for balance. Google “Rule of Thirds” and you’ll find lots of information written on this subject.

9. Have fun and don’t get discouraged:
When you first start blogging and you’re visiting other blogs, you can sometimes feel a bit overwhelmed. It can seem like there’s so much to learn and so much to know. Don’t ever compare your blog with the blog of someone who has been blogging longer, even if it’s just 6 months longer. If you took a look at the photos I took when I first began blogging, you would feel MUCH better. Trust me on that!
With each day, you will learn a new little trick or an easier way to do things. Your photos will get better and better. Let me tell you a big, big secret…the most important secret to growing a successful blog. Here it is: Don’t stop. Keep working, keep learning and keep sharing. The rest will take care of itself.
Pssst: If you’ve found this tutorial helpful, would appreciate so much if you give it a +1 in Google. You’ll find the +1 button at the end of the post. Thanks so much in advance!
For additional blogging tips, check out these posts:
14 Free Photo Editing Sites
Label Photos for Pinterest
Type Accent Marks, Currency/Math Symbols & Unique Punctuation for Blog Posts
Favorite Tool for Watermarking Photos for Blog
How to make a Blog Button with Grab Box Underneath


Thanks so much. I feel yet another photography post coming on. You are so on a photo-roll.
Great info, very helpful…I'd like to invite you to CountryMommaCooks Link & Greet Party
going on now-Sunday night……Have a wonderful weekend!
Thank you so, so, much! You explained it so well in a language I could understand, I have my camera right here with me and did what you said and it worked! I have an Olympus M. Zuiko Digital, someday I'd love to get a bigger lens for a full shot of a room but for now I'm happy:)
Thanks again,
♥Rondell
Thank you so much! I am sitting here googling how to work my SLR and found this post. This is so helpful. I am playing with my camera trying to learn how to take better pics. Mine always turn out too gold colored. But I'm thinking it's my wall color. No matter what I set my camera on when I take indoor pics the color is just too golden. It's driving me so nuts that I'm thinking about painting everything a light cream color. I love your blog. I've been a lurker for several years now. Your porches and home are so beautiful! So much inspiration!
THANK YOU for sharing these tips. So many of us struggle with taking photos for our blogs. It's so easy to compare with others and feel discouraged. It's really good to hear that it takes time and practice and that even experts have to take a lot of photos to get a good one.
Hi Susan! Oh, this is a great post with so much to help us budding photographers! I felt like I had milked my little Olympus camera for all it was worth and was so proud when I got my new Canon Rebel. These are great tips!
Thank you and I hope you have a wonderful weekend.
Be a sweetie,
Shelia 😉
Susan, it is with great kindness you are sharing these very important tips. I am a brand new blogger and a BRAND NEW photographer- never EVER felt comfortable behind a camera……..and you have encouraged me to TRY.
Nervous? Oh my gosh yes,. Feel disappointed in my photos so far? Yeup.
But I won't give up, and I will definately continue trying to learn and grow….I just hope I don't disappoint TOO many people while I do learn.
Thanks so much, you are awesome. And your posts are spectacular, true art forms!
Have a great weekend!
Thank you so much for explaining tips for using our cameras in easy to understand terms. I am also going to read your post on sites to use other than Picnik to edit pictures.
this has really been informative. thanks for the simple explanations. I especially liked the shots through the flowers and such. You gave me a whole new perspective.
Fabulous post, thank you so much for sharing your knowledge! I am ever so learning and ever so hopeful to learn more. Thank you! 🙂
Woohoo… you just helped me so much 🙂 Okay, so I've been blogging a few months… and two weeks ago I got a Nikon (way better than my last camera)… but so far I've only used it on auto focus… and after like 40 pictures indoors, I couldn't figure out why they've all had that "washed out look"… Thank you,thank you, thank you!!!!!! I knew I had to look into all of the different settings, but who has the time… Right?? Your post has totally inspired me to get playing with my new camera and figuring it out. Thank you sooooo much for the tips! Blessings, Diana
merci pour l'ensemble de ces bons conseils… C'est ainsi que nous avançons…
Gros bisous
Great info Susan, thanks so much for sharing!
Susan,
Thanks so much for this tutorial. I am going to try the "cheater" bar on my Canon. I am looking forward to the watermark lesson! Is there a way you could make them printable? I have a folder of all your hints which I printed when I first started blogging and I still refer to it! Thanks again.
Carol
What a brilliant post! Thank you so much Susan. I even got out my camera and followed through your blog with it and tried out the different techniques you suggested. Wow, what a difference! I usually just point and click and then try and fix the lighting in photo editing, but they never look as good as when you actually put a bit of effort in! It was our date night tonight and hubby and I spent the evening with him explaining how to use my camera based on your post. He used to be a keen photographer so he enjoyed it too. Look forward to your next ones. Thanks again! xxx J
WOW WOW WOW!! Thankyou for that GREAT post. I just learned ALOt. And as a brand new blogger of nine weeks it was such a great insite to me. I'm keeping this in my blog photo helps folder as I have of other of your posts. Susan you are so gracious to share all this with us..it is a wealth of information. THANKYOU thankyou thankyou!. I've already started saving. And one of these fine days I'll own that really great camera.
Nann
Thank you so much Susan! I loved reading your tips! I have a Nikon D3100 that I got back in Oct. for my birthday and have been struggling to learn. You summed up so much of how I feel and answered a few things I had been wondering about too. Thank you for taking the time to publish this very helpful post!
Thanks for all the great tips. I finally brought out my Rebel a few months ago, which of course made for better pictures then my little point & shoot. This will help me get more out of the Rebel. Have a great weekend.
This is such a huge assist! Photography is so much fun but the whole f-stop aperture business is impossible for my brain to digest. Your explanation of the cheater bar is so cool. Going to see my granddaughter this weekend so I'll put your tips to good use! Also, thanks for encouragement on blogging–I haven't had the courage to good public with mine yet. You just nudged me a bit closer 🙂
Cheers,
Jane
Thank you for sharing these fabulous tips! I wasn't aware of the cheater bar and can't wait to try this!
Wonderful, informative post! I just received a new camera (Sony a65) because we are taking a trip to Paris (be still my heart) for our 40th anniv. I need to take great pics because I may never go again. Your advice will reduce my learning curve SO much!
Love your blog, love your parties and have appreciated your comments to me. I have found so many of the (big) bloggers who take the time to help us newbies….it's so refreshing in this world of ours!!
Lorraine
Great post which is why it will be on of my top 5 for the week tomorrow! Manual setting is really important as well as taking dozens of photos. With digital it is so much easier because you can delete all the lousy ones or duplicates and keep the best to publish. I also feel the more you use your camera and experiment, the better you become! Have a great weekend!!
Another great and appreciated post. Thank you. I learned so much and better yet, your post is encouraging. It is hard to be patient with yourself!
Can't wait for the watermark tutorial in batches. I knew there had to be a way….it takes too long and I wondered how in the world all of you had time to watermark so many pics, etc.
Wonderful post..I got so many tips…I just received my new Nikon D7000. It was on world-wide backorder due to the tsunami, but worth the wait..Now comes the classes. Wolf Camera offers free classes with your purchase. Beautiful images and loved "going back in time" and reading past posts.
Dear Susan, You have just given us the best photography lesson ever. I remember the day I discovered the "tilting trick" when using my Kodak DX7590, an aha moment for me because I don't use flash and for the same reason you mentioned.
You have encouraged me to become better acquainted with Manual settings. I have so many large windows, mirrors and doors in my house. They always present a huge "too much reflection and light" challenges.
By the way I loved Picnik for editing purposes. Thank you for doing research to find alternatives. Gina
Susan, I'm sitting here in my jammies, with a cup of tea on my right & my camera in my lap! I just walked through every step you described…what GREAT information! I have the same Nikon & it was easy to find the buttons/switches, etc. I didn't know about the VR-Vibration Reduction…Thank you SO much! It was your blog & YOUR beautiful photos that made me want to get into "blogging" in the first place.
I, too, anxiously await your watermark tutorial, because we've ALL learned how important it is to put that on there, so you get credit for all your hard work!!
Mega grateful hugs,
Rett
Dear Susan, I have only recently discovered your blog…and I'm enjoying it so much:) Your site just has such a celebratory vibe!
Thank you for this post (for all your photo posts). Unbelievably helpful and useful info…I'm just in the early stages of realizing I actually want an amazing camera but I have no way of understanding what that would look like.
Thank you for every morsel of advice!
Super great post. Thanks Susan, you are always so great to share. Hugs, marty
That was fabulous! I had to go get my camera to follow the bouncing ball! I'm so thankful that someone did a post like this I could understand…love layman's terms! I didn't know about the vibration reduction, but when I looked at my camera..it was on. Who knew? And the wee tut on "cheater bar" was super informative. Thanks so much, wendy xo
Really enjoyed this post. I have a Nikon 3100 and have been in the mode of figuring this stuff out. I even bought a book, Understanding Exposure. It's a great book that I recommend. But I have found that my biggest problem is learning MY camera. I have a good idea, like yourself, what needs to be done, I just don't didn't take the time to learn what button to push. The 'dial' thingy…thanks, I get that now! lol I also wanted to let you know that I pinned this post to my Pinterest. I board I call Blog Design Help. I have great stuff on it, like how to make a button and such. Thanks for sharing this… Clear and easy to understand.
I always love to read what other people do to take good pictures, Susan! As long as it's simple and doesn't take a lot of time, I'm up for it! : ) I did find that once I got a better camera my pictures improved a lot. Going from a point and shoot to my Sony DSLR made a big difference in how my pictures turned out. I have always been the picture taker in our family {hubby is the video man} and I really love this camera. Between taking pictures for my blog and taking pictures of my granddaughter, I am very happy with the outcomes.
You are right, too, about lots of pictures. I take A LOT of shots of one thing. Sometimes, I will look back on the camera before I even download them because I can see one is too dark, the baby moved so it's too blurry, etc. I delete those before they even take up space on my laptop. I just painted a dresser in our master bedroom and must have taken 20 pictures to probably use about 5!
Great tips!
I have a Nikon camera and this post will be SO helpful. Thank you for taking the time to share your photo-taking experience in common-sense language! — Joann
I found my "cheater bar"! Thanks for these great tips Susan! Now, I can't wait to see your post on watermarking. Pamela
Susan, you just changed my life! I took photos this morning using your Tip #7 The Cheater Bar. Oh my, what a difference! I have struggled so much with taking indoor pics, and this tip has helped tremendously. Who knew? Thank you, again, for sharing.
I've been saving my pennies for just
such a camera… I've been using my
iPhone and so far it's working pretty
well but I know I need a good one!
Thanks for all the info and I'm so
looking forward to more info on the
series in your blog…
thank you!
Sandy
lol Yep, afraid I am. 🙂
Yay, glad it worked! Rondell, I know what you mean. My lens wish list is growing. I just have a kit lens right now…but definitely want to buy at least a couple more.
Angie, it may be a lighting thing. The pics I take in the evening inside my home are always too gold, but I don't have that issue during daylight hours. You probably just need more lighting in the space. Lighter walls do help some…I have a tough time sometimes in my red dining room. Thanks!
Thanks, Shelia…Canon Rebel is a great camera!
Awww, thanks Michele…you are so sweet to say that. Hopefully they will be a lot better in 2012 now that I have a better camera and I'm trying to learn to use more features.
May I add #10? Don't over do the post-processing.
Diana, so glad it helped! Yay!
Carol, I'll see what I can find out about that. That would be handy…especially for recipes and such.
Thanks, Julie! I still have so much to learn…will share more as I learn, too.
Fantastic post! ISO and f stop, blah, blah, blah, eyes glazing over. Thank you for feeling that pain and offering an alternative. Can't wait to try out the cheater! I'm usually in such a rush that the photos don't get the time they need, so that will be my new resolution. Thanks for inspiring! Have a great weekend. ~CJ
Nann, that's wonderful! The camera is half the battle.
Yay! 🙂
Rosie…that's a good one. 🙂
Kathy, love digital cameras because we can take as many pics as we want. I don't want to tell you how many I take. lol
Thanks, Lesley! I'll check out that book on Amazon…I'm in sponge mode right now, learning as much as I can.
Thanks!
Thanks, Marty!
Thanks so much, Susan! You can't go wrong with either a Nikon or a Canon. I don't know a lot about the others, but those are two very reliable brands. Check out this link:
http://www.kenrockwell.com/tech/recommended-cameras.htm. Ken Rockwell has lots of great info on his site.
Thanks, Rett! We are all learning together. 🙂
Thanks, Gina!
Thanks! You're so right and it's becomes a lot more fun the more you learn.
Thanks, Lorraine. Wow an awesome trip you have coming up! Have fun and definitely take a lot of pics!
Go for it, Jane! You're going to have so much fun!
Hi Susan!
I haven't been able to participate in TT for oh so long, due to helping ailing parents, but I do enjoy strolling by all the tables and taking peeks. I wanted to pop in and invite you stop by my blog for a little giveaway I'm having…brownginghamcreations.blogspot.com
Boy, am happy I dropped in today! What a great and valuable post! Thank you, thank you!!!
oh good grief….I learn something new everyday and did not know about the goldilocks bar. I took some photos today and used it and wow!!!!….it worked. I am so excited. How is this possible. I have read so many tutorials on f-stop, iso, etc. but no one ever mentioned this. Thank you…thank you. Cannot wait to hear how you do batch watermarking.
Thank you so much for these tutorials. You have given so much useful information in terms I understand. I can not wait for your next post.
Thank you! I am the proud new owner of a Nikon as well as a tripod. Ready to be the next shutter gal! Happy shooting
Pam Kelley
Susan….Loved the photo tut…Love the OOOHHH my gosh I get it now moment….I tried the goldilocks bar and had only a black picture the more I turned the wheel…then all of a sudden an OOOHHH moment "the other way silly" then the wonderful OOOOHHHH I get it moment…this is a great feature…I love the NikonD5100 camera…..so fun to learn and play with all the incredible features….Love the feature that logs what pictures were taken which day with the calendar feature….great to log vacation moments and what days you were where…thanks as always…phyllis
Great tips – I'm an auto mode kind of gal! Trying to figure out all those other settings!
Kelly
Susan,
Thank you so much for this post…I am bookmarking it for future reference. I also have a Nikon but have not learned all of its features yet…your post on the "cheater bar" will be a big help. Thanks so much!
Cheryl
A sincere thank you for this post – all excellent information! Looking forward to upcoming posts. Joy
This is good to know…I will need to take some time to play with the settings on my camera, too. I have lighting problems all the time! Thank you for taking time to put this information down so we can all understand it!
Hugs, GraceinAZ
Excellent post Susan. Some really great pointers.
– The Tablescaper
Susan…OK so this is long and wordy but I just couldn't help myself!
I just can't thank you enough for posting this tut on "our" new Nikon D5100! I receive your emails through RSS feed burner when you post and when this one came in, I just sat there thinking "how did she know I needed this right now?"
I have been in a state of quandary about my new Nikon to the point of not using at all which is just awful considering my sweet husband gave it to me for Christmas to blog with!
You are just an angel for posting these tutorials and I am sooo looking forward to reading all you have to offer!
I loved that you started off by saying "I'm totally an amateur in every sense of the word"…well me too so sometimes those instructional booklets just sound like gibberish to me so thank you for being "an amateur in every sense of the word"…its just what I need and to me, you are anything but amateur with your simple, easy instructional style!
If I were there, I'd give you a big ol' hug right now for these tuts and just being you!
Thank you sweet friend!
Terry
Thank you for the tutorial. I have been taking a gazillion pictures trying to get just the right one. My husband wanted to know how come I took so many pictures of the same pitcher with flowers. I am glad I'm not the only one. Also, thank you for the hint about Photobucket.
~Clara
Super post…learned so much! One thing I do to 'stabilize' my camera is to keep my forearms and elbows close to the body and almost push the boobs together..lol Keeps the camera steady!
So helpful for a newbie like me. I've had the Nikon for years, now I just need to learn how to use it!
Thank you so much! Such a huge help! I actually have a great Sony, just don't know how to use it so my pictures never come out right. So frustrating! Anyway, I appreciate your help so much!
Melody
ChattyChics.com
These are such fantastic tips! I pinned this page so I can refer to it again and again. Looking forward to checking out your other pages! I have a Nikon and still haven't learned how to move off of Automatic! 🙂 I'd love it if you stopped by my linky party and link up one of your favorite posts! http://www.serendipityandspice.blogspot.com
-Melissa
Hi Susan,
Wow! Super great tips! I love this post!!!
Thanks,
Dee
Love all your pics Susan. Hugs and blessings, Cindy
Thanks for posting these fantastic tips! It's nice to read a photo taking tutorial that isn't all f-stops and ISO. I know that I really need to start playing more with my manual settings, but it's just so scary. Thanks for the encouragement.
Wonderful tutorial, I will be sure to direct my readers to this post when they come to me for answers. You've compiled a lot of great info in one handy, dandy post!
I shoot with a Nikon D700, and absolutely love it! I'm self taught, and if I could add just one more teensy suggestion for your readers, it would be to invest in the book "Understanding Exposure" by Bryan Peterson. This book alone will elevate your work to amazing heights.
All the best,
Anne Lorys
Anne, thanks for the suggestion! Someone else mentioned that book and I meant to order it, so I just did. 🙂 Looking forward to reading it and appreciate the suggestion.
Great tips. Thanks. But if light is the and no flash I will have to move to a sunnier location. We are having an unusually warm winter but no sun. Mostly gray.
Carlene, that makes it tough, I know. You may want to invest in a light you attach to the camera…that throws the light at the ceiling and meters it.
Such great tips and encouragement, Susan! I've been relying so heavily on Picnik for 'fixing' my pictures, and now I'm worried! I just ordered a fancy-pants Canon, so maybe it will do the work for me! 🙂 And as much as I was enjoying this post, when you spoke of having 3 hrs to set the table, all I could think was how fun it'd be to hang out and create tablescapes with you!! 🙂
I'm headed for the cheater bar this evening! I'll follow the dancing ball and see what I can learn. I learned a neat tidbit at my photography store recently. They told me that when we have an over-exposed pic, the "information" has been destroyed, and we'll have trouble recovering it. But when we have an under-exposed photograph (dark), the information is still there, and we can recover it for a good picture. They suggested that I try playing with the "curve" adjustment in my editing software….it's absolutely astonishing! This was a great post that will be perused numerous times….and I love the reaction that you're receiving from other readers. Job well done! Cherry Kay
Thanks, Cherry Kay. Ummm, what is the curve adjustment? Sounds interesting. I have to learn more about that. That makes so much sense about the over-exposed vs. under-exposed. I have recently been fixing a lot of under exposed pics on some of my past posts. I hope you write a post and share all this awesome stuff your learning! I would love to read it!
This was so helpful. I take wretched pictures, and could never figure out why nothing ever looked like it did in "real life". I think I get it now. Thanks!
Brigitte, so glad this is helping. I'm reading a book called Understanding Exposure and the author says the most common aperture setting is f/8 or f/11, so if you switch over to M (manual mode) to take a pic, try putting your camera on the f/8 or f/11 aperture setting first. That should be a good starting place before relying on the analog exposure display bar.
Put a link to this post on my blog
http://4you-withlove.blogspot.com/2012/02/recap-of-week-4-of-5-weeks-of-kindness.html
Marilyn
Thanks for all the information! Now if I can just digest it. You mentioned that a newbie can feel a bit overwhelmed, with me it's a LOT overwhelmed. All the help offered on the blog-world
is so wonderful. I will certainly take your advice and keep on trying. Thank you so much, Susan for taking time to put these tutorials on your blog.
Hugs, Maki
THANK YOU SO MUCH FOR ALL THE VALUABLE INFORMATION. I AM SO THANKFUL TO BLOGGERS LIKE YOU WHO ARE WILL TO GUIDE THE NEWBIES LIKE ME, WHAT A GREAT COMMUNITY!! YOU HAVE BEEN MORE HELPFUL THAN I CAN EVEN SAY, THANK YOU!!!
You make me want to run out and buy a good camera. I'm using web photos because mine are so lousy. Heck, even my point and click scares me! Thanks for this wonderful, valuable reference!
Best wishes, always!
lovely explanation for the beginners like me!
This was great! I am SO horrible at blog pics, that I’m soaking this up. Maybe there’s hope for me. I will compare my canon w/the pics you’ve shown of yours and mess around with things a bit. I will definitely be taking TONS more pics than I have been. I know a big problem is me not taking enough. I just get so frustrated and walk away, lol…
Kiki, glad that post helped. Believe me, you’ll get better and better as you take more pics. 🙂
good golly – just found this post – thank you so much – I have been having the hardest time with my Nikon D5000 – now I can’t wait to go home tonight after work and try this…..
now I just have to figure out why it takes so long for it take the actual picture?!
Thanks!
Susan,
I enjoyed reading your post about taking photos for bloggers. I just invested in a Canon D600 and I’m so excited to tinker with it and try new angles & styles. I like your advice about taking LOTS of photos. It really makes a difference when you have 15 photos from the same angle that all look the exact same, but one of them is just… the best photo. And you know that’s the one.
Great writing.
Kevin
Thanks, Kevin! That sounds like a great camera…have fun experimenting with it, it really is so much fun!
Thank you!!!! I have just got my first (proper) camera and i am thinking of starting a new blog. Also i have a shop on Etsy and my pictures aren’t that great so new year new start, i will redo all of my pictures using your tips which are really helpful and easy to follow. Thanks again.
Don’t give up…it gets easier! 🙂
Pinning for quick reference. Thank you, Susan!
Susan
Great information, very helpful. You did work very hard on this post. With your help I will start to understand my camera and “Lighting.”
You’re the best
Nancy