Welcome to the 260th Metamorphosis Monday!
So, I’m kind of late in sharing this, like a whole year late. The pictures vanished into never-never land in my computer but I came across them this weekend and thought this may be helpful if you have a ceramic something-another hanging around your home in need of repair.
About a year ago I purchased a large white ceramic rooster online. Unfortunately, when Mr. Rooster arrived, he arrived with half his tail broken off. The company from whom I ordered him didn’t have another one. They credited me back for Mr. Rooster but didn’t want to spend the money to ship him back. They told me I could just toss him.
I hated to throw him out so I decided to try gluing him back together. I’ve never had much luck gluing large or heavy ceramic objects together in the past. All those fancy glues that claim to work, never worked for me so, I was super doubtful this would work at all.
His tail was actually broken in two places, one large piece was broken off and a smaller piece was broken from the top tip of his tail.

This is the large piece that was rattling around in the box when he first arrived.
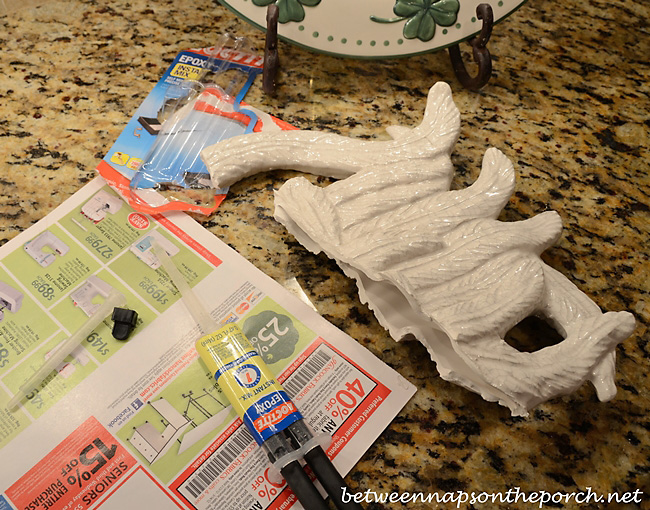
I headed over to a local hardware store and purchased this stuff, Loctite Epoxy. Per their info, it’s a self-mixing, epoxy syringe and is great for “bonding jagged and poor-fitting surfaces.” I was definitely dealing with some jagged and poor-fitting surfaces.
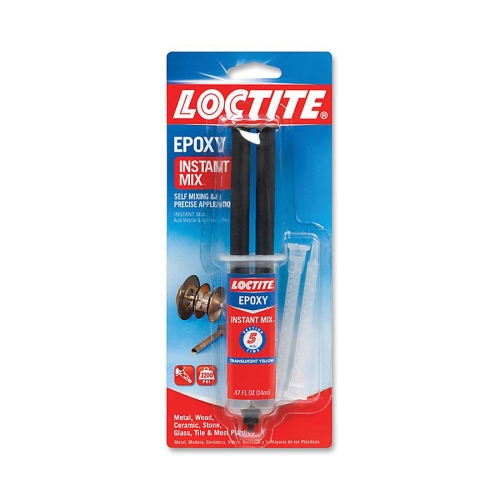
It’s a two-part adhesive: epoxy resin and a hardener. Apparently, they mix together in the syringe when you use it and per the package, “when mixed in equal volumes, the resin and hardener react to produce a tough, rigid, high-strength bond, which starts to set in 5 minutes and reaches handling strength in 1 hour.” I like the idea of a 5 minute setting time since I couldn’t sit and hold the tail in place for a long time.
I started by gluing the small piece back on to the tail. That went well so I went for the big break next.

I propped Mr. Rooster up on a breakfast chair with a pillow behind him for support. I wanted him facing down so when I attached the tail, the weight of the tail would be going downward toward the break, hopefully keeping the tail in place.

After I glued his tail on, I held it in place for several minutes, then left it to dry overnight.

I was relieved to find the tail stayed in place. The Loctite stuff really worked! Here’s how the break looked afterwards…not too bad. It’s been a full year and Mr. Rooster’s tail has stayed on. This is the best way I’ve found to repair a large ceramic piece that’s been broken.
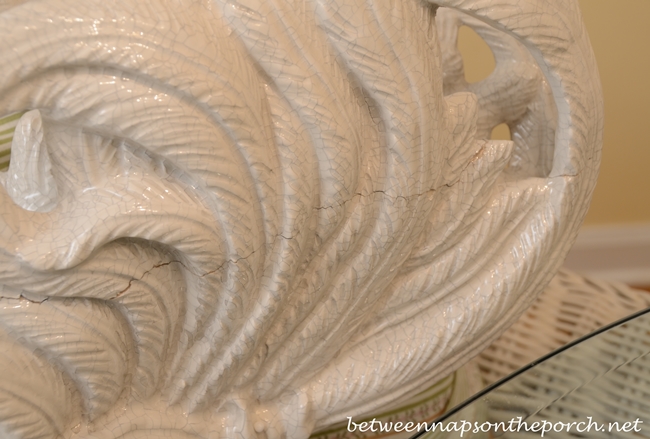
These photos were taken at night so they aren’t the greatest, but I think you’ll get an idea of how the repair worked. This is Mr. Rooster’s good side, so the break isn’t noticeable from this side.

And here’s his boo-boo side. I know repair experts could make the break completely invisible. I should probably try to touch it up with some paint. The epoxy said it will take paint or stain. I’m just amazed the epoxy has worked so well and it hasn’t fallen off in a year’s time.
Since he’s normally on the big island in my pantry/laundry room with his good side facing me, I haven’t worried too much about trying to camouflage the crack/line.

What do you use when you repair a large ceramic piece? Have any tips on making ceramic repairs?
Looking forward to the Before and Afters linked for this Met Monday!

If you are participating in Metamorphosis Monday, you will need to link up the “permalink” to your MM post and not your general blog address. To get your permalink, click on your post name, then just copy and paste the address that shows up in the address bar at the top of your blog, into the “url” box for InLinkz.
In order to link up, you’ll need to include a link in your MM post back to the party so the other participants will have an opportunity to receive visits from your wonderful blog readers.
Please observe these few rules:
Only link up Before and After posts that are home, gardening, crafting, painting, sewing, cooking, DIY related.
Do not link up if you’re doing so to promote a website or product.
Do not link up a post that was just linked last week since a lot of readers will have already seen that post.
Do not type in ALL CAPS. It spreads the links waaaay out.


Mr. Rooster looks as good as new. Great job with his tail repair! 😉 Thank you for hosting!
Mr. Roo looks great…I’ve never had luck gluing ceramic pieces now I know what to try. Thanks so much for hosting Susan have a great week!
Thanks, Martina…you too!
Mr. Rooster looks fabulous. I think the crack gives him some character. 🙂 We use epoxy for repairs in our home too…it works great! Maybe if you use some paint, mix a couple of colors to get a close match, and use a craft brush, you could disguise the crack some. Thanks for hosting MM! Have a great week!
K.
You did a fabulous job with the repairs. I’ll have to remember the name of this. I’ve used different kinds of glue, but I think you’ve hit the jackpot with this epoxy!! Thanks as always for hosting!!
I’m glad you repaired Mr. Rooster instead of tossing him. His crack just makes him look aged.
Susan,
I’m not good at repairing anything broken as I have next to nothing when it comes to mechanical skills.
Thank goodness, my “Mr.Ed” handles all those needed repairs!
Your Rooster looks great after his epoxy “fix”!
I’ll be sharing this post and the product information with “Mr.Ed”.
Thanks for hosting Metamorphosis Monday each week, dear friend!
Have a wonderful week ahead!
Fondly,
Pat
Mr. rooster looks great! You must have been bummed out when it arrived. Epoxy is the choice we like too- very strong and durable.
Really hate when items are broken! Makes me a little crazy and unhappy. I found to fill in the crack by using candle wax . It worked perfect on this one huge item I have and the piece was broken in 50 piece or more. Putting it together was like a puzzle. Mostly I just throw the item away. I find that it makes me happier in the long run.
I’m going to try that adhesive next time because I never have luck gluing things together like that. Thanks for the tip. Also, thanks for hosting the party.
Shannon ~ bohemianjunktion.com
Your story reminds me of when I was a little girl and I came home tossing my bookbag on the table having it slide across knocking off a beautiful figurine my Aunt had given my Mother from her trip to Europe. I gathered all the pieces and worked all day with my school glue doing the best I could to put Mom’s prized piece back together. My mother kept the fractures little piece and I have it to this day. Maybe it’s the labor of love that holds it all together.
I use that epoxy 2-step also, Susan. They make it in an even stronger dose (6000 psi), and that’s my go-to. I bought a serving tray after Christmas that arrived damaged and was no longer in stock but, unfortunately, it was just flaked chips (with pattern and color), so I can’t repair it. :/ Like you, I did get credit and still have the remains.
Thanks, Rita. I didn’t know they made an even stronger version. Will definitely keep that in mind next time I have a big item that’s broken. Sorry about your tray, that stinks. I usually throw things that arrive broken out because it makes me feel bad seeing them later. I have seen some repairs that were so amazing, you couldn’t even tell it had ever been broken. Can’t remember now where I saw that online. Not sure who does that kind of work, though…probably pretty expensive.
Sorry, Susan – I misspoke. The professional (HD) strength is 3500 psi. That stuff is awesome, regardless.
Susan, this is a great idea! I have used Elmer’s glue on items I couldn’t paint. I love your Rooster! Thanks for hosting!
Susan, your rooster looks great! I’ve never had good luck trying to repair pieces like this. I’m glad it worked out! Thanks for hosting!
Don’t you love it when you are able to save something like that? Have a great week, Susan!…hugs…Debbie
I’m glad to know about Loctite. Your rooster is a beauty. I’m glad you could repair him. thank you for hosting. laurie
Great job repairing your cute rooster. So frustrating when something breaks like that, but good to know it can be repaired.
epoxy is the best for stuff like this! Love your rooster! He’s gorgeous and thank you so much for hosting MM
Thanks so much for hosting, Susan! You did a great job on mending Mr. Roo! He is quite a beauty or maybe it should be handsome!
Oh, I’ll have to remember these instructions for the next time I break a treasured piece. Good to know! Thanks so much for hosting, Susan!
Nice work on that rooster! I have a drawer full of things that need gluing! Thanks for hosting! Life to the full! Melissa
We all have a few cracks! I may try that on some of mine.
Thanks so much for the party! Love your rooster! 🙂
Marti
So glad you didn’t toss him out. I wouldn’t try to paint it. You will never match the paint/gloss properly and the crack will look so much more noticeable.
Thanks for hosting, Susan. You did a great job on the rooster! Have a super week!
Blessings,
Nici
I’m going to have to write that one down, my husband is the king of glue, but it’s hard to find one that really holds. Glad you found one that did…as far as the crack goes, I say it adds character! Thanks for the party! 🙂
Susan, My heart would be broken if my large white rooster was broken. That was a strange sentence. I have used the “loctite” brand for mirrors. It was fantastic. I am so glad that beautiful fellow is feeling proud again. Thank you so much for hosting,
xoGinger
He looks SO regal!! I, too, love roosters and have a variety of them in my kitchen…they make me smile. So glad he was “saved.” franki
Locktight is amazing stuff. I have used it on lots of things and it holds forever!!! You did a great job on your rooster. He can proudly strut his stuff!!! My parents lived in England many years ago and sent back some antique china to me. Unfortunately, over the years a couple of pieces have broken. For china, I have found that a product called Crystal Effects by Stampin’ Up! is amazing at glueing china back together. It dries clear and forms a bond within a minute. Plus the glue does not yellow with time. It can’t be bought at a store but must be bought through a Stampin’ Up! demonstrator but there are SU demonstrators all over the USA. Just go to stampinup.com and request a demonstrator in your area and you can order Crystal Effects from her. It really is amazing stuff.
Great info. – thanks for sharing
Thanks for hosting!!
You did a great job Susan! Another good glue is E6000, you don’t have to mix it and I have used it on everything, it is great. I buy it at Hobby Lobby. You could try painting the hairline crack with glossy enamel paint but you will have to mix white with a little yellow, brown or gray to get the right shade~I think you’ve found the best solution, keep his best side showing!!
I’ve used that same Loctite before and it really does work well. Glad it worked to fix your Rooster tail.
Thanks so much for hosting!
KC
Thanks for hosting! Your rooster now looks as proud as a peacock!
It depends on the item, but magic markers can do a good job of covering a crack.
Ok, broken horse, here I come!
I love roosters and chickens and have antique prints of them and even little cards that came inside packs of cigarettes sold way back in England. I understand the desire to repair your rooster.
Thank you so much for hosting…have a great week!
XO Barbara
Hi Susan,
Thanks for sharing this tip with us! I actually have used epoxy years ago when one of the little people figurines in my Dickens Christmas Village broke. The epoxy did a great job; we’ve never had to repair it again! It’s good to know it worked so well for you because that’s a BIG rooster. 🙂 It would take a really strong adherent to repair that break.
Thank you for hosting Met Monday and have a great day!
Denise
Yes, the Loctite products are amazing! I have also had a lot of luck using them!
Thanks for hosting!
I am going to have to give this stuff a try because your rooster looks great.
One thing I have been trying to research is how to repair chips off the rim of something, like a platter. I have a couple that I have managed to chip, and I would like to fix it. I don’t think either one is worth taking to an expert, but I like them and would like to give it a go. One site suggested using epoxy mixed with something else, and this Loctite might just work.
Fabulous Mr Rooster & excellent repair. In one of the pictures, I see a plate with either clovers or shamrocks on the rim. Please tell me they are currently available. With several holidays coming up so fast, I’m trying to think ahead. Those (salad) plates would be perfect! Still trying to find some Red or Red & White heart-shaped salad-sized plates; re-check ebay, Amazon & Google daily. Can’t find “just” what I’m looking for.
Paula, you may find some in TJMax, Marshalls or HomeGoods this year. I purchased that platter and the matching plates several years ago, but I was shocked to find the matching bowls in the store last year, I think it was last year. You can see the platter in the center of this table, as well as the salad plates: https://betweennapsontheporch.net/st-patricks-day-tablescape-welcome-to-the-78th-tablescape-thursday/
and here: https://betweennapsontheporch.net/a-st-patricks-day-table-setting-welcome-to-the-185th-tablescape-thursday/
Susan, I think you have mental telepathy. I was just thinking you had not had a favorite thing you can’t live without for a while. I am putting this on my “in case I ever need it list”. I mentally thank you every time I use my shampoo. I even have my sister using it.
Madonna, I still LOVE that shampoo too. Last time I was in GNC I bought a bottle even though I didn’t need it yet. I’m always afraid they’ll quit making it. I tell everyone about it if the subject of shampoo comes up. 🙂 Glad you’re still enjoying it, too. About every 10th shampoo, I’ll use something else just to make sure my hair doesn’t get to used to it, but I’m not sure that’s even necessary since it doesn’t have all that bad stuff in it that so many shampoos have.
Great job Susan, good to know about Lucite. I bet Mr. Rooster was happy to get his tail back!! 🙂
Thanks for hosting, you are our *go to* woman for everything!!!!
🙂 Yep, I think he was! lol
Good morning, Susan! I am glad you were able to fix your rooster. We’ve used that epoxy on other types of surfaces besides ceramic, but I will have to try it next time a ceramic piece gets broken. Thank you for hosting the party today–Happy Monday!
Great repair. I am putting glue in my list of supplies that work. Thanks for hosting today, loved joining in.
Joy
Thank you so much for this great party dear Susan; this week looks awesome! Have a wonderful wee.
FABBY
Oh, I’m so happy you could glue the pieces on the beautiful roos!
Fabby
Thanks for letting us know about Loctite. I have a ceramic piece that is broken and I have tried 5 different glues to repair it. Nothing worked so far. I will definitely try this one.
You did a fantastic job on Mr. Rooster’s repair! Thanks for the tip. I’ve not had good luck with these kinds of repairs but I’ll give this a try. Thanks for hosting!!
Mr. Rooster is quite the grand one even with his boo boo. Great job on the repair! Thank you for hosting and I wish you a lovely week. Toodles, Kathryn @TheDedicatedHouse
Wonderful repair on Mr. Rooster, Susan. He certainly is a beauty. I love roosters too and I haven’t been able to pinpoint exactly why. Have a great day!
I am so glad you were able to fix Mr. Rooster – he’s terrific – great job! I do appreciate you hosting,
Kathy
Susan, thanks for the information on the Loctite. I have a repair job on some laminate flooring that I have been unable to find an adequate glue and I hoping this will do the trick.
If you should decide that you want to paint out the crack in Mr. Rooster there is a paint product that I discovered when I needed to cover a chip on a piece of Fitz and Floyd. It is called Gloss Enamel by American. You can find it in any craft stores. It is made for ceramics. It does take quite awhile to harden but looks great. Here is a link. http://www.decoart.com/cgi-bin/Products.cgi?Americana_Gloss_Enamels
Thanks, Nancy! I’m going to check that out!
Susan,
Are you going to post pictures of your pantry/laundry room? I don’t remember seeing that part of your lovely home.
Lindsey
Thanks, Lindsey. My laundry/pantry is nothing special. It’s just a room with the washer/dryer, a utility sink, a big island and a small closet/pantry. You can see it in this post: https://betweennapsontheporch.net/welcome-to-the-15th-tablescape-tuesday/ AND in this post after a party when it was a disaster: https://betweennapsontheporch.net/party-on-the-titanic/
I’d like to completely gut it and turn it into a butler’s pantry. I’ve thought about a stackable washer/dryer to free up more space. I’d get rid of the island and would have lots of built in shelving with some glassed door and some solid doors or maybe not, maybe all open shelving…not sure. The room is kind of an odd shape since the back staircase comes out into the laundry room. One contractor told me to get rid of the back staircase which would increase the size of the room, but I love having a back staircase as a second route in case of a fire or when I’m in the kitchen in PJs and front doorbell rings. lol
I realize I am sending this way after your posting date but my tip will still work for Mr. Rooster. Take some air drying clay or plaster of paris or just plain spackle and rub it over the join line after the glue has dried. Let the
clay dry completely (overnight) and then rub with a damp cloth. The crack
disappears. I have tried this on objects that are smashed into a zillion pieces with good results. If the item is multi coloured ceramic you can always spray
paint it with a flat white which makes it look old and expensive. Been DIYing
for 65 years and have found lots of tricks for the trade. LOL
Thanks, Pam…I will have to try that! Appreciate the tip!