Recently someone asked in a comment if I had written a post showing my process for planting shrubs. I was thinking about that today and remembered that I had written a post about 1-1/2 years ago that showed how I planted some Leyland Cypress trees in my back yard. I figured a refresher is never a bad idea, so hope you find this post helpful.
I don’t have the best luck with keeping indoor plants alive, but I’ve always had great success with the majority of the trees, shrubs and flowers I’ve planted outside. The only time I can remember something failing is in my 20’s when I planted some shrubs that couldn’t handle a lot of sun, in an area where they got sun almost all day long. That was definitely a newbie mistake. I also planted some azaleas under a massive oak tree that sucked all the moisture out of the soil around it, so the azaleas never did well. Hopefully, I’ve learned from those mistakes.
So the first step when planting anything is to take note of how much sun or shade the area gets where you’ll be planting and buy plants that are well-suited for that environment.
Georgia Red Clay
Here in Georgia, we have lots of this stuff: thick, red clay. If you buy a plant, dig a hole and stick it in this stuff, it will probably live for a while, but it’s highly likely it will struggle and not grow very much, if at all. It’s also likely it won’t survive. All the nurseryman around recommend adding some rich soil amendment or soil conditioner before planting.
You may not have red clay where you live like we do here, so just be sure and ask your local nursery if it’s a good idea for you to amend the soil in your area before planting. What’s the soil like where you live? Is it perfect for growing as is, with nothing else needed. Or, is it goopy and thick like our red clay soil, or, maybe it’s really sandy.
I usually buy soil conditioner in the nursery where I’m purchasing the plants because I’m already there and it’s convenient. This time I purchased it in Lowe’s when I stopped by one afternoon for some pine straw. In addition to soil conditioner, I picked up a few bags of top soil. I don’t ever use just topsoil when planting, but it’s never a bad idea to mix a little in.

Disclaimer: This may not be the way a professional will tell you to do it, but this is what has worked for me in the past. I can’t promise your plants will thrive if you plant them as I do mine, but this is the system that’s always worked for me. Take what you can use from this post and discard the rest. 🙂
So, here’s how I plant shrubs, including the 16 boxwood shrubs I just planted.
I first dig a hole that’s 2-3 times the width of the root ball of the plant. The holes I dug for my boxwood shrubs were mostly double the width of the root ball, with some being a little bigger when I decided to move a shrub further over to the left or the right from where I had originally planned.
I used to dig the holes about twice as deep, too, but I later read somewhere that this isn’t necessary. Apparently the roots primarily go outward and not so much downward, at least in the beginning. Not having to dig so deep lets you put all your energy into digging the hole bigger around.
After I have the hole about twice the width of the root-ball of the shrub, I dump in some top soil and some soil conditioner or soil amendment and stir it all up. As I’m mixing those into the hole I scrape down into the bottom of the hole and into the sides of the hole so that I’m mixing in some of the ground dirt (in my case, clay soil) too.
I personally don’t think it would be a good idea to dig a hole, dump in a bunch of top soil and soil conditioner and then stick the plant into that and fill it up with more top soil and soil conditioner. I just feel that plants need to be surrounded by the soil they will be growing in, but just well-amended so they can get off to a good start. Does make sense?
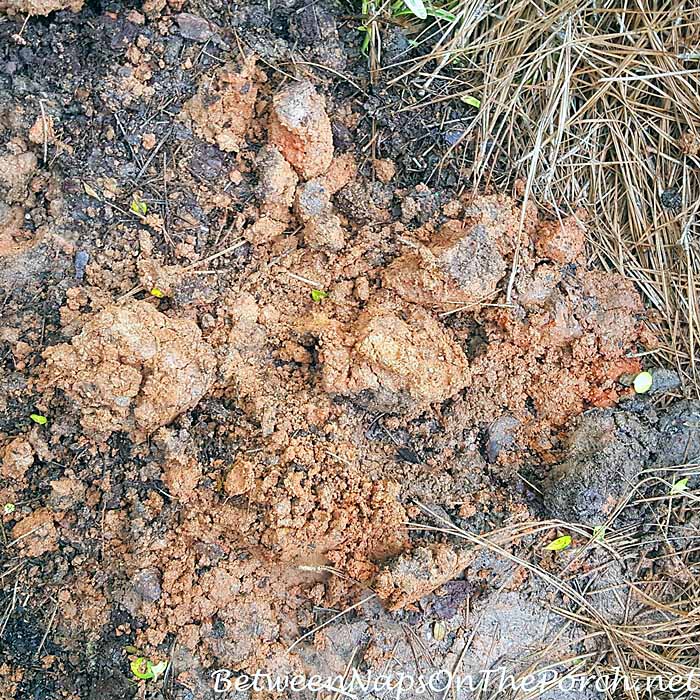
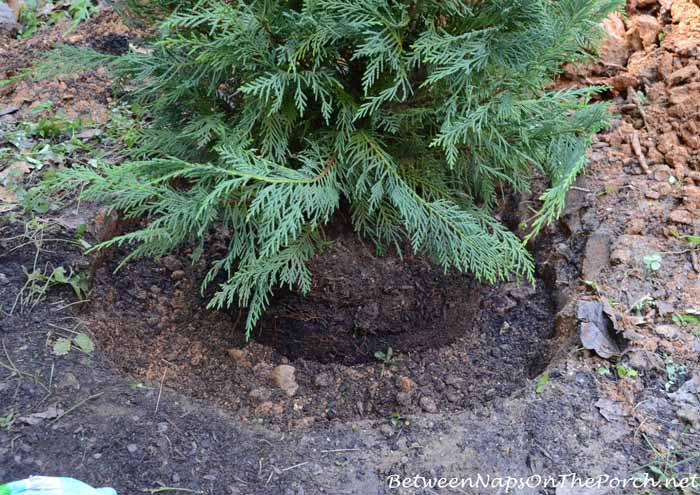
You can see in the photo below, I’ve mixed in some soil conditioner and a bit of top soil with the existing clay dirt to create a nice, rich mixture of clay dirt, top soil and soil conditioner.
The best way I can describe what it’s like to try to mix soil conditioner and top soil into clay soil is this: it’s similar to attempting to mix cold butter right out of the refrigerator into flour, the clay being the cold butter, only much thicker and heavier. It’s not easy because the clay just wants to stay all stuck together in a big, fat clump. It can be really thick and goopy.

In the past I used a trowel and a shovel to break up the clay and to mix in the soil conditioner. This time I used this “garden/vegetable tiller” and it helped tremendously. (It’s available here: Garden Vegetable Tiller.) I love this thing! I used the flat sharp end to break up the big clumps of clay so I could mix the soil conditioner and top soil all in between the smaller clay pieces. The other end was helpful for mixing everything together.

You can’t really force the soil conditioner into the clay, but you can break down the red clay into small particles and create a clay/rich-soil mixture that will allow the roots of the plant to grow. You can see the bits of red clay chunks all mixed in with the good top soil and conditioner.
You can also sprinkle in a bit of starter fertilizer if you like. I mixed in a very small amount into the soil for each shrub, although I think I may have forgotten that step on a couple. I think I probably did that for this shrub because I can see some of the white powder there on the top right in the photo. That step is completely optional.
Next I remove the burlap from the plant, if it has burlap around the root base. (See this post for why I do that: Should Burlap Be Removed From a Ball & Burlap Plant, Prior to Planting)
Then I take my hands and rough up the dirt around the root base of the plant, exposing the roots a bit more. I don’t do a lot of this, just a little. Then I place the shrub into the center of the hole atop the good mixture I’ve created.
I didn’t really take a photo of this next step, but what I do next is off to the side of the hole, I’ll mix more of the soil conditioner and top soil into the dirt/red clay that I had previously removed from the hole. Then I fill back in around the plant with this amended soil mixture.
If you had the energy while digging your hole initially, you could put the dirt your digging out into a wheel barrow and mix the soil conditioner/topsoil into the dirt while it’s in the wheelbarrow. I take the easy route and just do it beside the hole on the ground. As you’re adding your dirt back in around the hole you can add more soil conditioner if you think it’s needed.
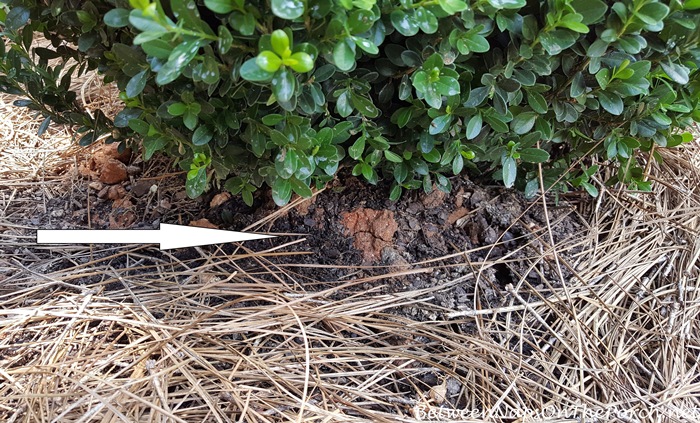
All the nurseryman around here say to leave the top of the root ball slightly up out of the dirt. Some say several inches but I think that’s too much. I usually leave it sticking up/out of the dirt about an inch. I gently tamp down the dirt all around the hole with my feet and hands.
Once you water the plant, it’s probably going to settle down further into the hole, which is why it’s recommended you start with the root-ball slightly sticking up and out of the hole. Plants shouldn’t be down in their planting hole too low because it lets water collect there when it rains, causing the plant to rot/die from too much water/moisture. Does that make sense? Hope I explained that okay.
The arrow below shows approximately where the ground level is for this boxwood shrub, so you can see about how much of this shrub was sticking out right after I finished planting it. Don’t forget to water your plant well once you have it planted.
This planting technique may not be the system you use, but it has worked well for me over the years.
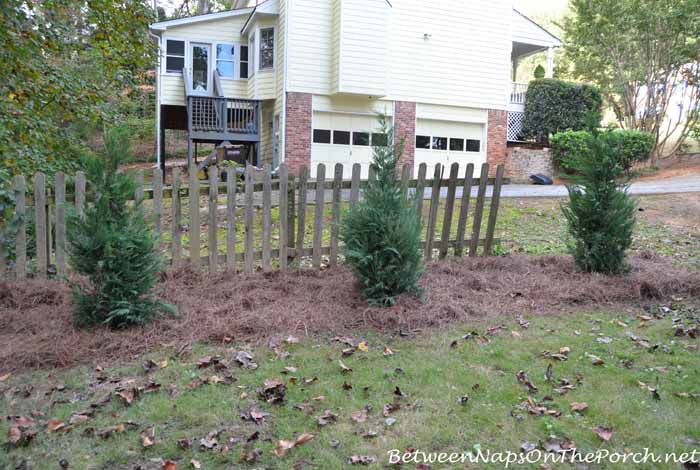
Here’s an example that shows how this system works in my yard. This is how the three Leyland Cypress I planted in October 2014 (1-1/2 year ago) looked right after they were first planted.
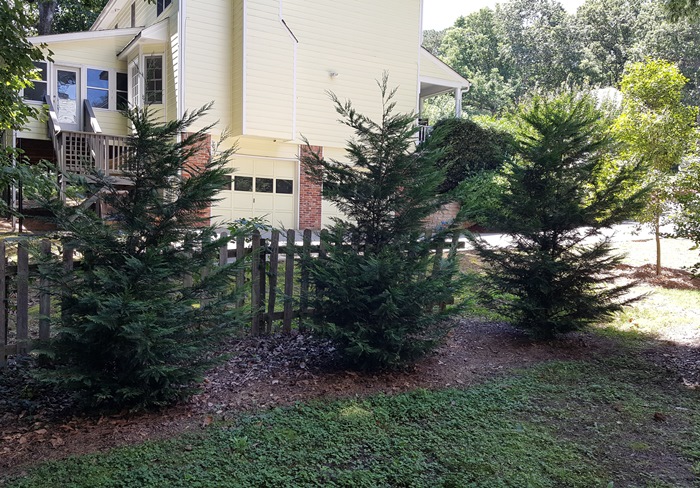
Here’s how they look 1 1/2 years later. I took this photo right before sitting down to write this post. Not bad for a being in the ground a year and half…and they aren’t even in full sun which they would prefer.
I also sprinkled a little Triple 13 fertilizer (13-13-13) around them earlier in the spring, so I’m sure that’s helped with their spring growth. In about 2 more years, they will start to give me the screening I need on this side when I’m sitting on the screened porch that’s a full story up.
In an ideal world, they should have been planted a bit further apart, but I wanted them to grow together for screening purposes as quickly as possible, so I planted them a bit closer than is recommended.
This is a photo from that previous post showing the hole I dug for one of the Leyland Cypress trees and the mixture of dirt that I added back to the hole.

Here you can see how the size of the hole compared to the root ball of the tree.
So that’s how these were planted, the same process I’ve detailed above.
And that’s how all the boxwood shrubs were planted here in the front of the house. (View that post here: A Front Yard Makeover With Boxwood Shrubs, Benches & Copper-Roof Dovecote)
Hopefully I’ll have the same success with the boxwood shrubs that I had with the Leyland Cypress. Of course, boxwood shrubs grow much, much slower than Leyland Cypress trees, which is why I purchased the biggest ones I could find. I’ll be a happy girl if they survive and establish well for me. Additional growth can come later. 🙂

If I had to sum this whole post up, it would be: Dig a hole twice as wide as your plant, Amend the soil well with soil conditioner, Don’t plant your plant too low, leaving about an inch or so of the rootball sticking up to allow for settling and water your new plants often until they have become established, which is usually for the first month or so, longer if you’re not getting rain and it’s summertime and hot.
Hope you find this helpful with your planting. Again, your mileage may vary, but this is the process I use when planting shrubs and trees in my yard.


Looks like a winning process, and you have great examples for proof. The front looks stunning and I can’t imagine the porch sans benches now!
Thanks, Mia! I can’t either…not sure why it took me so long! lol
Mia, I’m testing out a new comment system, could you let me know if you get this comment? Thanks!
I’m in N.C. with the same awful clay. I’ve always just mixed in some mushroom compost when I’m planting, but haven’t always had the best results. I’ll try your recipe next time. (And your landscaping looks wonderful !)
Thanks so much, Winnie! XX
Your trees in the planters, are they perennial? They are beautiful. It’s all lovely. And I agree with Mia, the benches are a must. Nice job!
Thanks, Mechelle!
Yes, they are tree-form Limelight hydrangeas. They are deciduous so will lose their leaves for winter, but they’ll leaf right back out again in spring. You can see them better in this post: https://betweennapsontheporch.net/landscape-makeover-with-boxwood-shrubs-benches-dovecote/
They are on different blooming schedules right now since I purchased one last year and just purchased the other one a few weeks ago, but they should bloom at the same time next year.
Excellent write up, Susan. You sound like a master gardener.
Don’t I wish! In my dreams! 🙂 Thanks, Rita!
The planting you finished around the front of the house is gorgeous! MORE than professional, it was planted with love and balance. I love the repeat of color, texture, etc. It is restful and appealing; welcoming. julie
Thank so much, Julie! So appreciate that and love that it’s coming across that way. 🙂
Susan, we have that same clay here in Mississippi. What I want to know is how strong are you to do all this by yourself?! I know what trying to dig in this clay is like and there’s no way I could plant all that. Are you training to be a boxer on the side?? Ha ha!!
Well, I got stronger as I went along. lol I just took it one bush at the time and somehow they all gradually got planted. I will not be defeated by the red clay! 😉
I don’t know how you do it! We have clay soil where I’m at in Illinois. It can’t be too dry & it can’t be too wet or it’s very difficult to dig very far down. Hard as a rock! I let my husband do all the big digging! In fact, we have just put in 12 new shrubs! We have at least 4 or 5 more to do. We’ve been planting all different kinds. The last ones will be boxwoods that are replacing old evergreens. Your landscaping looks wonderful!!!
WORKs for me!!! Your yard is just really coming together!! Nice JOB!! franki
Great post. Just wonder if you prefer the soil conditioner pictured in today’s post over the mix you purchased at Lost Mountain nursery. I have the hardest, meanest rock filled soil and need all the help available to keep my plants alive.
Rocks are awful, I know. I kept digging up so many while planting so I sympathize, Jean. Actually, the kind I purchased from Lost Mountain Nursery is just for planters…it was potting soil. The kind I purchased at Lowe’s is more for use in amending soil like I had to do for the shrubs. So I liked both, but just for different purposes.
I used the soil I purchased at Lost Mountain in the large planters with the tree-form hydrangeas, so that why I needed it.
Susan, I am so impressed with you planting them all by your self! Do you have any tips for how to get the shovel to even penetrate the soil ? I live in Ga. also and this soil is hard , hard , hard. I have seen men use post hole diggers ,and also jump with both feet on the shovel sides to cut thru the grass and soil . I tried jumping on the shovel and that was a laugh . Please share how you get started . Your yard looks amazing, especially with the dovecote.
Deborah, I was just reading comments on this post and sorry if I never answered your question. I try to plant after we’ve had some rain, but if hasn’t rained in a while, I’ll go out and water the area where I plan to dig. Of course, you don’t want to dig while it’s still wet and yucky, but after it dries a little, you can dig. If it’s the dead of summer and we haven’t been getting any rain, it’s impossible to dig into clay (it’s like concrete) without watering the area a bit first.
Again, apologize if I didn’t answer this when you first asked. I had a new comment system I was testing back then, so maybe I answered but it’s just not showing up here.
Thanks for the info Susan. Never used the soil conditioner. In this area, it’s not red clay, but a white clay just as goopy and always where you don’t want it. I have that tiller but with a long handle. One of my favorite tools. Now that I am older and it’s harder to use large shovels and big tools, I have some long handle child size tools. So much easier to use, especially the shovels (okay, so I broke a couple). I bought them from a Big Lots nearby.
Susan, you are amazing! Thank you for the detailed instructions on planting. I always appreciate you adding links to things that help make life easier. I’ll keep this post and refer to it in the future. 🙂
I know you are proud of your hard work. Your front landscaping looks prettier every time I see it.
Susan, you’ve done an amazing job and your yard looks fabulous!! Just wondering how the Georgia clay compares to Prairie Soil….I had a portion of this “nightmare soil” in my yard when I lived in AL and it would dry and crack open in my yard in the summer regardless of how much you watered it. It also dried hard as a rock if you did not get it off your shovel, etc. immediately after working in it. One high-end neighborhood had legal issues because the builders had not properly prepared for this type soil as it expands & shrinks so much and foundations were cracking. Most of the homes in the area, including mine, were built on slabs, thus very susceptible to foundation problems. Thankfully, I never had any damage because my builder had prepared for the Prairie Soil issues when the slab was poured. Somehow….my roses, azaleas and peonies survived!! 🙂
Barbara, I live in Montgomery and there is a high end neighborhood that is sinking due to the soil it was built on, according to what I’ve always heard, from homeowners and builders, and I mean these homes are expensive!
Wow, all of your hard work paid off. The front looks so pretty and will look even prettier when the bushes are fuller. Your posts are always so informative! I think my Japanese maple is having the problem your azaleas had. I have it under a huge 38 year old Silver maple (thinking the Japanese maple prefers filtered sun) where in reality it is getting the life sucked out of it. Thanks for that tip.
Great job on selecting and planting the boxwoods. It looks wonderful! You have inspired me to tackle a similar project in the fall here in South Carolina.
Susan~
Everything you planted looks wonderful !! I prepare for my plants the way you prepare for your new plants too !! We also have a lot of clay soil here in Indiana, but so far everything is green and growing 🙂 I must say I love your Leylands, and purchased one here and it is not doing very well BECAUSE they are not for planting in this Zone 🙁 I better pull it out and return for credit while I can !!
ps I wonder why I always have to find you in my junk mail 🙁
I love the formal garden look…structured, uncluttered, and calming. Everything looks so pretty, and I know you are enjoying your new view. Our southeastern PA soil is predominately limestone. It is a great soil to work with, and our grasses stay nice and green during the winter months, which pleases me as grass doesn’t get that dead-of-winter appearance here (think Ireland). It is a terrific soil for growing fruits and vegetables, too, and allows for good water drainage. Our zone allows for trees and bulbs of the northern states, yet allows for most of the plants that usually only grow in the south, such as magnolias. I’ve had both red and white clay soils, so I know what you mean. Side note: We came home from vacation just in time, as we both just came down with miserable colds. I will fill you in on the trip as soon as I feel better. Hugs!
Do you have fescue grass, Bobbi? Our fescue lawns stay green during the winter, which I love, but they normally look terrible during out hot summers. That’s great that you guys have such good soil…clay is a beast! lol Yes, can’t wait to hear about your trip. Sorry you guys got bad colds. Colds are the pits!. I think I had a virus this past week, had lost of aches. So weird for us to be getting sick this time of year.
I want to thank you. I ordered the garden vegetable from Amazon. It arrived today and I love it. It breaks up the northern New York clay easily.
You did a great job with your planting. Thanks again
I love that thing, too! I wish I’d had it years ago. It’s so much easier to use to break up the soil than just with a shovel which is what I was doing in the past. So glad you like it, Abbie! 🙂
My heart goes out to you having to live with the red clay soil. I just planted a B&B Tsuga Canadensis (Canadian Hemlock) and was shocked when I removed the wire and burlap and the root ball fell completely apart and it was entirely red clay soil. I picked up a handful and quickly formed it into a ball. I swear you could throw some pretty nice pots from this stuff. The original ball was 18″ deep and so was the hole I dug. But after the clay broke into hunks, I was left with about half that height. This 200 lb.+ tree was already in the hole so I had to work in place amending the chunks and tilting the tree back and forth to elevate it to the proper height. Cannot image working with it all of the time. I live in Connecticut and I complain about the rocks. Very difficult to put a shovel in the so called soil…it takes a long time to dig a hole but I will take it over the red clay any day. BTW…you do a spectacular job on your yard…very professional. 🙂
Thanks for the update I’m new to this red clay and I’m trying not to over complicate amending the soil.Any suggestions for planting azaleas in NC clay soil?
I would just do the same, mix in a lot of soil amendment in with the clay. Your local Home Depot or Lowes…or garden center should have some. Also, make sure you don’t plant shrubs deeper than it should be, plants tend to settle a little after they are planted and watered a few times.
Excellent post. I plant my customers shrubs and bushes this way Minus the Soil Conditioner. I’m going to try your way. I love how you think. Putting red clay onto the soil is so true. I use the same method. Its important to think like the Plant. They want to get used to what they are in for… red clay.