Welcome to the 285th Metamorphosis Monday!
Last December I shared the story behind a mystery alcove located just outside my master bedroom doors. That previous post can be found here: If These Walls Could Talk: A Mystery Alcove.
I’ve always been glad this little alcove was here because it has been the perfect spot for a chest that was once was a changing table for my son when he was a baby. When I placed the chest into the alcove, I thought how great it would be to have a lamp in this dark corner of the hall.
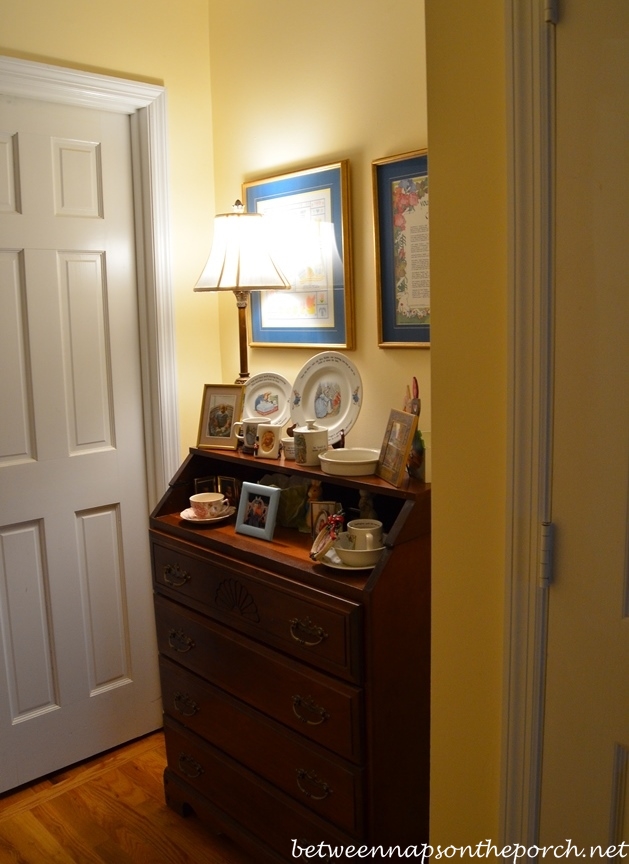
The long upstairs hallway has three overhead lights like the two visible in the photo below, taken when I was preparing to hang wreaths on the exterior windows one Christmas, but what a waste to turn on three lights in the evening to navigate down the hall. Plus, lamp lighting is so much more pleasant and easy on the eyes.

So I called a contractor who occasionally does work in my home and asked him to install an outlet in the alcove. When my contractor entered the attic to fish the wall for the outlet, he made a surprising discovery. After trying repeatedly to fish the wall, he discovered a header was in his way, meaning once upon a time, a door had been here.
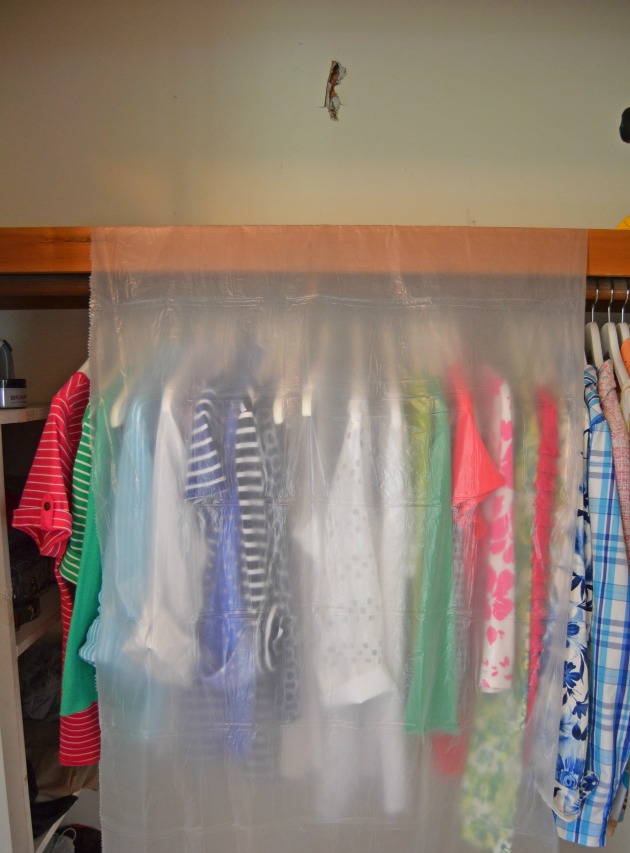
Ahhh, that made perfect sense since the master bedroom has a dressing room off of it and if you removed both closets behind the bi-fold doors shown below…
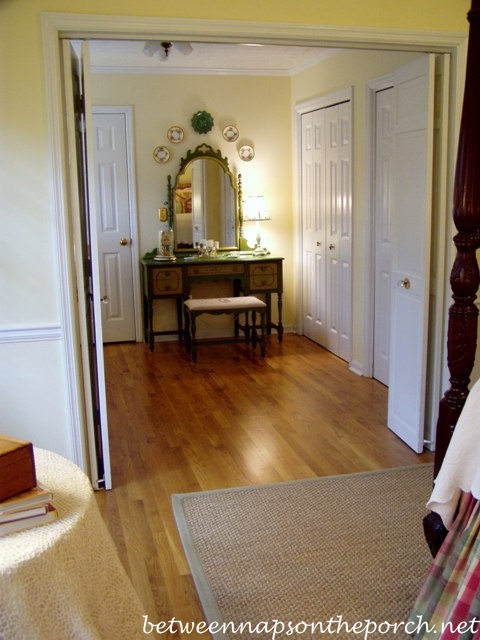
…and removed the built-in drawers and dressing table under the window, this dressing room is the exact same size has the other bedrooms in this house, not counting the master bedroom. It also has the same size walk-in closet as the other bedrooms. So this had clearly been another bedroom when the home was first built.
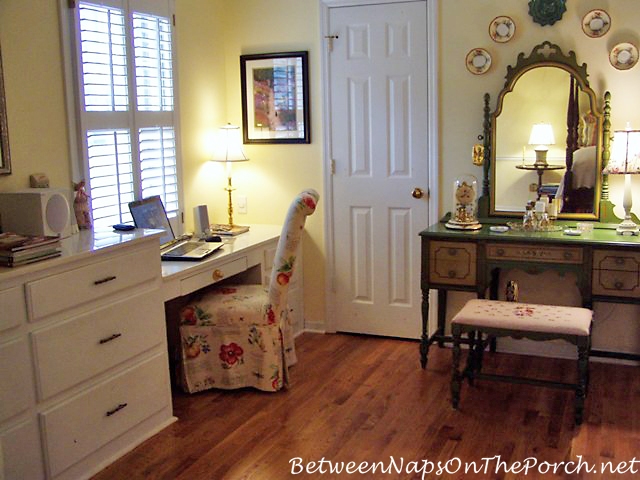
One day, many weeks after the outlet had been installed in the hallway alcove, I was in my dressing area searching for something in the first closet on the right that’s just barely visible in the photo below.
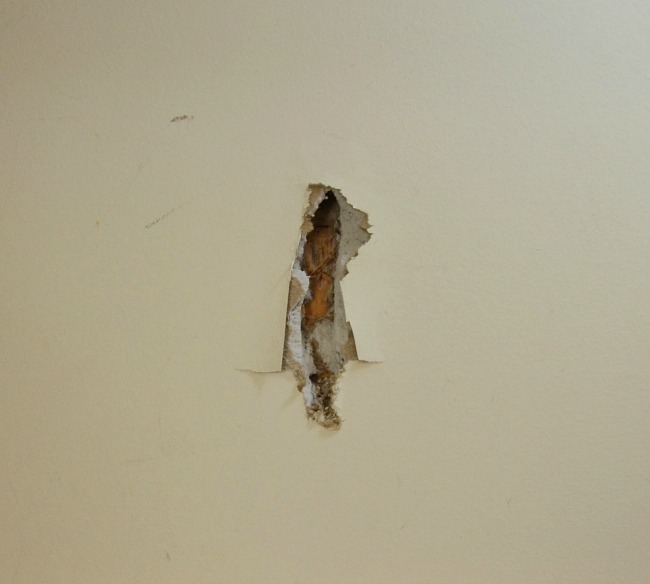
I moved some things I had stored on the top shelf around and my mouth dropped open at what I saw.

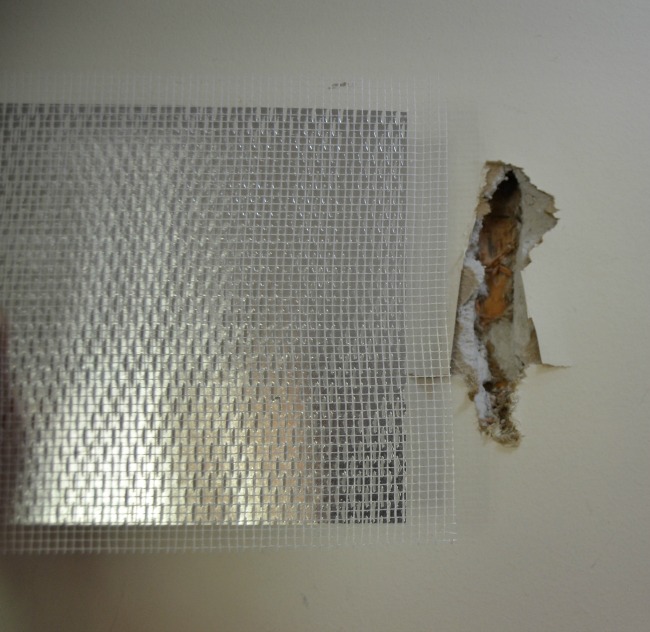
There was a big jagged hole in the closet wall. I was baffled for a few minutes trying to figure out how I had lived here for so many years and had never noticed this big hole in the closet wall. Then it hit me, this must have happened when my contractor was attempting to fish the wall because this is where the header of the old bedroom doorway is located. He had accidentally punched through the back closet wall (while attempting to fish the wall) since the header was unexpectedly in the way.
I was really wishing I had noticed this while the contractor had been here because he would have gladly repaired it. I made a mental note to myself to fix it one day, then closed the closet doors and promptly forgot about it. It was easy to forget since the hole is almost always hidden behind tons of pillows and cushions I keep on the shelf. Recently while I was cleaning out the closets and revamping my summer wardrobe, I saw it again and decided to fix it once and for all.
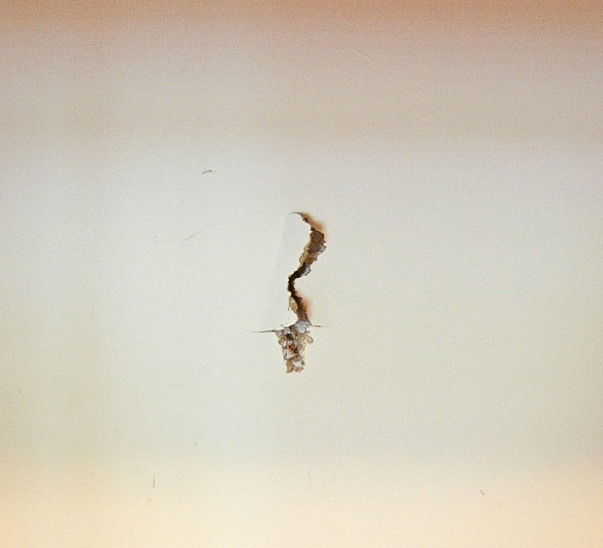
I knew the hole was way too big for a little spackle. I searched how to repair a large hole in a wall and the videos I found online were really complicated and involved cutting out a big square hole in the wall and using wood braces or shims to recreate a place on which to nail more wallboard, etc… I had a feeling there had to be a simpler solution and there was!
If you have a similar size hole, this one was around 4-4 1/2 inches long, or even a hole that’s bigger, here’s what you’ll need to make the repair:
Drywall Repair Patch (they come in several sizes at True Value)
Joint Compound
Drywall Sanding Sponge
Protective Dropcloth
Wide Putty Knife
Joint Knife (smaller knife)
Protective Mask (not shown)
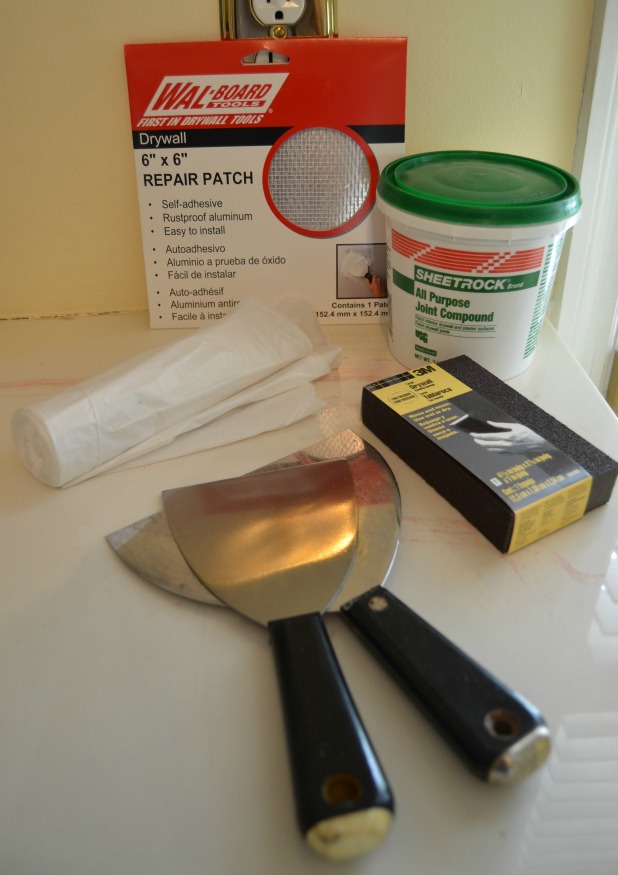
Here’s how a drywall patch looks out of the package. It’s made from rustproof aluminum. I chose a 6″ x 6″ size patch but they come in larger sizes, too.

I covered the top shelf and the clothes in the closet with a small piece of the dropcloth. One thing I’d probably do differently next time is cover the clothing a bit better. The dropcloth worked great for protecting the clothes and shelf against any stray pieces of joint compound but it doesn’t hurt to cover things a bit better for the sanding that comes later.
The first thing you need to do when repairing a large hole similar to the one I had in my closet wall is to cut away the damaged wallboard protruding outward from the hole. It will just get in the way of the repair patch and cause it to bump outward instead of laying flat. I used scissors to cut the loose wallboard away but a utility knife would work well, too.
Next I peeled the backing off the aluminum repair patch.
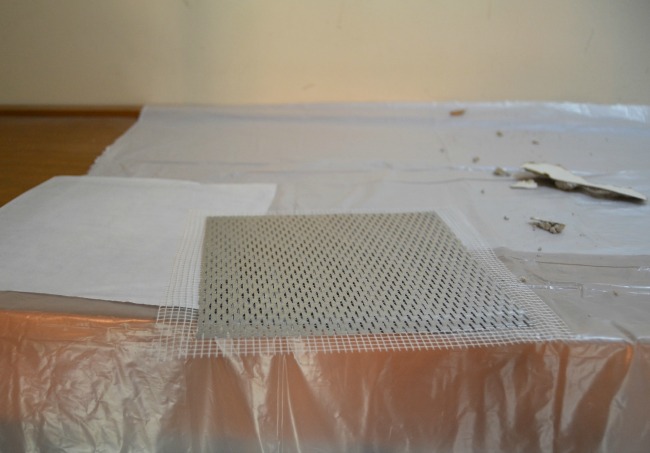
I held it up alongside the hole just to verify it would be big enough to cover it and it was. I had measured the hole but it’s best to double-check before adhering the patch to the wall.
I placed the sticky side of the patch down over the hole and it stuck very securely to the surrounding wallboard.

Time to crack open the joint compound. You absolutely need to use joint compound and not spackle or something similar because spackle will crack and doesn’t work well for repairing large holes in sheet rock.

Next, I spread a fair amount of joint compound over the whole area, applying a thin coat. Don’t attempt to cover the area fully with just one coat. Just as it’s better when spray-painting something to use several thin coats of paint rather than attempting to cover the surface with one thick coat of paint, repairing a large hole with joint compound produces a better result if the compound is applied in several thin coats.
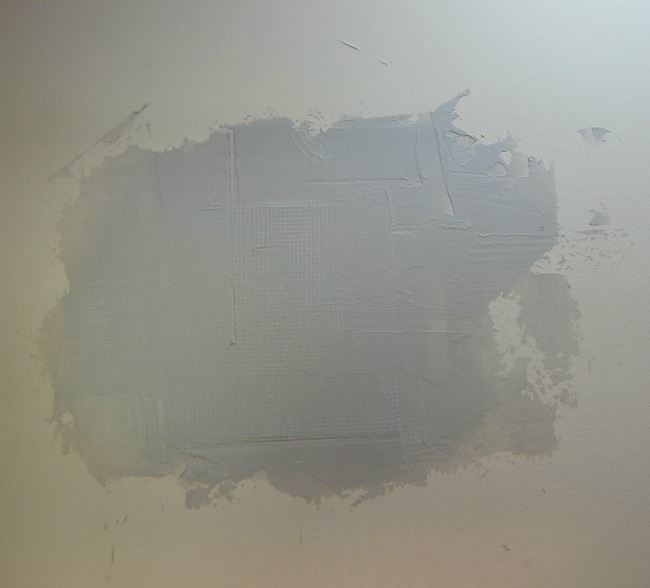
I took a photo when it was partially dried so you could see the difference in how it looks when dry and when still wet. The darker gray area is still damp while the white area is completely dry. The joint compound needs to be totally dry before you begin sanding.
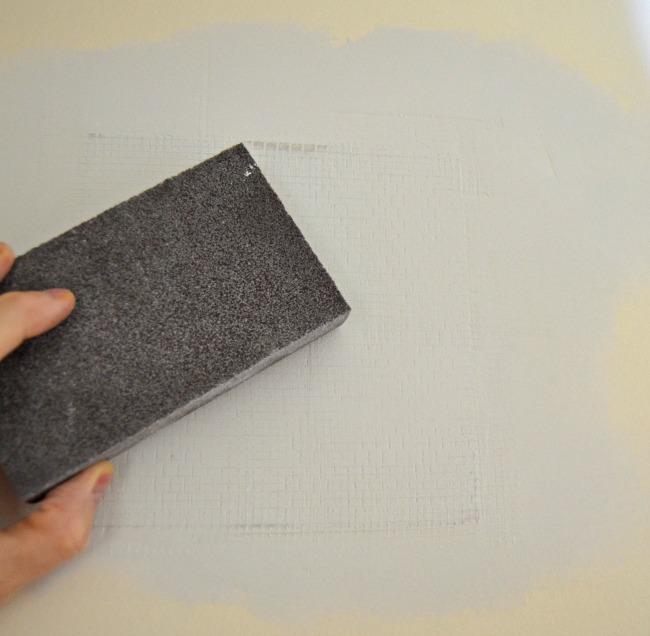
Once the first coat was dry, I donned a dust mask like this one and got busy sanding with my drywall sanding sponge.

The drywall sponge I used was great because one side was slightly courser than the other one, allowing me to switch between the two sides as needed. I used the less-course or finer side most of the time so I wouldn’t sand away too much, too quickly. Be sure and go slowly because joint compound sands away effortlessly and you can remove more than you wish before you know it. You want as thin a layer as possible and it should be nice and smooth without any grooves showing.
After I finished sanding the area, I applied another thin coat of joint compound. This is how it looked right after I applied it before I used the joint knife to spread it out nice and thin.
Spread out the second coat and let it dry.

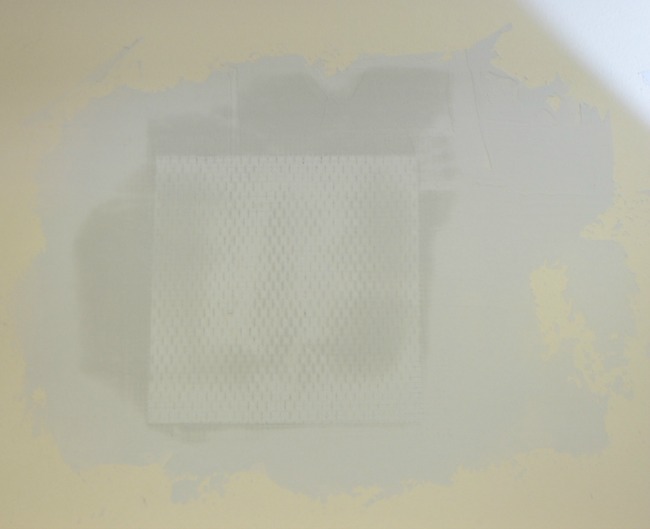
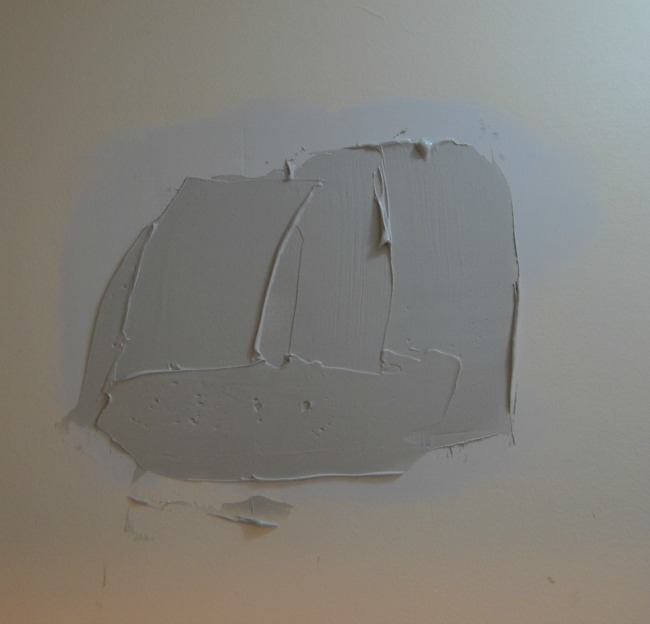
After sanding the second coat, I could still just barely see and feel the mesh in a few spots. See the darker areas below?
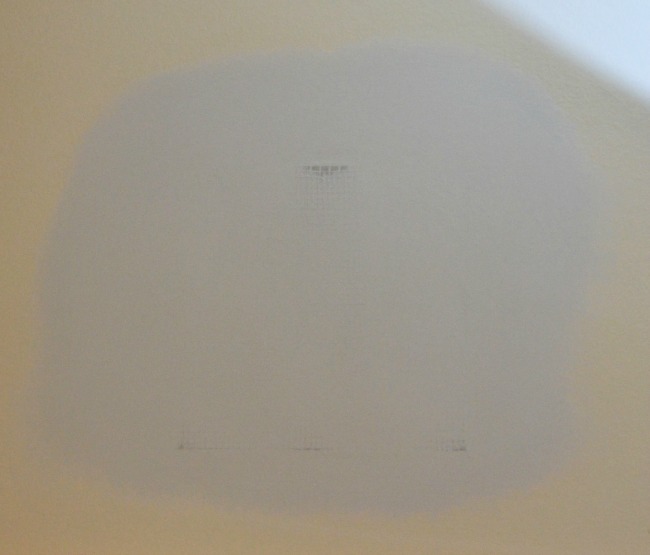
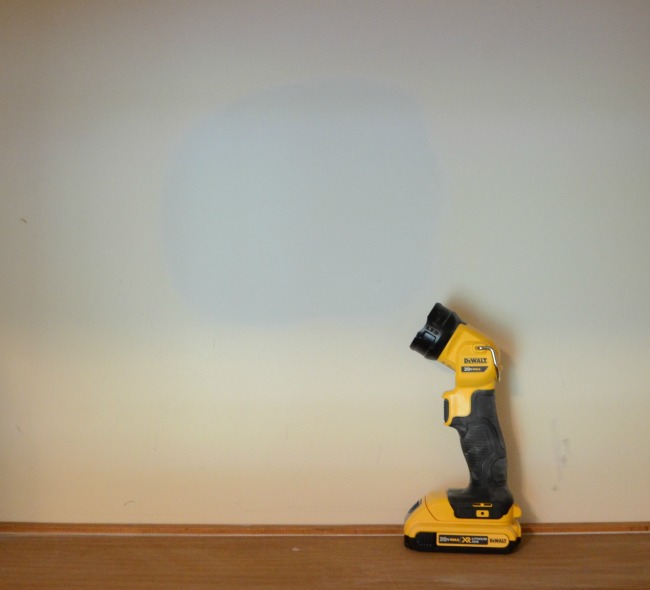
After one more coat of joint compound and more sanding once it was dry, I finally had a nice, flat, smooth surface ready for painting. I had to place my dusty-from-sanding flashlight near the repaired area in order to get my camera to take the picture below. It refused to take it without something other than a blank wall to focus on. I decided that was probably a good sign, a sign my repair was looking as it should if the camera couldn’t find anything to focus on. 🙂
I still need to paint all the closets in this room. They haven’t ever been painted and still have the original paint on them from when the house was built so many years ago. I’ll be sure to share that mini-makeover once I complete the painting. Of course, I’ll need to prime over the repaired area first before painting it.
Do you have a good size hole in a wall somewhere in your home that needs repairing? If I can make this repair by myself, you definitely can do the same! It’s easy to do, really–just requires a bit of patience since the process does involve a lot or “rinse and repeat” steps.
I was one of the bloggers selected by True Value to work on the DIY Squad. I have been compensated for my time commitment to the program as well as writing about my experience. I have also been compensated for the materials needed for my DIY project. However, my opinions are entirely my own and I have not been paid to publish positive comments.
Looking forward to all the great Before and Afters for this Metamorphosis Monday!

If you are participating in Metamorphosis Monday, you will need to link up the “permalink” to your MM post and not your general blog address. To get your permalink, click on your post name, then just copy and paste the address that shows up in the address bar at the top of your blog, into the “url” box for InLinkz.
In order to link up, you’ll need to include a link in your MM post back to the party so the other participants will have an opportunity to receive visits from your wonderful blog readers.
Please observe these few rules:
Only link up Before and After posts that are home, gardening, crafting, painting, sewing, cooking, DIY related.
Do not link up if you’re doing so to promote a website or product.
Do not link up a post that was just linked last week since a lot of readers will have already seen that post.


Thanks so much for the party!!
Hugs,
Debbie
I’ve used that drywall patch before as well and it is great. I’m so glad they make it easy so you don’t have to call in a sheet rock guru. Thanks for hosting.
Shannon ~ bohemianjunktion.com
lol Me, too! Definitely easier than some of the videos I found online.
Susan,
I remember your alcove story well — it was a good one. I apologize for going off-topic but we’re gearing up for a move to Atlanta — and “knowing you” has helped me immensely — and I have a question: how do you deal with the Georgia bugs? How do you keep them out of your house? Your home always looks so bug-free.
I was moving things around in my closet the other day — three floors up from the backyard — and was surprised by a fairly large spider (in my California-book; we’re in VA now). Can you tell us how you keep the spiders/bugs out of your gorgeous home?
Thanks!!
Alley
Thanks, Alley. Well, the occasional bug will find their way in but I do have someone come out and treat around the exterior of my home quarterly. I can’t stand those HUGE cockroaches that we have outdoors and when one gets in the house, I can’t sleep until I know it’s gone, so I do have the outside treated and that works. You can buy the chemicals and treat yourself but I prefer to let the pros do it since they know the correct way.
Thanks Susan! That’s exactly what I do here in Virginia. We get an “all seasons” plan and, for the most part, it’s kept the bugs out. Since we’re moving to Atlanta in Sept. would you mind sharing your bug company — you could email me privately if you’d prefer.
A million thank you’s! Alley
I’ve been using a company called Dixie Exterminators. It’s the same company I have my termite letter with…or whatever you call that thing. lol Here’s their website: http://www.dixiepest.com/
Duly noted! THANK YOU!!!
Glad to know about the patch! I have always used the fiberglass tape, which is a mesh like this patch, but you have to add a number of strips to cover a larger hole.
I think you’ll like this Ellen if you ever need to fix another area.
Great job Susan I can’t even see where that hole was! Love those sanding blogs so much easier to work with than the sanding paper! Thanks so much for hosting!
I love the blocks, too. So agree…much easier than sand paper. I really liked how this one was especially made for drywall and had two different grit(s) in one block.
I have a hole in a closet that can benefit from this well written post. Thank you for sharing and for hosting.
Thanks, Laura…hope it helps!
I bought a can of spackle yesterday to repair a corner I bumped when I moved a chair. I hope I can do as good a job as you did on your wall. I think I may have to research a little before tackling it. And where is my darn putty knife?
lol I have so many putty knives from loosing them and buying more. I finally corralled them all into my tool chest recently…trying to be more organized. Good luck with your repair, Madonna!
Great tip, Susan! Thanks for hosting! …hugs…Debbie
Thanks, Debbie!
You are so amazingly handy Susan! And I really appreciate the how to, I had no idea there was such a thing as a dry wall patch, very good thing to know! Your alcove looks great, but I am afraid if it were in my house it would never get dusted 🙂
Shhh, how did you know! It’s always dusty, until company is coming…then it gets cleaned! 🙂
fantastic step by step instructions…………….thank you Susan!
Thanks, Anne!
You’re so handy Susan! I probably would have stacked some storage bins on the shelf and not bothered to fool with it 🙂
I was tempted! 🙂
Great job! I had never heard of the “sanding blocks” before. How handy! It always bothered me having all different kinds of sanding paper handing around. Now I just need one of these blocks!
Jane, I really like them. I’ve used them before but this was the first one I’ve bought that was made just for drywall sanding. It was in the same area with the joint compound so I bought a couple knowing I can always use them.
Excellent tutorial Susan and a great job! Many years ago when my daughter was single and living in her own Town House she had a Chocolate Labrador Retriever who in the mischievous puppy stage chewed through a gyproc wall right to the fire barrier between the units. (We suspect she first licked it to soften it and being as sociable as she was, just wanted to visit the neighbours … ☺.) Mother (me) was called to repair it and it was actually the first time I used the mesh for patching which eliminated squaring the hole off etc. As it was somewhat large and deep; I stuffed it with crumpled newspaper first, then applied the mesh and layers of joint compound which worked out beautifully. -Brenda-
Brenda, that’s a great idea! I’ll remember that if I ever have one that’s really deep. This aluminum patch was really stiff, didn’t give at all but it wouldn’t hurt to fill the hole if it’s super deep. Your daughter is so lucky to have such an awesome and talented Mom!
Thank you for the compliment Susan. (I try my best …. ☺) Cannot rightly recall if I used the nylon type mesh or the aluminum one at that time as it was about thirteen years ago but do recall for sure that when we changed out the cheap hallway lightS to recessed ones (on the main floor with no attic above); the ceiling required some patching and I definitely opted to use a patch that resembled aluminum because of its strength.
Another great product that is ideal for patching ‘cracks’ is by DAP. It is called ‘Alex Plus/Acrylic Latex Caulk Plus Silicone’. It comes in a tube and is good for interior/exterior application, is paintable and mildew resistant plus it is flexible so cracks do not reappear. It is also super for seaming mouldings etc. and has a guaranty for 35 years. -Brenda-
Susan, you always amaze me with what you are willing to try to tackle and what a great job you do when you tackle it. Mr. Linky says that don’t have a link back to you, but I do. He says you have to approve my link. laurie
Laurie, Thanks for letting me know. For some reason InLinkz does that with links sometimes…have no idea why. I just clicked over to InLinkz and approved it so you should be all set.
Susan,
“Mr. Ed” uses a similar product and treatment.
Many times, he has had to cut out a portion of drywall to make repairs.
Once he completes all the steps and repaints, it is as if the wall had never been repaired.
Thank you for this great do~it~yourself home repair tip.
Thank you for hsoting Metamorphosis each week!!!
Wishing you a wonderful week ahead, dear friend!!!
Fondly,
Pat
Send him to my house, Pat! 🙂 Thanks…hope you have a wonderful week, too! XO
Well Susan I can tell you right now I’m the worst – the absolute worst hole patcher on the planet – I would have a big mound on the wall – so it’s not just product – you have to have some talent there too lol.
Thanks for another great party !
Have a wonderful week – hugs
Suzan
Suzan, I get a little anxious when making these kind of repairs because I want it to turn out perfect. I have to just take a few deep breaths and take it one layer at the time. I was determined to do this repair slowly to keep the layers really thin, but the impatient part of me was ready to be done with it already! lol That’s the hardest part, doing each layer slowly and letting it dry…not rushing it. It really isn’t hard…promise!
Thanks so much for hosting another great party, Susan!
Have a great week,
Suzanne
Great job! I think that might be what our contractor used for a crack we kept getting at the top of the drywall above our fireplace. It seems to have done the trick!
You will laugh at this- a friend of mine had a company install a whole house smart system which involved wiring in pretty much every wall. They drilled through a wall and right through the top of her china cabinet at one point! They fessed up to it, but all that could be done was to fill the whole with wood putty.
Oh, my gosh! I would not have been a happy camper! She must have a tall china cabinet. Mine is so short, that couldn’t happen but I can def see that happening with a taller one. Hope they at least gave her a big discount…and hope it wasn’t an antique. Thanks for sharing that Liz. If I ever have any other work done like that, I’ll be on the watch now!
Joint compound can hide a multitude of sins. Thanks for the tips and thanks for hosting. Hope you have a great week.
Sooo true! It saved me when the walls were so damaged in the office from removing wallpaper. Thanks, Kristi!
Those repair patches are fantastic. I am a big hole maker and we had a huge one. We found out how to fix it at Home Depot. It was so easy and perfect. There is something for everything at the Hardware store. I am always amazed and a learn something new. Good luck on your home renewal!
Peggy, I love going to them, too…could ramble around in there for hours! 🙂 Thanks! They didn’t come today, the painter had a death in his family, but they will be back tomorrow. Should be finishing up in the next day or two. I’m ready to get all the stuff out of my kitchen and living room and back out onto the porch!
Your article is just what I needed. Once I get my new bedroom finished and we start working on my old bedroom, there is a whole just like that in one of the walls where I lost my balance while making the bed and rammed my shoulder into the wall. Now, thanks to you, I will know how to repair it. You just knew I would need help with that, didn’t you!!!!! Thanks!
Ouch, how did your shoulder make out? That sound painful! Those patches come in several sizes, Linda…so just measure before you go shopping. They do make it super easy!
Repairing drywall is definitely not my favorite thing to to do!! Thanks for hosting Susan:-)
You amaze me Susan, wish I was as clever and talented like you to mend and fix things in the house! Thank goodness Alejandro, my hubs is, lol! You did a great and neat job, it looks like you don’t make a mess of anything with your proyects.
Have a great week.
FABBY
Fabby, I promise you could do this! It really is easy…just takes patience which is always hard for me since I won’t to rush and see it done. If you’re patient, you can do it!
Ok, that’s really impressive. It’s funny how I consider myself a creative person and wouldn’t think twice about restoring or developing many different things from scratch, using my hands somewhat commandingly, and yet would never in a million years think I could do a repair like that. I’ve retouched furniture, often walk around the house painting things and giving them finishes, but as soon as actual “tools” are involved, I become intimidated. I’d like to take inspiration from your lead. Thanks for sharing (and hosting!)… 🙂
Lory, I promise it is super easy. If I can do it, anyone can! 🙂
Ugh! Repairing holes in is not my favorite thing to do. So hard to get it right! Thanks for the great tutorial and for another wonder party.
Blessings to you,
Patti
Thanks, Patti!
oh gawd Susan, the drywall repair post is genius. I have the same dilemma and will pin this! Christine from Little Brags
Ah…patching holes. Much needed and dreaded task. Done it many times with all my DIY projects. Great tutorial. Thanks so much for hosting!
KC
lol Why do we dread it so much?! I think I do because I’m a recovering perfectionist. Thanks, KC!
Good for you for getting that hole repaired een though you can hardly see it! I have used on of hose drywall repair kits vbefore, and they work fabulously, I think!! 🙂
xo, Crystelle
Crystelle Boutique
Thanks, Crystelle!
Wow, I learn the most amazing and useful things from you!!! This looks so doable for me, will have to give this a try!!! Thanks……
Thanks! It is…promise!
well…now this explains why the hole in my wall didn’t repair well with Spackle !! i did not know about joint compound. thanks sooooooooooooooooooo much for sharing this!!
Ann, Years ago I tried spackle on a fairly big hole and couldn’t figure out why it cracked so badly, so I totally sympathize! Later I learned what I should have used…joint compound. You’ll have a lot better success with it.
Great tutorial, Susan – we’ve had to do this before as well – great kit! I do appreciate you hosting,
Kathy
Thanks, Kathy!
Your repair turned out way better than one I did in a similar spot! So glad I got the chance to meet you in person this weekend! XO
Christy, it was awesome meeting you! Best thing about going to a blogging conference is getting to meet in person the bloggers you’ve come to know. Love that!
Great job, Susan. You really are very talented…Christine
Thanks, Christine!
Thanks for the party!
Thanks, Sherry!
Hate then we discover those nuisances …. however, you certainly dealt with it very well…. My hubby used that method of patching and it worked very well…You did a great job…and BTW, your closet is so organized and love the uniformity of your hangers!
Nice work! and very helpful tutorial. I feel confident I could do this if needed. Thanks.
Susan…..great post, very useful. I almost wish I had a hole to patch.
I’m back! I was on my way out when I entered the party – We discovered an old doorway from our hall bathroom leading to the summer porch off our bedroom. This doorway still had the door in it! I was wondering if you know whether the door is still in that spot! We opened the spot and have the door exposed in our bathroom. There was once a clawfoot tub in that bathroom and a previous owner had installed a garden tub thereby needing to enclose the doorway. Now, we’re going back – replacing the garden tub with a clawfoot tub. Just curious 🙂
Kathy
Kathy, that’s a good question…wonder if it is in there?! I’m not sure…wouldn’t that be a hoot! Oh, I love clawfoot tubs! I can’t wait to start renovating all my baths…they so badly need it!
It makes sense that it might still be in there so that they wouldn’t have had to create supports – though that may not be hard. I’m going to have to refinish the clawfoot tub we have – it’s sitting on my back patio – rusted, but in great shape. The other bathroom we have was a blanket closet that was transformed into a bathroom – it is small and is in need of good ventilation – another project down the line…always in pursuit – and taking one thing at a time, I still need to finish in my dining room!
Great job on the wall repair- you make it look so easy! Thanks for hosting the party!