The Valentine’s Day table setting I posted for TT this week had a yummy centerpiece that is also great to make and give as a cute gift. This centerpiece was created in colors of red, pink and silver for Valentine’s Day, but you can create the same centerpiece/gift with candy bars in pastel colors for Easter or Mother’s Day or for a birthday gift. This also makes a great end-of-year gift for a favorite teacher.

Years ago, I bought one of these “sundaes” for my son. When I was moving everything out of his room to make way for a home office, I came across it again. He had never taken it apart to eat it…what was wrong with that boy?! ☺
I thought it would make a fun centerpiece for a Valentine’s table, so I took it apart to see exactly how it was made and then recreated it with new candy. I’ve put together a little tutorial…you are going to love how easy this is to make.

To make this “sundae” you’ll need:
Hot glue gun
1 parfait glass
50-55 small snack size candy bars (in whatever color is appropriate for your needs)
1 four-inch styrofoam ball (cut in half)
50-55 Floral U-pins (available in craft stores)
1 bendy straw (any grocery store should have these)
1 or 2 pieces of white tulle (around 6-8 inches in size) to represent the whipped topping
1 round red candy or truffle to represent the cherry on top
Time needed to make: Around 15 minutes

Here’s a little close up of the floral U-pins. Before you get started, cut the 4″ styrofoam ball in half.

Start by filling your parfait glass up with candy bars. Next, run a bead of hot glue around the top rim of the parfait glass. (The hot glue is visible in the pic below.)

Press the halved styrofoam ball onto the hot glue. Give that a minute to dry, then you’re all set to start adding the tiny candy bars.

Take a floral U-pin and poke it through the edge of the paper on one end of the candy bar. You have to push pretty hard to get the floral pins to pierce the strong wrapper on the candy bar, so I worked atop a thick piece of foam board. A plastic cutting board would work well, also.

Starting at the bottom, stick the candy bars into the styrofoam ball all the way around as shown below. Repeat this process for two more rows. I got so carried away with adding the candy bars, I forgot to take pictures again until I had them all on.

I just went around and around layering them close enough to each other to hide the white of the styrofoam underneath. Three rows did the job, but I added 3-4 candy bars on top to finish it off and to make sure none of the styrofoam would be visible. I ended up using around 46 candy bars. Buy a few more just to be safe. You don’t want to run out…plus, there’s nothing wrong with a few leftovers for the creator of the sundae. ☺

Once all the candy bars are in place, take your bendy straw and bend/crimp it about 1/3 up from the bottom of the straw. Add a drop of hot glue to where you crimped the straw, then just push the straw down into the styrofoam ball.

Gather your tulle into kind of a poof and add some hot glue to the bottom where it’s gathered together. I used two small pieces of tulle. That was easier than trying to keep one larger piece gathered together. Then just stick it onto the center/top of the styrofoam ball. You could probably use the floral pins to attach it, but hot glue worked better for keeping the tulle in the poofy shape I had created.

You’re almost done. Just take your truffle or round piece of red candy and hot glue it in the center of the tulle, to represent the cherry on the top of your sundae.

That’s it…all done!

When the pastel colored candy bars begin appearing in the stores any day now, you could make one of these for Easter. A candy-bar sundae would make a cute end-of-year gift for a teacher or a birthday gift for a friend or co-worker. Happy sundae making! ☺
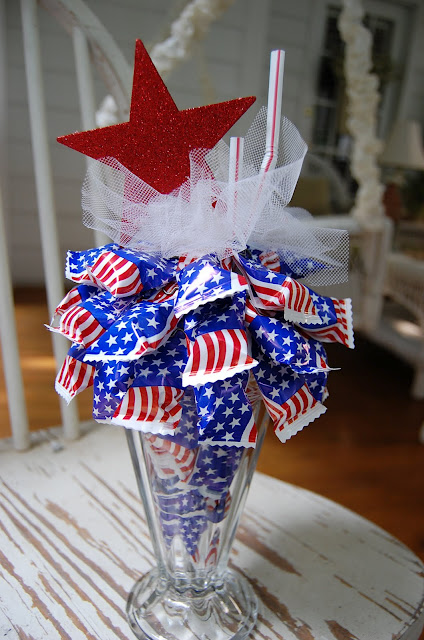
Update: Created a red, white and blue version of this cute Sundae in this post: 4th of July Craft or Party Favor. Check out that post for more details.


This is very cute, Susan. I can't wait to make one for each of my girls!
XO,
Janie
What a great idea,thanks for the tutorial too!Veronica
Thanks for sharing! It is just darling. A great idea for home or gift to someone.
I love it! I am going to make one for each of my daughters. Thank you for sharing this idea and the instructional tutorial.
Susan, this is a darling idea. Thanks for sharing how you made these. Your Valentine Day is full of delights.
Snow here today! So my snowy table this week was timely. 😉
~ Sarah
Super cute! Love this idea!
I absolutely LOVE your tablescape! You have a fabulous blog and I am now your newest follower.
xo
Great idea! I think I'll be trying this for Easter. Thank you for sharing Susan.
Your table is wonderful!
Debbie@lakehouse
Thanks so much! This si cute AND easy, can't get better than that!!! XO, Pinky
Adorable Susan. I love it! 🙂
OMG…I LOVE LOVE LOVE it! I know what my boys teachers are getting for valentine's day!!! Thanks for sharing this adorable idea!!!
Wow, how cute. I think I'll have to hit goodwill for a sunday glass to make my own.
Thank you for the fun and step by step tutorial on such a cute centerpiece. We have a fund raiser at work on Valentine's Day, so I think I will try your "Sundae Centerpiece"
Mary
I love it and can't wait to try it! What a great idea for Easter as well.
This is so sweet! I care for a 98 yr old and I know she will love this. Thank you!Everything is so beautiful!
Susan,
So cute! Thanks for sharing the tutorial. I will be making one for my husband.
Hugs,
Donna
Wow ~ you weren't kidding when you said it was easy! Can't wait to try it! Think I'll make my hubby and son both one for Valentine's Day! Thanks for sharing the "how to"! Enjoy your weekend.
Hugs,
Donna
Susan, thanks so much for sharing this! I bet my grandsons would love this. It will make a perfect V-day gift for them.
I wish I had time to make some of these for our Thrift Store. I think they would sell and we can't give away the mismatched sundae glasses we have. Ya'll check the thrift stores for these glasses! Thanks for sharing a lovely idea!
So cute Susan. Thank you for the tutorial.
Susan, this is such a cute idea and your tutorial helps so much! Thanks!
I also love the idea of making one with Easter candies.
Thanks so much for sharing.
HOW cute is this? Making one and sending it to my long distance husband this very day!
Hugs, Lisa
Hello,
Your blog is very sweet
Zuzana
Thanks for the cute idea and for sharing how you made this. I just love it! Your table is beautiful as always!
What a cute idea…and it won't even melt! Of course, with my love of chocolate it probably wouldn't last long around here:)
Susan, this is a great tutorial and a unique idea. I MISS YOU like crazy, girlfriend.
What a sweet centerpiece! Great idea!
Hugs
Charo
Your table is so cute, Susan and I love your candy bar "Sundae" Thanks for sharing how to do it. I will love making these.
Very adorable and surprisingly easy! I am just in love with that polka dot cake though. Do you remember where that's from?
So simple and "sweet"! I love this idea and think I can get the children involved in this awesome project….Only problem is there is way tooooo much chocolate involved here! I am trying to be good and stay away from this hazardous to my body stuff!
Thanks for the tutorial! Awesome as always and love your table setting! I am inspired to set the table secretly the night before valentines for a special Valentine breakfast for my four kiddos as a treat before we begin our homeschool lessons!
Blessings to you and yours!
Lisa, thanks! The cake stand/top came from two different stores a year or ago. I found the top at TJMax and the bottom from Marshalls. They are both Dept. 56 pieces so you may be able to find them on eBay. Hope you are able to find them. 🙂
Country Cottage…that sounds like a wonderful idea! I love it!
Susan,
Thanks so much for the great tutorial for making this darling candy sundae!!! You did a great job keeping the instructions simple with your pics. I can't wait to make some of these for my Valentines!!!!
Hugs, Katherine
What a great. I love the winter header on your blog.
Ann
How do you keep coming up with beautiful tablescapes again and again and again? Adorable Valentine Sundae. Am I overlooking it or do you still have all your tablescapes listed in one place? I thought you could click on them under your header? Love your blog. Thanks for making it so beautiful and interesting.
Anonymous…thanks! Just click on the header Tabletops at the top of the blog. I may need to change that header title to something else.
This reminds me of how much I love chocolate. I need to go and get some to make one of these, too sweet.
Thank you, Susan, for pointing me in the right directions. It's obvious to me now 😎 Off I go to enjoy your tablescapes.
Susan,
This is adorable! I love your website. Thanks so much for sharing your wonderful ideas. I love the cake plate in the background with the polka dots! Where did you find Ie/
HI Debbie! Thanks so much! The cake stand/top came from two different stores a year or ago. I found the top at TJMax and the bottom from Marshalls. They are both Dept. 56 pieces so you may be able to find them on eBay. Hope you are able to find them. 🙂
Susan,
I am having a wonderful time on this rainy day in Mississippi making these adorable sundaes! Thank you so much for the idea and perfect tutorial on how to assemble. I love your blog even though I am new to checking out blogs, your is at the top of the list.
Very nice! I love your idea on Valentine's Day Gift! Thanks for the info and keep up the great work.
Oh Thank you Thank you!!
I have seen these and wanted to make them so many times!
Now my forth of July will be perfect!*:*~
My head is about to explode for all you beautiful ideas.
~~Wendy
Thanks, Wendy! It is sooo easy to make…and fun!
This is great . I never would have known how to make it . Thanks for showing how it .
Mary / Mariah
Your tablescape is adorable. I especially love the dishes! What pattern are they, if you don’t mind sharing? I have a bit of a place setting and glass obsession. 🙂
Thanks, Janey! They are vintage Copeland Spode, pattern is Tower. From the mark on the back, they are from the 1920’s, I believe. I found them on eBay so you may be able to find them on there.
So adorable! I pinned it. Thanks for sharing.