Welcome to the 19th Tablescape Tuesday!
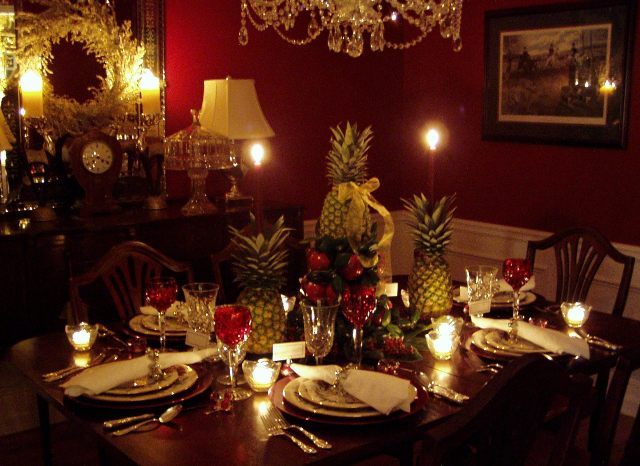
When I posted a Christmas tablescape a few weeks ago, I received several questions about how I made the fruit tree centerpiece. Even though Christmas is over, I thought it might be helpful to see how it’s made, just in case you would like to make one next year. Honestly, I think this would be beautiful for any occasion, not just Christmas. So for this Tablescape Tuesday, I’m sharing the “secret” to this all natural centerpiece, including the pineapple candle holders on both sides.

I start by gathering nandina berries from my yard…
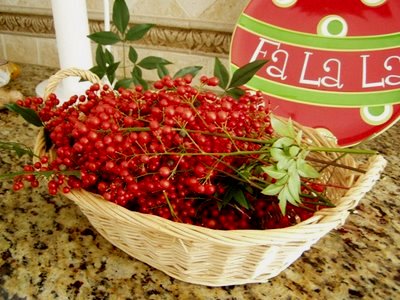
…as well as some holly…

…and some magnolia leaves from the the big magnolia tree in my front yard.

You’ll need a pineapple for the top of the tree. I bought 3 since I also like having the pineapple candle holders on either side. And, of course, you’ll need some small, Red Delicious apples. I always use Red Delicious because I love their deep, red color for this centerpiece.

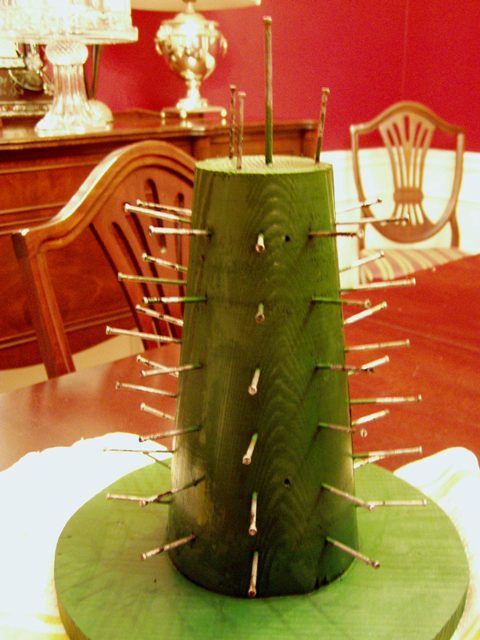
One of the most important components is a form a friend of mine gave me as a Christmas gift 15 years ago. She knew I had long wanted to make an apple tree like the ones you so often see when visiting Colonial Williamsburg. The form I have is a wooden, cone shaped structure that’s painted green, with finishing nails protruding all around. There is one really long nail and three shorter nails on top. I found some similar cones online for sale at the Williamsburg Marketplace…click HERE to access that site.
I didn’t think to take pics when I first assembled the tree on December 12th…I was too busy panicking about the 25+ neighbors who would be arriving for a cookie party at my home two days later! 🙂 So I took some pics this past Sunday, as I took the tree apart. The fruit is a bit past it’s prime in the pic below, since it’s a couple of weeks old…so please try to ignore that. 🙂 The apple tree normally looks great for about a week and a half…then things begin to get a bit wilted.
When first assembling the tree, I start by placing the apples on the tree. I push the apples onto the nails, turning the tree around and around, as I work. I always start at the bottom and work my way up to the top. If you use apples that are too large, you will run out of room. It just doesn’t work well and you end up with the apples not fitting correctly and sticking up way past the top of the tree. Once the apples are in place, I push a small pineapple down onto the nails at the top. In the pic below, you can see what the tree looks like with just the apples in place and no greenery.

Next, I cut short pieces of holly and tuck them down in between all the apples to hide the form underneath. I use holly because that’s what I have available in my yard; boxwood would work great, also. The holly stays looking great for a long time. It actually still looked good before I removed it for this pic.
Once I have the tree in the center of the table, I tuck magnolia leaves under the base. I place the magnolia leaves so they are pointed outward, kind of like spokes in a wheel. This year I tied a sheer ribbon/bow around the top of the pineapple. I really like the way it looked so I think I’ll use that idea again next year. 🙂
I found a great article online that gives some history of Williamsburg fruit trees/cones. It also shows some great pics of trees using other types of fruit like pears, lemons, kumquats and pomandered oranges. The article, which you may access by clicking HERE, is taken from Susan Hight Rountree’s book, Christmas Decorations from Williamsburg.
The pic below is of the finished tree, when it was still fresh.

A few tips: You want to purchase a pineapple that is relatively small, for the top of the tree. Otherwise, it will overwhelm the tree itself.
You may have to shop around to find pineapples that are “pretty” without crushed foliage. When I was shopping at Publix, they only had around 3-4 pineapples out…and they all looked waaay too big and squished. I asked the produce manager if he had any others and he brought out a whole box full. They looked much better and the tops were in better shape. 🙂
The pineapple candle holders (see pic below) on either side of the apple tree, are done with a “kit” I purchased about 17 years ago on a Christmas home tour. The home tour was sponsored by Traditional Home magazine and since I was a subscriber, they sent me two free tickets. 🙂 After touring this beautiful, historic mansion in Atlanta, we shopped in the gift shop “tent” they had set up behind the house.

I found this candle holder “kit” in the little gift shop tent and bought two.
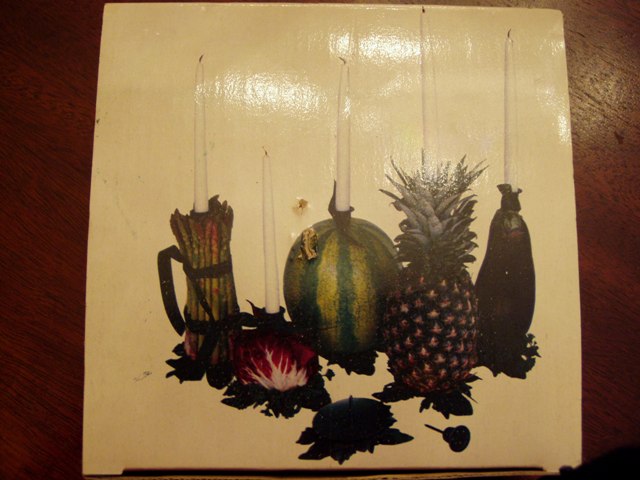
There’s a base that you push the pineapple down onto. The other piece you see pictured here, gets pushed down into the center of the pineapple…ta-dah…instant candle holder.
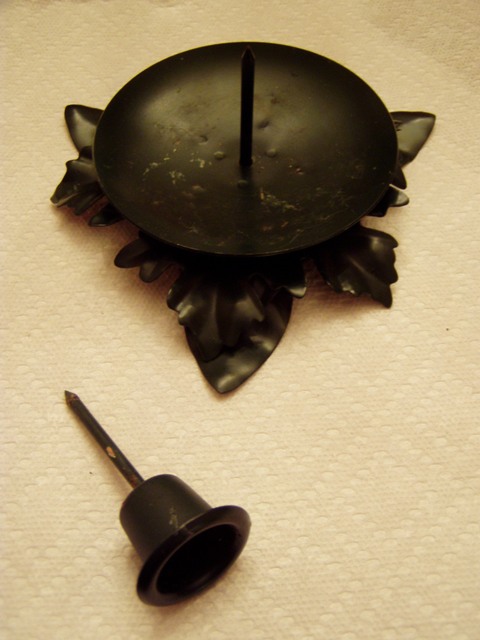
There’s not a lot of info. on the box, but I took a pic just in case you wanted to look online to see if these are still being made. It appears these were made by a company called Carnevale in 1991.

Tammy at White Iris Designs found a candle holder base and spike online that will work with fruit…it’s at Gardens etc. Thanks Tammy for sharing this! Just click HERE for the link.
I love this centerpiece and make it every year for my annual Christmas party. The apple tree would actually work well anywhere in the home. I could see it on a large coffee table in a family room….or perhaps as a focal point on the counter in a kitchen.
Please take time to stop by the blogs shown below. They all have beautiful tablescapes posted that will surely inspire!
The following blogs have beautiful tablescapes awaiting your visit:
Life at Ann’s Place
Linda (Mom of a German Shorthair on RMS)
White Iris Designs


My goodness this is so gorgeous. I’ll bet it smells fragrant too.
Oh, Susan, this is wonderfully brilliant and instructive. Thank you so much for taking the time to photograph this, and for the step by step. This is priceless!
Hugs,
G.
Susan, Thanks so much for sharing your centerpiece how-to’s with us. I really admired it when you posted it for your cookie exchange party. I think that this would be fun for my family reunion dinner also. I am showing this to my Dad, he could construct something similar for me. Your Christmas dinner table setting is absolutely gorgeous, BTW! So rich and warm! ~ Robyn
Susan,
Thank you so much for sharing! That centerpiece is a beauty!
xoxoxoxoxoxo
Donna Marie
I love your table and the apple centerpiece. I have one of the cones I purchased from Williamsburg.. I love that place.
I must comment on your house it is just beautiful.. my taste! and a Georgia girl too.
Susan! I absolutely love this tablescape and thank you thank you for the instructions! Wonderful, just wonderful!
Susan Thank you so much for sharing how you do this..I know it sure is pretty all done..great post as always Susan..and I will be visiting the others today..hugs and smiles Gloria
thank you for sharing, nothing better then pics to tell a story~ its been a lone time since i did a fruit centerpiece, but i adore the look. i especially like adding straight from the garden, makes things extra special.
Susan, I love this one! It’s so beautifully elegant on your table. Thanks for the step by step instructions. ♥ Diane
Susan can you change my link above to A Southern Daydreamer to http://asoutherndaydreamer.blogspot.com/
The link you have is to my FIRST tablescape….and this is my third!
Everyone is going to that one again,.
Thanks
Susan
Susan, what great gadgets you have! I will have to get some gadgets for my tablescapes. Thank you for sharing this good information. laurie
The more I read…the more fascinated I became! Thanks for sharing! 🙂 L~
How patient you are to write out the instructions…i am certain it will help so many! i know i gleamed a lot o information 🙂
my tablescape is up 🙂 but I have had several lost messages…so perhaps it did not get through when i linked/emailed…
but certainly no worries..i just wanted to let you know that i love the idea and support it as well… 🙂
i shall try and visit each of these blogs…and i am sure to have a grand time!
That is really beautiful like the rest of your wonderful home
Thank you so much for such detailed instructions on how to make this centerpiece. You are so talented.The last photo is incredible.
Hugs,
Chris
What a great idea for a centerpiece I am thinking already on how i can use this with a twist for the summer table scapes;) Thanks for sharing and hosting of course;) Hugs French;)
Good morning Susan…I can’t wait to give this a try…my friends will be fooled into thinking I’m brilliant…and I won’t tell them any different…LOL
Happy New Year! 😉 Bo
Thanks so much, Susan! I’m saving this post for future reference.
I’ll be visiting the tablescape posts, today and tomorrow. I intended to put something together here at the condo, for a TT post, but didn’t get to, due to an inner ear infection. We arrived yesterday around noon, plenty of time to put something together. By the time we unpacked I was very tired and took a nap…woke up dizzy so went back to sleep and just now woke up at around 5AM…not all together yet, but well enough to read my blogs.
Your poll was a wonderful idea. I love seeing what everyone is interested.
Thank you for this, Susan. I know it will come in handy in the future.
susan, what fun this must have been to put together..thanks for sharing. You know I’m going to be on the “look-out” for one of these fun objects to work into a tablescape..:-) I’m off to see the other great creations..
Thanks for hosting another “great” Tablescape Tuesday..hugs ~lynne~
Bravo…it is just as beautiful today as it was when I first saw it. Thanks for the instructions they will be most helpful for future projects.
Happy New Year!
Thanks for being such a gracious hostess!
Thanks for the tutorial Susan!
And for hosting this fun day, week after week!
Susan,
I must have neglected to click on the PUBLISH YOUR COMMENT button last night, to let you know that I had posted a table setting for today. 🙁 I noticed that you had requested a notice be in by eight and I was late and hurried to get it in. That will teach me to be in such a hurry. SO SORRY….:(
HUGS
‘D’
So clever.Thank you for always sharing your secrets.Happy New Year dear…Ann
This is such a beautiful centerpiece, Susan! Thank you for sharing the “how to” with us!
HAPPY NEW YEAR, HAPPY NEW DREAMS COME TRUE!
Susan this is just beautiful and so creative. It’s totally over the top! Deb
Hi Susan, Even vacation can’t keep me away from your blog. Sure glad I stopped by. Can’t wait until I can actually “get to this” on my own computer. I’m so happy that I stole a few minutes away from Legos and storybooks for this reward. I wondered how you did that fab centerpiece. I’m going to find one of those forms or build one!
hugs~ carol
Thanks for sharing this info. They are beautiful. Sally
Gorgeous, Susan! Thank you so much for hosting this fun ‘event’!!
Hello Susan…
Girlfriend, I’m so glad that you gave us the instructions for making this beautiful “one of a kind” centerpiece!!! I was wondering when I first seen it…just how you got all of it to stack up and stay put…hehe!!! Anyway, it’s absolutely gorgeous!!! I sure would like to try one! I was thinking…(oh my, and that can be dangerous..hehe!) but if one had the time…they could do pretty little designs in the apples with cloves…that sure would give off a nice “Christmasy” fragrance!!!
Thank you so much to taking the time to photograph the steps and for all the instructions…I just love the “crafts and how to’s”!!! Have a great day, my friend!!!
Love ya,
Chari
Susan, thank you for always being willing to share your ideas with all of us out here in blogland.When I went to Williamsburg I got inspired by the same centerpiece and have yet to do it.You have inspired me to look at it again.I would really like to do the fan above the door but am afraid it would rot in the Calif sun on my porch, have you ever done that one? Kathysue
Thank you Susan. This ia great that you share this step by step. It looks so festive and to add the pineapple candle holders.
I just love reading your blog, so many beautiful, yet simple, things to browse through. I have to pour a cup of tea and settle in so I can take my time, relax and enjoy.
I hope you had a fabulous Christmas and have a wonderful prosperous New Year. May you and your family all be blessed with good health and happiness in 2009.
Susan, I love your centerpiece. You always have such great ideas. Thanks for showing us how it was done. Your entire table is set so pretty. I just love visiting your blog. Hugs, Terrie
It seems like I’m always behind lately. If DH’s vacation doesn’t end soon, so that he goes back to work, I may never catch up. Love having him home, but it does play havoc with my schedule.
I am sorry I am so late to the crafting party. Looks like a wonderful project, if I can find a few necessary items that I’ll keep on the lookout for. Thanks for the instructions. HAPPY NEW YEAR!
Happy new year..Zehr@
My husband is taking notes! LOL! Well, that’s a good thing, because this is gorgeous and now I see – DO-ABLE! Thank you for showing the rest of us how to do it! Makes it a little easier to TRY to catch up with you! LOL!
Susan,
Just beautiful. I took a 56 week course in floral design and made a boxwood tree something on the same idea. I noticed you did not use a table linen. I like the way the candles reflected off the wood on the table top. I will have to leave my table linen off the next time I set my table. You are so talented.
Shirley
Lovely centerpiece for your table. Thanks for the step-by-step instructions. You are amazing!
Happy New Year!
Joyce
Hi Kathy,
I’ve ALWAYS wanted to do the fan over the door…I think those are AMAZING! Unfortunately, I’ve never had a front door that it would work over…always had a large pediment or something in the way. I did get to see one once in person though above someone’s door here in Atlanta…and it was gorgeous! 🙂 Susan
These centerpieces are so great and I’m so glad you showed us how to make them. What cool pieces of equiptment to make the job easier!! Happy New year to you and yours Susan!!
Susan, I would love to join your Tablescape Tuesday group. I posted today, but it was done without much time to prepare. It looks like a lot of fun! Please add my blog to your list.
Hey Susan; Thank You so much for sharing oh how to make the lovely fruit tree. You made is look easy, when it looks very difficult. Your table setting is just gorgeous. I can’t wait to try my hand at making my own.
Hugs;
Alaura
What a beautifully created centerpiece, Susan. Thanks for the step by step instructions! Happy New Year!..Christine
Hi Susan! My mother made those apple trees! I could smell it when I read your instructions! Thank you for the instructions and the memories 🙂
When I get my all consuming project finished here, and finally have any extra time at all, I’d love to participate in your tablescaping Tuesdays! A treat I look forward to seeing each week!
Happy New Year to you and yours, and thank you for visiting my world and your kind comment.
xo Isa
This is just beautiful. I am saving this idea for next year, have the perfect spot in mind! Thanks for the tutorial, it’s nice to know the “how to” behind the “that’s gorgeous” lol. Kathy
Hi……
Your blog is really interesting… Keep posting…. Wishing you ” A Happy New Year”
Hi……
Your blog is really interesting… Keep posting…. Wishing you ” A Happy New Year”
Thanks so much for sharing this…
it is so beautiful. Altho I don’t have the magnolia leaves, I do have the holly and red berries.
We are having a party tonight for 20 to 30 and I so wish I had this beautiful centerpiece for my large table. I am unsure what I will use…something simple, as there’s no time for anything fabulous…oh, dear…maybe my Rum Cake on it’s pretty cake plate with holly and berries all around…not sure yet…
HAPPIEST NEW YEAR, dear friend,
love, bj
Your table center piece is so lovely, I made one years ago, but you have found great pieces to hold the apples and pineapples together. It turned out for more beautiful than the ones I used to do. I love the one you made for each side of the main arrangement.
Beautiful table, thank you for sharing how to make the center piece.
Beautiful Post!! Just stopped by to wish you a very Happy New Year!!
Thanks for the helpful tutorial.
I wish you and your loved ones a happy and prosperous New Year!
Carrie
Sweet Sue~~~ Sending the WARMEST WISHES for the HAPPIEST & HEALTHIEST year ahead… EVER! Love and hugs, Linda
I got your email and we’re all set, I think….I’m charmed.
I added you to my blogroll with the little icons…so cute.
Happy New Year!
Susan.. I’ve so enjoyed this past year getting to know you. Your friendship means the world. Found the centerpiece at Willamsburg today..I’ve been a good girl and haven’t ordered it yet..but you know me..it is weighing heavy on my mind..lol. Mr. P and I wish you a very Happy New Year darling..
hugs ~lynne~
Thanks so much for sharing. I saw something similar in Colonial Williamsburg. Your dining room is lovely. Happy New Year.
Sweetie
LOVE THE STEP BY STEPS!!!!
HAPPY NEW YEAR!
Susan – your tablescapes are always so beautiful and inspiring! I’ve already visited the link you posted for the centerpiece form and am going to order it in the next day or so. I can’t decide between the large or small one!!
Hope you have a Happy New Year ~
Thanks for taking the time to measure and get back with me – I’ll order the large one since I would use it on my DR table.
I still have my wreath on my front door, but all my inside decorations are put away – I take them down the day after Christmas – always have!!
Have you been by Chari (Happy to Design’s) blog today? She has a very cute post about the past year and some of you RMS’s and mentions you – it is quite funny!! If you get a minute or just need a break, you ought to swing by there!!
Gorgeous table center piece! Bravo!
Happy New Year. Wishing you many blessings in 2009 🙂