
Each summer I like to create a table setting with a carved watermelon centerpiece. I missed last year but I couldn’t let this summer get away without trying a new one. They are just so much fun to do! (You’ll find the table setting below here: Summer Table Setting with Carved Flower Garden Watermelon Centerpiece)

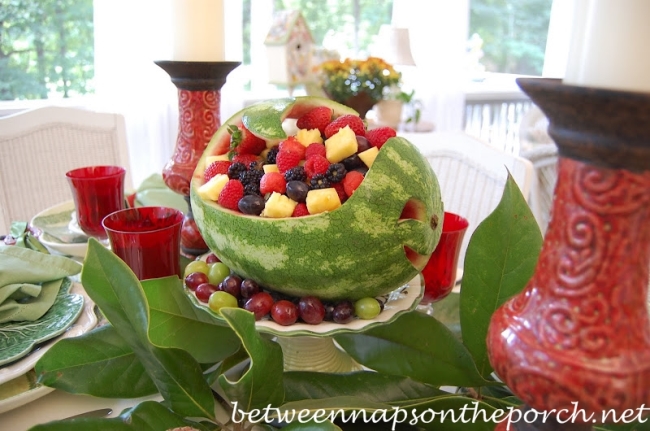
Two summers ago I carved this whale centerpiece. You’ll find the tutorial for this guy here: Carve a Whale Watermelon Centerpiece
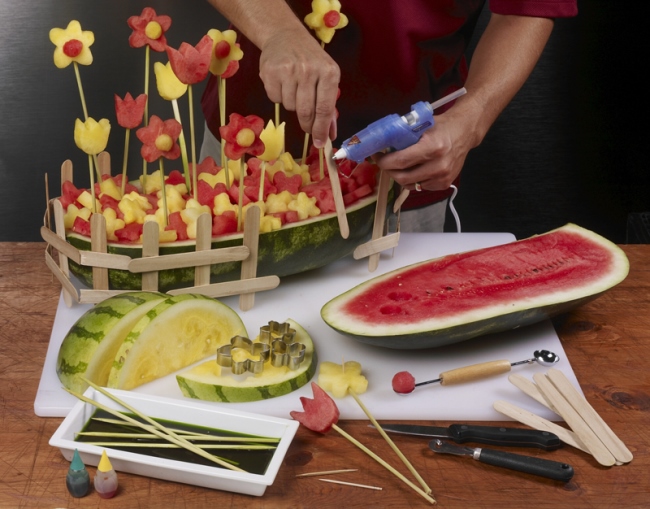
This summer I decided to try my hand at a cute flower garden centerpiece I found at the website, watermelondotorg. I have all things gardening on the brain these days, so why not a flower garden for the table!
I gathered together the things I would need: Seeded Red Watermelon, Yellow Meat Watermelon, Cantaloupe, Blueberries (not pictured) Skewers, Craft Sticks, Green Food Coloring, Green Pipe Cleaners, White Spray Paint-optional, Glue Gun or Fabri-Tac, Flower & Butterfly Cookie Cutters, Wood Tooth Picks.
Note: The directions called for a red seeded watermelon so that’s what I used. I now think a seedless one would have been better because there wouldn’t be any seeds showing and getting in the way. Next time I make this, I think I’ll go with all seedless melons. The directions also called for using a melon baller, I got mine out but never used it.
Tip: If you can’t find a yellow meat watermelon, pineapple will work just fine.

In the example centerpiece , the picket fence was left natural. The stems of the flowers appear to have been left natural, too although the directions said to dye them green. Ummm. They don’t look dyed in the example pic, do they? I did dye mine as you’ll see in just a sec.

Picket Fence
Since I wanted a white picket fence, I spray painted the craft sticks I found at Michaels. They come 60 to a bag and I ended up using a little over half, around 40 craft sticks to make the picket fence.
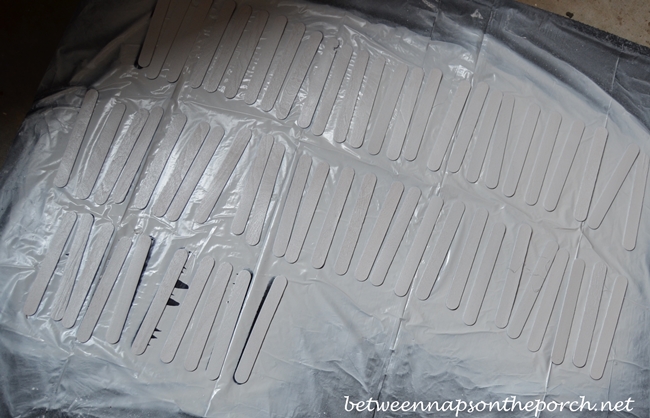
Once the craft sticks were dry, I glued them together to create fence sections. The directions recommended using a glue gun. Since I always burn my fingers when I use a glue gun, I first tried gluing them together with Fabri-Tac. Fabri-Tac does work but it was taking a little longer to dry than I liked. The last time I used it was when I made a Pottery Barn Knock-off Banner for the 4th of July. That was on fabric and it dried super fast. It seemed to be taking a little longer on the wood so I broke out the old glue gun and used it instead.
I made the fence in sections, three pickets wide. I just eyeballed them for spacing, not taking time to measure. I did try to keep the pickets evenly spaced, though. I glued two finished sections together (top left section of pic below) just to see how that looked.

Flower Stems:
The directions said to dye the skewers green by soaking them in green food coloring. I had some of the “Wilton Icing Color” in the color, Leaf Green. I mixed a hefty amount of Leaf Green into a little water in the bottom of a glass casserole dish and soaked the sticks. After a few minutes I checked on them and they didn’t appear to be changing color one bit. Maybe if I had left them to soak all night it would have worked, but since I didn’t want to wait, I took a paper towel and rubbed the food coloring onto the sticks.
That technique worked great…in the beginning. But after the sticks were all dry and I started using them to skewer the melon flowers, the green dye started running down like crazy as it got wet. Oops. So I ended up wiping some of the dye back off. I noticed if I wiped off too much, the skewers were no longer green. I had some really stubborn skewers that were just not interested in being dyed green!
Side Story: The next day I headed up to a garden nursery in another county to shop for shrubs for the front yard. As I was chatting with their landscape designer she asked, “Why are your fingers green?” 🙂 I should have said something clever like, “I’m such a great gardener, I’ve advanced passed the thumb stage!” Hee, hee. But like a dork I told her I’d been dying wood skewers to make flower stems for a centerpiece. You know she thought I was crazy!
So be forewarned, if you decide to go off road when dying the skewers, you too may have green fingers for a week! 😉

Making Leaves and Butterfly Antennae
I already had a big bag of pipe cleaners and the bag contained several different shades of green. I ended up using different greens for the leaves. Making the leaves is easy, just loop the pipe cleaner into a leaf shape, leaving some of the pipe cleaner hanging down for attaching to the stem. It’s best to attach the leaves to the stems prior to adding the melon flowers to the stems. Snip off the little tails (excess pipe cleaner) after securing the leaves to the stems.
I used a couple of different colors of pipe cleaners to make the wee butterfly antennas. Again, they were super easy to make. I used a pair of needle-nose pliers to curl the tips of the butterfly antennae.

Flower and Butterfly Cookie Cutters:
I went to several stores in search of flower-shaped cookie cutters and struck out. I asked my fabulous Facebook friends if they knew where to find them and someone mentioned they had seen them in Wally World. That’s where I found the ones you see on the left. Searching for cookies cutters was a bit of a challenge; I felt like Goldilocks in the story of The Three Bears. The flower cookie cutters I found were either too large or too small. The smallest flower in the box from Walmart (on the left) worked great!
I also needed to find some butterfly-shaped cookie cutters. I found the “Fox Run Mini Flower and Butterfly, 11 Piece Cookie Cutter Set” online at Amazon for just $3.25 ($7.25 with shipping) If you want to order those, just search by that name on Amazon and you should easily find them.
I also ordered a Wilton set of three cookie cutters that included a regular flower shape, a tulip shape and a butterfly. I bought that set (not pictured) for the tulip but they turned out to be way too large so I didn’t use them. They’ll make cute cookies next spring, though.

Slicing the Top Off the Watermelon:
I forgot to take pics of slicing the top off the melon but it was way easier easier than I thought it would be. The key is using a super sharp knife. I used a very large and very sharp butcher knife. I turned the melon up on it’s side so I could make a nice, straight cut off the top. In other words, I rolled the watermelon onto its side and I sliced off about 1/3 of the melon just like I was slicing off a big slice of bread.
Here’s a photo from watermelondotorg and you can see how much they sliced off the top of the watermelon.
Cutting out the Flowers with the Cookie Cutters:
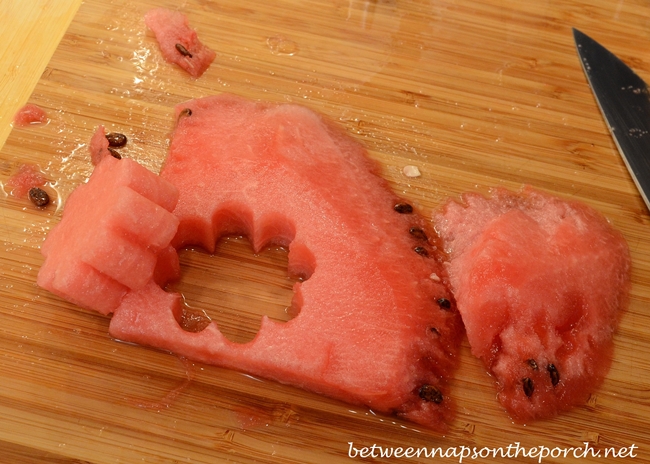
I cut out large sections of the watermelon to use for the flowers, although the flowers were mainly cut from the 1/3 portion of the melon I had removed from the top. I sliced that 1/3 section in half again to get a nice section from which to cut the flower shapes.
Using the smallest flower shape from the Wilton set I found in Wally World, I cut out bunches of flower shapes. Notice how thick the flower is in the picture below. When the flowers came out too thick, I just sliced them in half again which gave me two flowers just the right thickness. I also cut flowers from the yellow meat watermelon.
I used the same cutter to cut flowers from the cantaloupe.

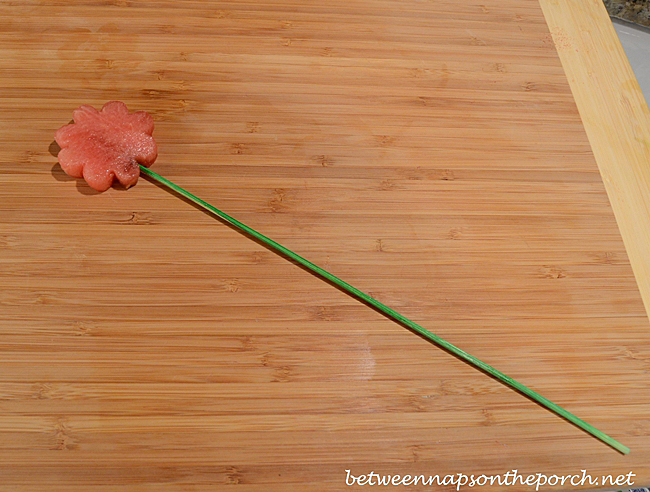
Once I had my flowers all cut out, I stuck a dyed skewer stem into each one and started placing my flowers in my garden.
Attaching Flower Centers with Toothpicks
I used blueberries to create centers for a few of the flowers. You can use melon balls, if you like. My melon baller didn’t make small enough balls to use them as centers so I just went with blueberries. I like the color contrast better anyway.
To attach the blueberry center, I broke the tip off a wood toothpick, breaking off about 1 inch of the toothpick. I just stuck one end into a blueberry…
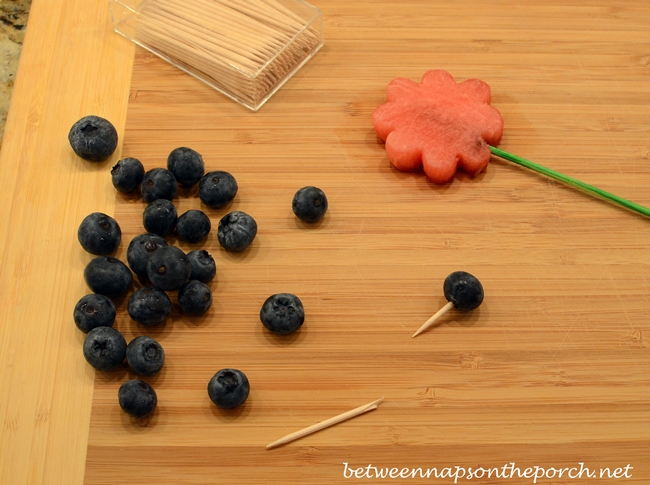
…then pressed the toothpick onto the center of the flower.

Using the butterfly cookie cutter, I cut out several butterflies from the melons and cantaloupe. To attach the pipe cleaner antennae, I pushed the green skewer all the way through the butterfly until it stuck out the top just a little, then I wrapped the antennae around the top of the skewer. You can see that pretty well on the yellow butterfly on the far right in this picture below. It helps to create a little loop (in advance) with the pipe cleaner that you can then slide over the top of the skewer, prior to adding the little antennae to the top.

Cut out plenty of flowers and butterflies to fill the watermelon back in all around the stems.
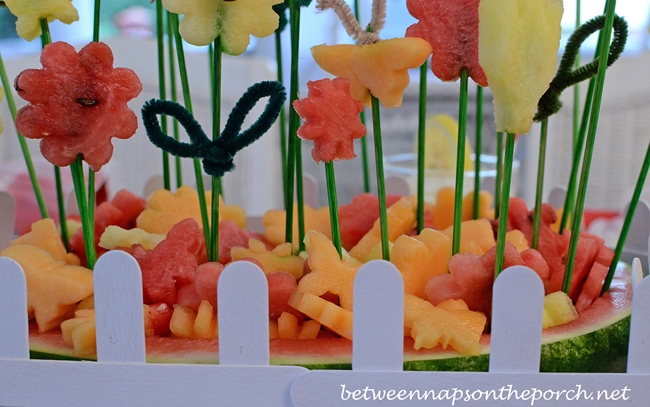
Assembling the Fence
I didn’t hot glue my fence pieces together, just leaned them up against the watermelon. If I had been serving this for a party, I definitely would have taken the time to glue the fence pieces together so they wouldn’t fall over if bumped.
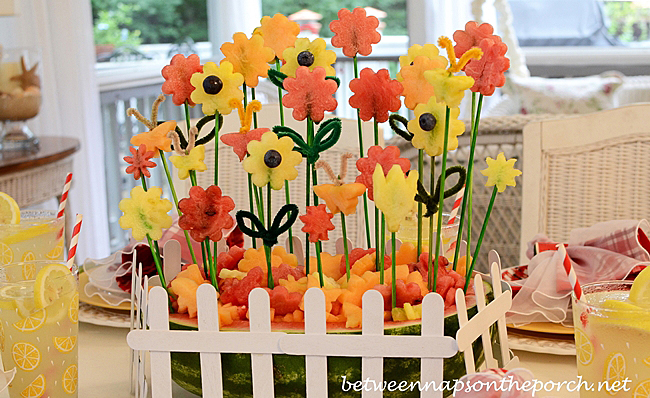
So that’s it! My final advice would just be…make the fence, dye the flower stems and make the leaves and antennae all in advance so once you begin making your centerpiece, you won’t need to stop to do any of those things. If you do have to stop at some point, cover all your fruit will plastic wrap and place it in the refrigerator. It’s best to make this centerpiece all at once since melon can look a little odd if it’s left out too long.
I hope I covered everything but if I didn’t, feel free to ask a question.
Wouldn’t this centerpiece be pretty sitting on some of that fake/synthetic grass, the kind that looks so real. I could see making a table liner with the synthetic grass and placing this edible garden in the center. That would be so cute!


Susan,
Is there nothing you can’t create? You amaze me with your creativity skills! I have receive several of these Edible Arrangement gift baskets on special occassions and I wondered how or where the people bought the cutters for these shapes. I will keep this to refer back to. I would have never thought of the popsickle sticks or dying the skewers green. I will look back over this tonight sometime so my brain can absorb it! Thanks again for sharing this. I loved it! Where did you find a seedless cantaloupe? Is it a specific variety?
Thanks so much, Betty! It was much easier to make than I thought it would be…really a lot of fun! Sticky, but fun!
Susan,
Such a cute idea. Funny thing….Last night a received a mail order catalog called Fresh Finds. On page 55 is a kit with all you need for $10.95!! It has the little cut out plastic cutters where you can do several at a time. Heart shaped, star shaped, flower and butterfly as well as two more (6) total, bamboo skewers and a guide book.
It mentions you can also use for cheese, finger sandwiches etc. When I saw it I thought that is what you used.
You are so creative to gather your own kit! Love it!
Shelly
Shelly, that’s sounds perfect if they are the right size. If they would work for finger sandwiches, sounds like they might be a good size! Thanks!
This is so cute! Great job!
Thanks, Jann!
Get a cool glue gun-it works just as well and you won’t burn yourself. I got mine at Michael’s years ago. It’s really good for fragile things that can’t take the hot glue. Not expensive at all
Sandi, I didn’t know they made cool glue guns. Do they just not get as hot?
The glue is barely warm-I rarely use my hot glue gun any more. My cool gun is smaller and uses smaller glue sticks but I imagine you can get any size-seems like mine cost about $5. I’ve probably had it 10 years-got it at Michael’s.
Well, you could fry french fries with mine…it’s evil! I’ll look for one that’s cooler next time I am in there. I have a coupon now so I’ll check ’em out.
When I see this, I think that is a hostess that really cares about her guests.
Thanks, Madonna! You guys were my guests for this table! 🙂
This is just darling Susan, and I can see why you feel it’s fun to make. It reminds me a little of the button bouquet I made…labor intensive but fun nonetheless!
As always, it looks adorable on the table!
Thanks Doreen! It’s not too bad if you do some of the things in advance. Happy Friday!
Oh, Susan,
This is too cute! I love it. Thanks for the wonderful tutorial.
Susan, you are such an inspiration and so creative. I am looking forward to trying this myself after seeing how wonderful yours turned out. Last night I was at a Pampered Chef party and saw fruit and cheese cutters that look like they would be perfect for this. I ordered them and now can’t wait to get them and start creating!!
Susan, I’m pinning this because I’m going to make this next spring for our annual golf benefit party! I already have a container that has a picket fence around it and the cookie cutters. Oh yes! I can see it on the table right now! Thanks for your inspiration!
That sound perfect, Jane! You’ll have fun making it. 🙂
Susan,
That is absolutely adorable! I always thought a watermelon bowl, baby carriage or anything was so creative and cute, besides being a perfect conversation starter on a great centerpiece. I also love your white picket fence; that was a great idea! Thanks for sharing your wonderful ideas!
Pat F
Las Vegas
Thanks, Pat! Appreciate you!
Oh, Susan, you have outdone yourself!!
Rosie
Thanks, Rosie!
All I have to say is WOW!
Happy Saturday Susan!
I am going to a BBQ on Labor Day weekend and I am making this to bring! I love it!
LL
I have ordered several items from that Fresh Find catalog that Shelly mentioned and find their quality very good. I haven’t rec’d a catalog from them in a while, will pull up their website and see if there’s something I can’t resist and it might be what Shelly is talking about!
Susan, since you’ve used your cookie cutters for this project, why not do a article about using those cookie cutters for other parties, like for cocktail parties or showers, etc.? Maybe others have throw parties where they used special cookie cutters for party foods. There’s this lady at our church that loves to make party foods and sometimes she will make cucucmber/cream cheese party rounds for a Memorial service or another special occassion and send it with her husband, as she is wheelchair bound and doesn’t come to church anymore but her husband is active. She made some of the most adorable deviled eggs in 2012 and sent them by her husband. They were decorated like a baby chick’s head. Too adorable to eat. Used raisin for eyes and I think a carrott piece(small)for the nose and it looked as if the chick had a hat on (white of egg).
When she makes the cucumber/cream cheese rounds, her cucumber rounds are paper thin and they get pressed into the cream cheese spread and she sprinkles some type of herb on top. I think it might be dill. Beautiful!
Betty, those deviled eggs sound adorable. And don’t you know she had so much fun making them! That would make a fun post…all the “other” uses for cookie cutters.
Forgot to tell you that I found a set of 4 or 6 watermelon wedges napkin holders at the Human Society Thrift Store and I’m saving them till next summer to use.
Good find, Betty! You’ll enjoy using those every summer!
Oh my word…..this centerpiece is precious! You inspire me (as you always do) with your creativity! I might gather up my courage and supplies and give this a try!
Thanks, Tammy! Go for it! Really is fun to make.
Thank you for the tutorial. I plan to use this idea for a birthday party cook out that I am planning for the week after labor day. I have lots of gloves to keep the green where it belongs on the skewers. What a fun way to serve fresh fruit. I wonder if I would be able to get some fresh mint or parsley to stick to the skewers to use as leaves.
That would be so cute! Do you think it would wilt? Would be a lot cuter than pipe cleaners if it won’t wilt to fast. I bet mint would last pretty well.
Susan,
Although you had your trials, dear friend, I believe this is a doable centerpiece!
Thanks for all the tips and what to avoid or do ahead!
I think this centerpiece is absolutely charming!!!
I have placed this in my resource file. . .one never knows what another year may hold!!!
Fondly,
Pat
Thanks, Pat! I would definitely make one again sometime.
Thank you for the gorgeous idea! Your watermelon flower garden looks just amazing! Can’t wait to try it by myself!
Adorable. You’re so talented! I’m definitely going to try this… wish me luck:)
Thanks, Katie! It was a lot of fun to make!
Susan, this tablescape from 2 years ago still intrigues me! I have a couple of questions about your centerpiece. First of all, did you make your picket fence? The wooden slats seem too big for popsicle sticks, so I would like to know how you went about this. Secondly, what did you use for your green flower stems? I AM going to try this one day! I assume you attached the butterfly antennae and blueberry flower centers , possiblywith broken toothpicks. If I do make this one day, I want to have all my ducks in a row! As you probably are on March 10, 2016, we are having a soggy day. Your Tablescape Thursday today was truly a brightening spot on such a gloomy day.
Thanks, Martha!
The “pickets” are craft sticks I found in Michaels and spray painted white. The green stems are wooden skewers that I dyed green.
Martha, I’m not sure if you can see the post to read it, maybe you’re reading this via a phone or something, but when you can get to a bigger screen or computer, read this post because I go into a lot of detail about the pickets and what I used for various parts, including how I held the center to the flower with toothpicks. You’ll find all the answers to every one of your questions in the post, but let me know if you have any additional questions. It was fun to make, you’ll have a blast with it! 🙂
Susan, I’m so embarrassed to have asked you questions after seeing your detailed explanation above. I was on my phone, and somehow I was not able to put up all the information on this post. I can’t wait to try this!
No, don’t be one bit embarrassed! I figured you were trying to read it on a phone which is so difficult to do. I’m eager to try another watermelon centerpiece this summer. There are so many neat ones to make!