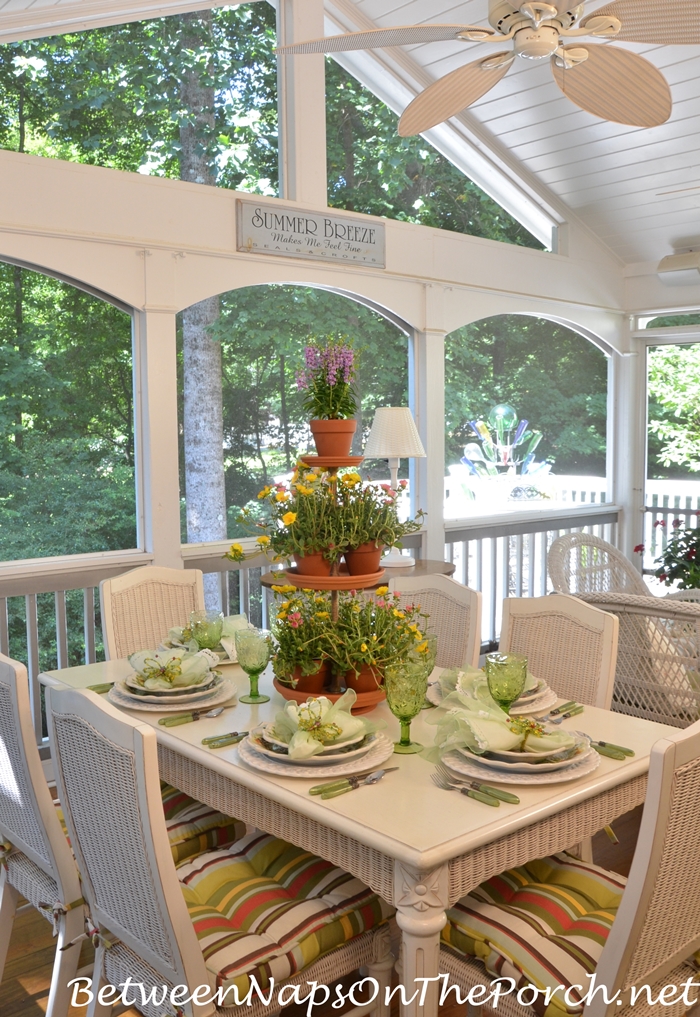
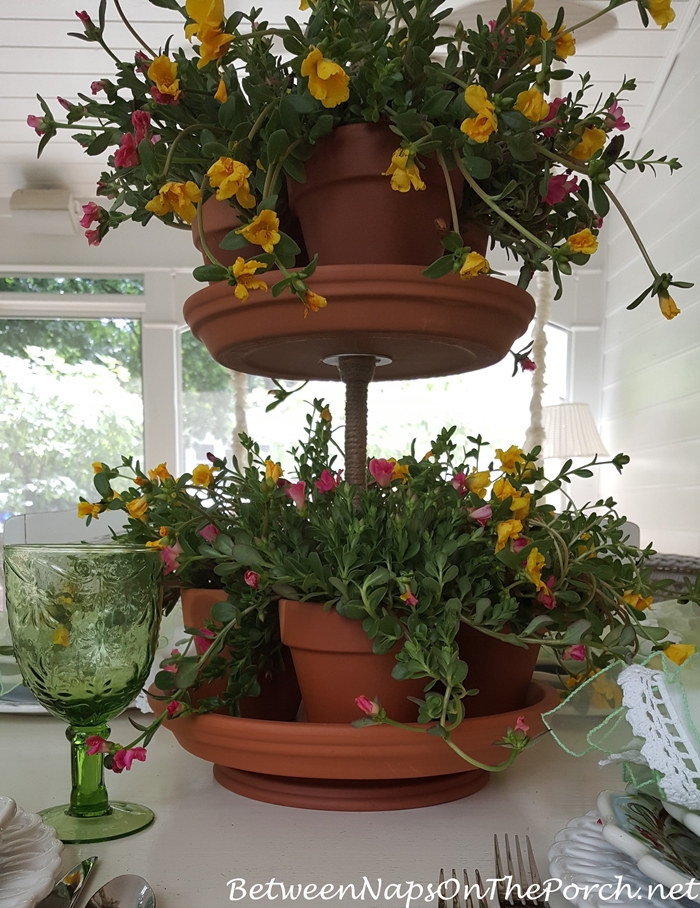
Yesterday for Tablescape Thursday, I shared a table setting featuring a 3-tiered planter or plant stand as the centerpiece.
Today I’m sharing detailed instructions showing how I made the planter, in case you would like to make one, too. This is one of the easiest DIY projects I’ve ever made and it only took about 1-1/2 hours to make. Well, maybe a little longer for the jute part, more on that in a sec.
I first fell in love with this tiered plant stand when I Googled for painted potting benches to get ideas for what color to paint a potting bench I had just purchased. Google took me to this adorable potting bench on the Lowe’s website.
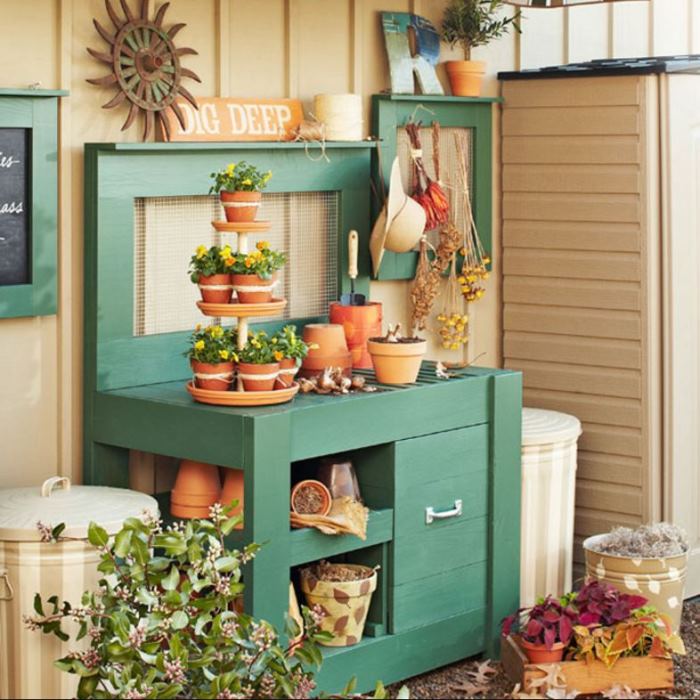
Photo from Lowes.com
Oh. My. Goodness! I loved the planter the minute I saw it and knew I had to make it. It temporarily made me forget all about the color search for my potting bench. lol
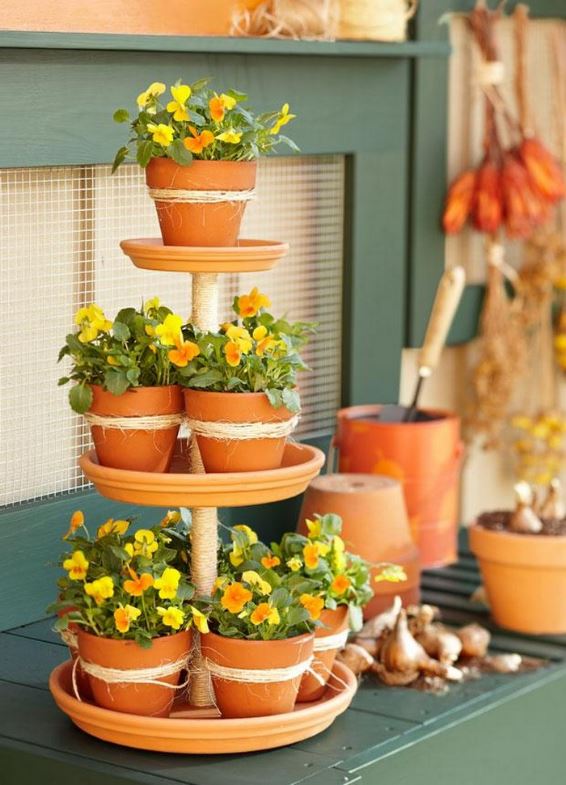
Photo from Lowes.com
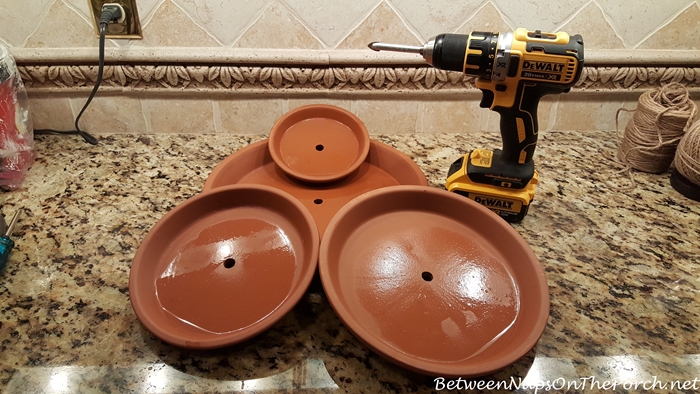
The instructions I found at Lowe’s were great but there were a few errors which I’ve corrected in this tutorial. To make this planter, these are the supplies you’ll need:
1 12-inch terra-cotta saucer (Instructions at Lowe’s said to buy a 11-inch saucer. I looked in two different gardening stores and couldn’t find one. At Lowe’s I discovered the item number they mentioned is actually a 12-inch saucer, which made more sense anyway.)
1 10-inch terra-cotta saucer
1 8-inch terra-cotta saucer
1 6-inch terra-cotta saucer
1 4-inch terra-cotta pot
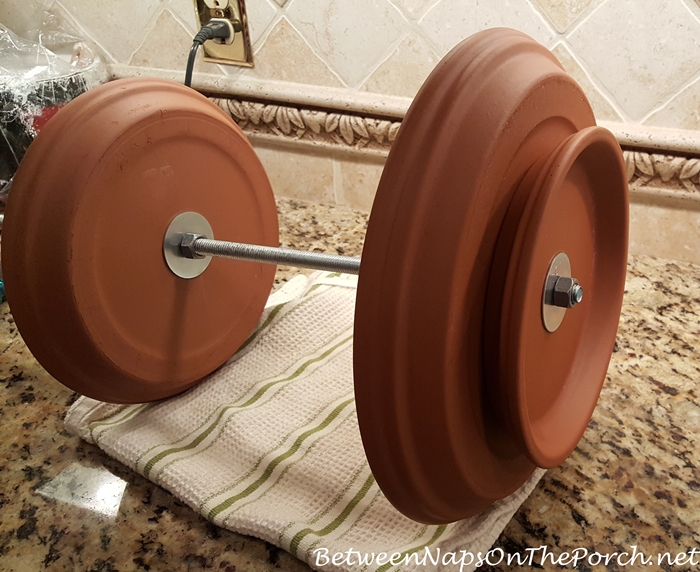
1 1/2-13 x 2-foot threaded rod (This is a 2-foot threaded rod that’s 1/2 inch in width and the number 13 refers to the thread size.)
Jute or sisal twine (Directions called for sisal but I used jute because I already had that on hand)
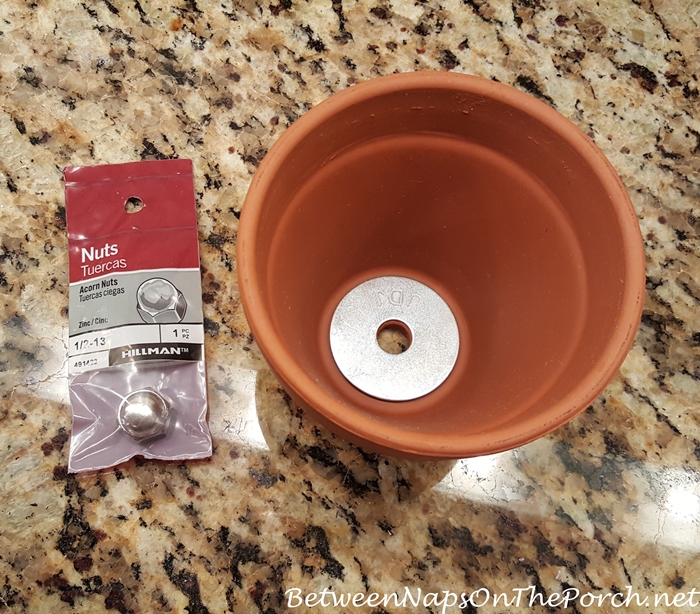
6 1/2″ x 1-1/2″ zinc-plated fender washers
5 1/2″-13 hot-dipped galvanized zinc hex nuts
1 1/2″-13 cap nut (Lowe’s instructions said to buy a 5-pack, but that’s not necessary. You only need one and they were sold individually at the Lowe’s I visited.)
Drill
1 1/2″ glass-tile bit
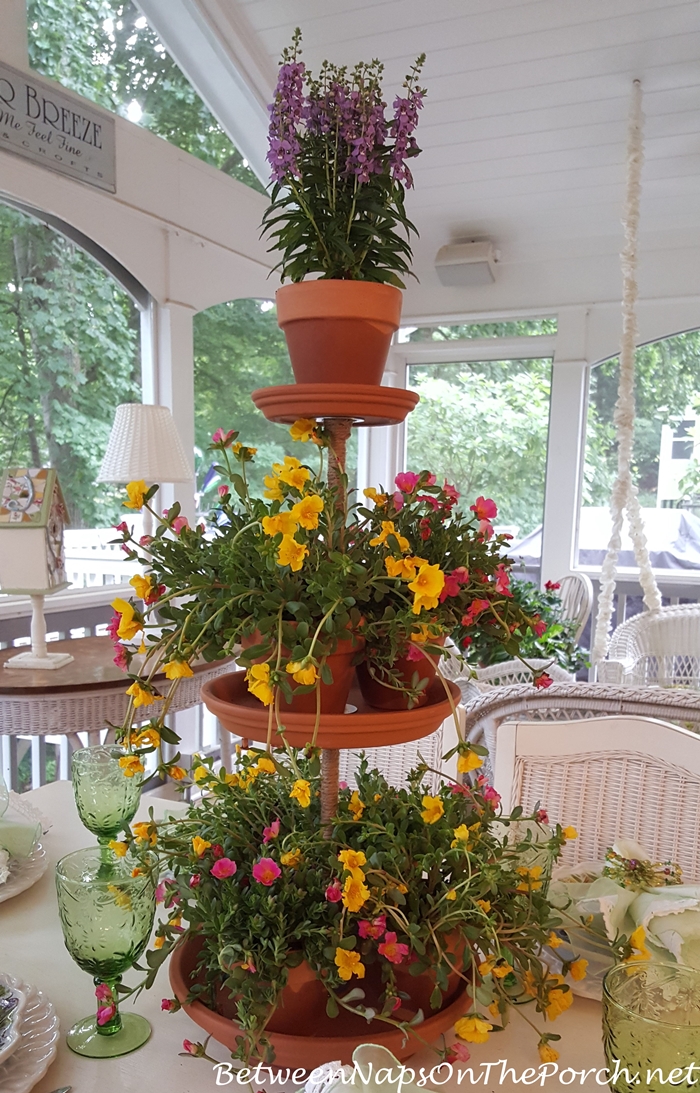
Optional: 7 additional 4-inch pots (I used 4 inch pots for my plants and 4 fit comfortably on the bottom tier and three fit comfortably on the 2nd tier. You can barely get 5 empty pots on the bottom saucer, but once you put flowers in them, it doesn’t work. There’s just not enough space between the pots.
As mentioned above, the instructions at the Lowe’s site were incorrect on one of the saucer sizes. The instructions called for an 11-inch saucer. I looked in two gardening centers, including Lowe’s, and couldn’t find one. I’m not sure they even make an 11-inch saucer. Glad I couldn’t find one because if I had used that size in this project, there’s no way 4-inch pots would have fit on the bottom tier. So, ignore the instructions at Lowe’s and buy a 12-inch saucer.
Oops! Just realized I left the 4-inch pot out of the picture below, and accidentally included a smaller saucer that you don’t need. So ignore that smallest saucer in the picture below and don’t forget the 4-inch pot that goes on top!

The first task, and the trickiest (if there is a tricky part to this project) is drilling a hole in the center of each saucer. You’ll find an easy tutorial for finding the center of each saucer in this previous post here: How to Find the Center of a Ceramic or Clay Saucer
I’ve had a wee bit of experience in doing this, but it was many, many years ago when I made a “Pot Puppy” following directions I found in a Southern Living Magazine. So, I really couldn’t remember anything from back then.
Here are the two most important tips for drilling a hole through the center of a clay saucer:
- Wet down the saucers thoroughly and drill slowly. A wet saucer is much less likely to crack.
- Drill pointing straight down. In other words, try to not tilt the drill bit. Just drill straight down into the center of the saucer.

I purchased two of every size saucer so if I had one crack during the drilling, I wouldn’t have to get in the car and drive back to the store in the middle of the project. I was glad I did because though none of my saucers cracked, when I started the project I discovered one of the 12-inch saucers I had purchased had a big chip on the outer edge. So when you buy your saucers, look them over carefully and consider buying two of each size just in case one does crack. You can return the ones you don’t use later.
I couldn’t take photos and drill at the same time, so I’ll describe how I drilled the hole for each saucer. To start with, I thoroughly wet each saucer in the utility sink in my laundry room. Then I placed the saucer on the corner of the sink where it was well braced and had a big gap underneath. (My sink is a big, plastic tub-type sink so I didn’t have to worry about scratching it.) I had a small amount of water standing in the saucer because it’s great if you can keep the saucer wet while you’re drilling.
Another way to do it would be to find two objects that you can place in the sink that won’t slide or move. Then place your clay saucer on top/in between them. Just make sure that they are situated where you won’t hit one of the objects while drilling. If at any time your saucer looks like it’s getting dry, re-wet it before continuing. I actually had water running slowly into my saucer while I was drilling, but my drill is battery-powered. I wouldn’t do that with an electric drill…too risky!
I didn’t have any saucers break and everything went smoothly. It’s a cinch to drill through a clay saucer with a glass/tile/ceramic drill bit. They work great!
Oh, one more drilling item: The hole that was already in the 4-inch pot that goes on top, wasn’t quite big enough to go over the rod when it was time to place it on the top at the very end of the project. So, I wet it down and drilled out the hole to make it a little bit bigger. More on that later in this tutorial.
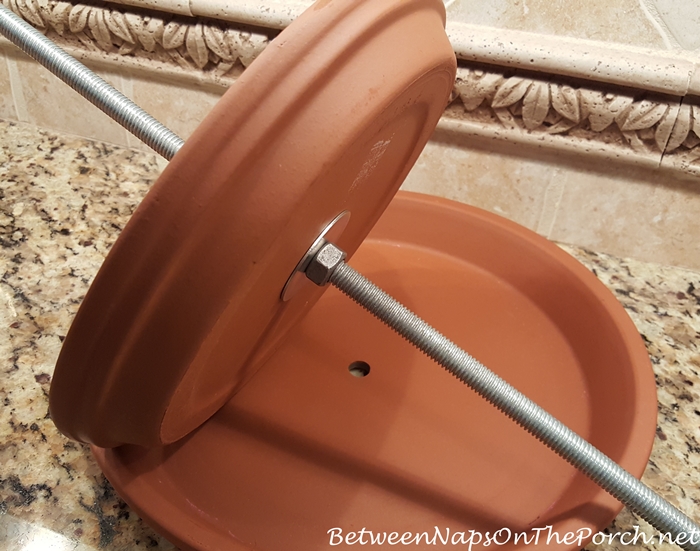
Next, find the center of the threaded rod and mark it with a sharpie. Place the rod through the hole you drilled in the 10-inch saucer, then run the saucer up to the center of the rod where you made your mark. Secure the saucer into place with a washer and a hex nut on either side as shown in the photos below.
Here’s how it looked on top…

…and here’s how it looked below the saucer. The washer really gives you a nice surface on which to tighten the hex nut.
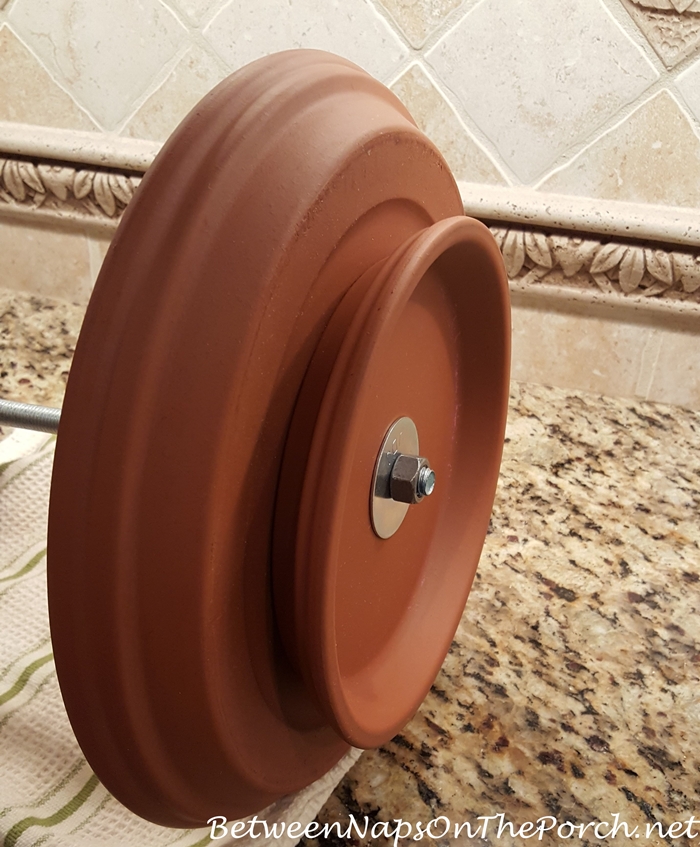
Now we’re going to put the bottom saucer on, along with the base that the whole planter will rest on.
First slide a hex nut and a washer onto the rod. Slide the 12-inch saucer on next.
Turn the 8-inch saucer upside down and side it up the rod to meet the 12-inch saucer. Secure the two saucers together onto the rod with another washer and hex nut placed below the smaller 8-inch saucer as shown below.
This will be how it looks from below.
And here’s how it will look from above, looking down into the big 12-inch saucer.
This is how your planter should look so far. Now it’s time to add the top part.
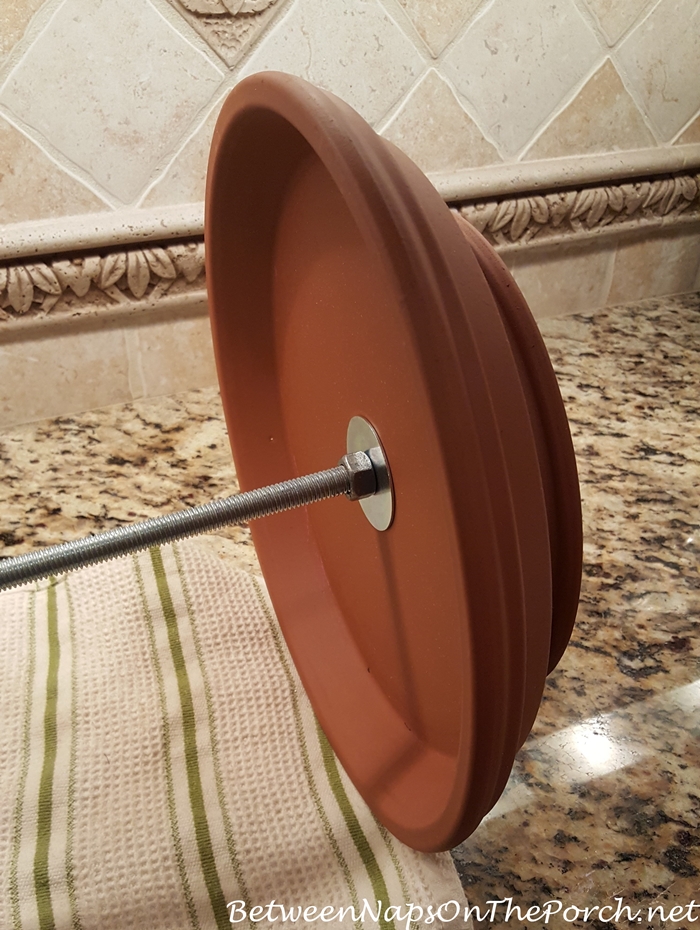
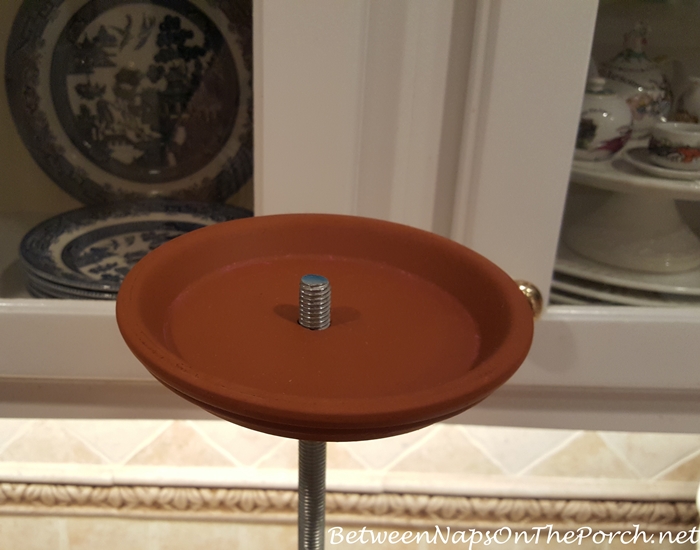
First slide on a hex nut and a washer, then the 6-inch saucer. We’ll adjust the placement of those in a minute.
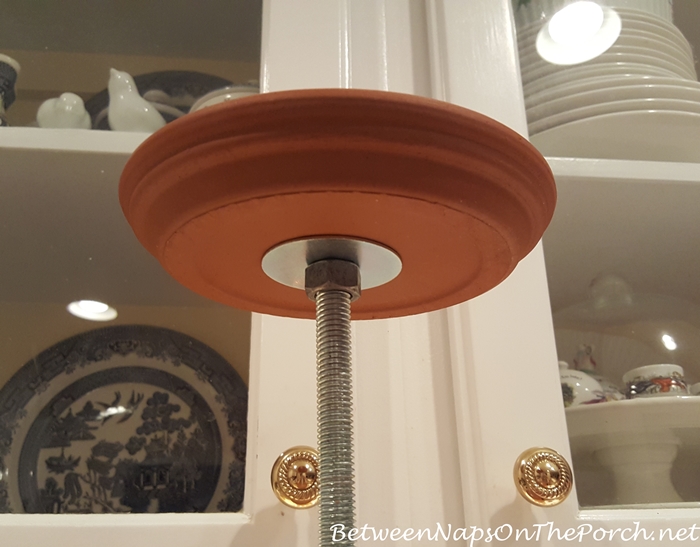
Here’s how it looks from the top, so far.
Next, place a washer inside the pot (see picture below) and place your 4-inch pot atop the rod that is sticking up out of the saucer. The hole in the 4-inch pot that I purchased wasn’t quite big enough to fit over the 1/2″ threaded rod. So, I wet the pot down and using my drill, widened the hole just a tad. That was super easy since the hole was already there, just had to widen it out a bit. Get your cap nut ready because you’re about to use it to cap this project off.
Screw the cap nut onto the threaded rod. I wanted my cap nut to be screwed all the way down, so I loosened up the hex nut I had put underneath the saucer and moved it down the rod a little bit. Then I screwed the cap nut down further.
I could tell that it could still go on a bit better, so I kept lowering/adjusting the hex nut under the saucer until I knew the cap nut was screwed down as far onto the rod as it would go. Hope that makes sense. If it doesn’t make sense now, it will when you’re doing it. 🙂

The last part, and probably the most time-consuming step, was wrapping the jute yarn around and around and around the threaded rod. I did this while watching TV.
To start it off, I used a drop of hot glue on the hex nut to attach the jute to the rod. I used hot glue because it dries quickly, but any type glue would probably work. I’m just too impatient to wait for regular glue to dry. Fabri-tac would also be a great choice since it dries so quickly.
Next, start wrapping. I’ll see you next week. Call me when you’re done. Pack a lunch because you’ll need one. This takes forever!
Actually, it probably just took ME forever because I cut off a gigantic piece of jute yarn so I wouldn’t have a break in the yarn in the middle of the rod. It’s cumbersome working with a really long piece of yarn. Looking back, it would have been fine if I had used a few smaller pieces because it’s easy to hide where one piece ends and the next one begins.

Here’s how the jute-covered rod looked once covered. The directions said to use sisal, but I just used what I had on hand, which was jute. In this photo you can also see the 8-inch pot that acts as the base for the planter. Love how that looks and works!
You’ll also find the instructions for this project at Lowe’s here: Tiered Terra-Cotta Planter/Plant Stand
Again, ignore the part about using an 11-inch saucer, it’s a 12-inch saucer that you’ll need. And you don’t need to buy a 5-pack of the hex caps, you only need one, and the Lowe’s I visited sold them as singles.
Let me know if you have any questions, happy to help.
Update: I had a question about the purpose of the bottom 8-inch saucer, the one that gets turned upside down. It acts as a base and probably offers a bit more protection when you water the individual pots since it keeps the bottom saucer from coming in direct contact with whatever you have the stand sitting on.
I think it would be good idea to use a pottery sealer, as well, something like this: Pottery Sealer. And as Dotti mentioned in the comments (thanks, Dotti!) the bottom, base saucer gives the whole piece a flat surface on which to sit, since there’s a hex nut under the big saucer. So you definitely need that 8-inch base saucer.
Big thanks to Lowe’s (this is not a sponsored post) for sharing the instructions to make this adorable planter! I absolutely love it and am thinking of making another one as a serving piece for outdoor parties. I was thinking about adding an 8-inch saucer in the mix, instead of just using it as a base. The 4-inch pot could be left off the top if not wanted, although it is a nice touch with a flower for an outdoor party. For a 4th of July party, the pot at the top could hold flags or something festive that looks like fireworks. Lots of possibilities!


Well, Susan, I’m in love with this project! It looks amazing on your beautiful summer table. I want to make it, but will have to come up with a place to store it. Maybe my shed. Is that calibrachoa in your pots? What flower is the purple one on top? It all looks fabulous! Are you going to keep in inside or put it out on your deck? I was anxiously awaiting your tutorial on how to do this; thanks for being so quick in posting it.
Thanks, Martha! The flowers on the two lower levels are Portulaca and I think the top one is Salvia, but I can’t remember now. I was just looking for something that was purple and spikey/tall. lol
I think I’m going to use it on the porch, although the flowers probably need to be where they’ll get plenty of sun. I may keep it on my breakfast table, it gets sun for part of the day. That’s where it is right now. 🙂
So adorable, Susan. I’m going to make one. I get very frustrated when the instructions are not what they should be. Thanks for the correct ones. What clever ideas you’ve come up with for using the planter besides showcasing flowers. Pinning this for sure!
Thanks, Nancie! I meant to take a photo of it without the flowers. Without the flowers/flower pots, the stand looks a bit qawky, with too much space in between all the levels. So, if someone is making it to use as a server, I really think it needs a fourth level. I’ll have to take a photo of it tomorrow without the pots/flowers and add that to the post so folks can see it that way. I love it this way with the flowers, though. The threaded rods come in lots of different lengths, so if someone wanted just a 3-tiered server to serve food on for a party (like cupcakes) they could purchase a shorter rod and then the levels wouldn’t be so spread out.
Now this is how a tutorial is done: detailed steps, lots of photos with close-ups, extra tips, and important notes in bold!!! Plus start with an adorable and useful subject.
Thanks, Mia! 🙂
Such a great project Susan, and your instructions (as always) are spot on. I think I’ll Pin this one 🙂
Quick question…the small saucer on the very bottom, what is the purpose of that?
(I know it’s often not worth the trouble, but if there’s ever a time that you need to take a pic but you need both hands for whatever it is you’re doing, put your camera on a tripod and use the timer.)
xxx
Thanks, Doreen! The 8-inch saucer on the bottom gives it a little lift, a nice base, which makes it easier to lift. Plus, it just looks nicer. It also helps to keep water off the surface of whatever the planter is sitting on when you water the plants. I have a can of sealer that’s just for clay pots and such. I think I may use it on the bottom of the saucers to help with that.
Doreen, Dotti just made a great point. Without that bottom dish, the planter couldn’t really sit flat. It would be resting atop the hex nut, which would make it wobbly. Excellent point!
Really cute idea. Wetting the terracotta makes sense, as most tile saws are wet saws. Guess that is the trick for avoiding cracks. I long for the day that I have the time for things like this. For now, I am going to be happy if I get my herbs and large urn planted today!
I love this idea and can’t wait to try my hand at it. Thanks for the great idea and detailed instructions. Have a great weekend!!!
From the pictures, it also looks to me like the 8-inch saucer on the bottom keeps the whole thing flat, whereas without it the bolt and nut pieces (probably not their real names) that stick out of the bottom and would make it wobbly and not sit flat.
That’s an excellent point! Good thinking, Dotti…bet you’re right!
What a great tutorial for a great project! I’m curious about the cost of this project….not exact but an approximation would be good to know.
Thanks, Pat! I just looked at my receipts and it was approximately $44 before tax. That includes the glass/tile bit which was $8.98. That’s a great bit to have though because you can use it to make other projects. That price does not include the 7 pots with the flowers. The little pots were .78 cents each.
Wouldn’t it make a cute tiered tray for a garden tea party? Adorable!
Thank you so much this is awesome and a perfect out door centerpiece, or even indoors where it could get sun. Thanks Susan .
Well done Susan. Thanks for the great tutorial. I’ve made my own version of the Pottery Barn roped napkin rings with the small anchor. If I can ever get my tablet to sinc with my laptop Windows 10 version I’ll download a picture and send to you. I was quite pleased with how they turned out! Have a wonderful weekend!
Good show! This looks absolutely beautiful as your centerpiece on your table. So many possibilities.
I’m in love with succulents right now and would love to make one filled with all different varieties planted in the saucers. Maybe using the grey colored clay saucers with the succulents. Thank you so much for sharing. You never cease to amaze me!
Thanks, Anne! I like succulents, too. These portulaca have been so frustrating because they are always closed up when I want to take photos! Plus, they drop the little flower pods after the flower dies, so I’m constantly having to clean up after them. They are pretty when they are open, though.
I love it! Such a cute idea! Thanks for sharing and giving such detailed instructions and extra hints.
If no one has answered yet, the purple flower on top is Angelonia.
Your project is adorable!
Thanks, Tammy! I didn’t save the little tag and couldn’t remember the name, so appreciate you identifying it! 🙂
Oh, Susan….I want to come to one of your parties. I’d even do dishes! This is one of my favorites that you have done. Just my style. So glad you blog.
You are so sweet to say that! Thank you, Sandi! XX
Beautiful arrangement. I did try to make it but the threaded rod just leans to one side. Is that the function of the clay pots? To keep everything centered?
Thanks for the help!
Umm, not sure why it would do that. Maybe the hex nuts aren’t tightened down well enough? Or, do you think the holes that were drilled into the clay saucers are too large? Sorry, I’m not sure what could be causing it to lean. Wish I had more suggestions.