Welcome to the 249th Metamorphosis Monday!
One of the most basic DIY jobs we face at one time or another is painting. We’ve all painted a room or two in our time, haven’t we? Paint truly has the ability to transform a space taking it from so-so to sooo beautiful!
I’ve never been afraid to paint walls but doors have always been a bit of a mystery for me. More than once I’ve painted a door to perfection, left it to dry and came back 20 minutes later to admire my handiwork only to find ugly drips running down the door, completely ruining my beautiful paint job.
Each time I wondered, how does this happen?! It looks great when you finish but as soon as you walk away, the paint gremlins come out and stir up trouble. It was a mystery I could never figure out, so over the years I pretty much avoided painting doors whenever possible. I would paint a whole room, including the trim and never touch the door. I just decided door painting was something I was not good at.
Well, this weekend I totally conquered my fear of doors! I have a secret weapon now and it has turned me into a door painting ninja! Remember a few months ago when my screened door did this. It just flat-out broke. Over time, the bottom edge that had apparently never been painted, soaked up water whenever it rained. It began to swell up, causing it to stick occasionally and to finally break.

I purchased a new screened door and after trying a vinyl one, I returned it and went with a wood door since they are very light weight and don’t have a tendency to sag as much as a heavier vinyl door.
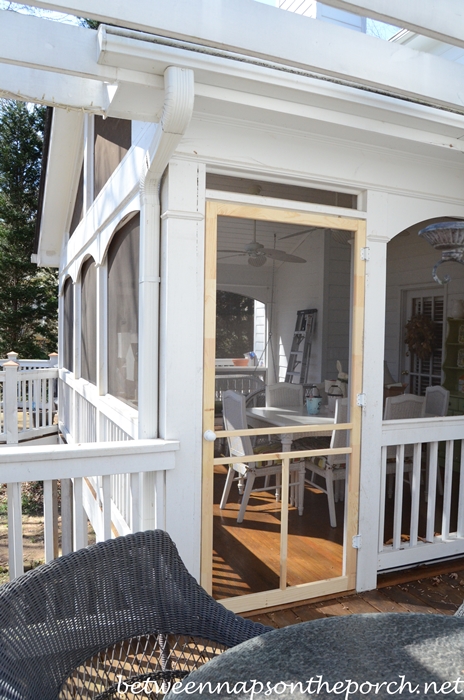
I had the screened door professionally installed and one weekend I got to work priming it in anticipation of painting it.

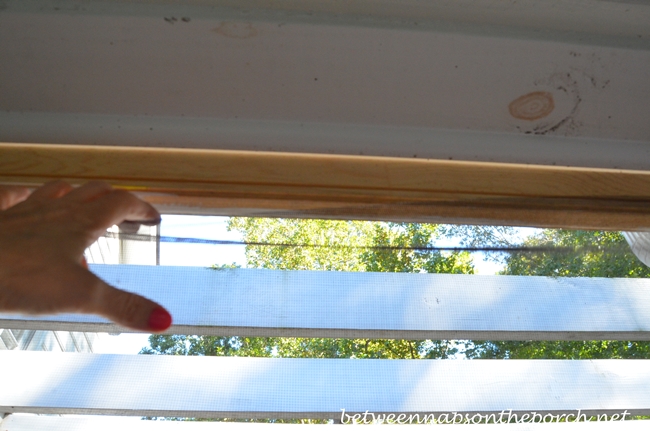
Somewhere during the priming process a little light bulb went off and I realized there was absolutely no way I was going to be able to paint this side of those two bars. The screen was totally in the way.
Ummm, it’s been 5 1/2 years since the porch was built and painted so I had forgotten that the painter who painted the porch, removed the screens from the doors prior to painting them. My contractor had them rescreened by the same person who built the screens for the porch windows.
While I was thinking this problem over, the summer monsoons came to Georgia and I put the screened door painting project on hold. At least the outside was primed so I figured it would be okay.
I’ve had the honor this year of working with True Value as part of their DIY Squad and though I’m not a hard-core “knocking-down walls or ripping out tile” type DIYer, I knew it was time to get this door situation whipped into shape. Since I really didn’t want to paint it the old way using a brush, I decided to try something different.
I ordered this guy from True Value, the Wagner 590 Paint Sprayer. I have to tell you, I. Am. In. Love! I want to kiss Mr. Wagner! He is totally responsible for taking away my door-painting-fears and turning me into a door-painting ninja! I will never try to brush paint a door again!

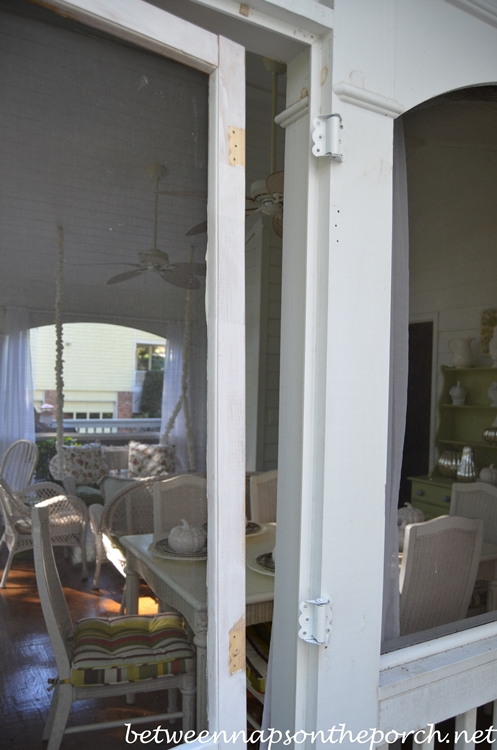
I was eager to put Mr. Wagner to the test so I started by removing the screened door. I hated to do it since I had paid someone to professionally install it but I came up with an easy way to do it and still keep my professional install.

I removed the screws from the door side and not the porch wall, so it should be pretty easy to re-attach the door after it’s rescreened.
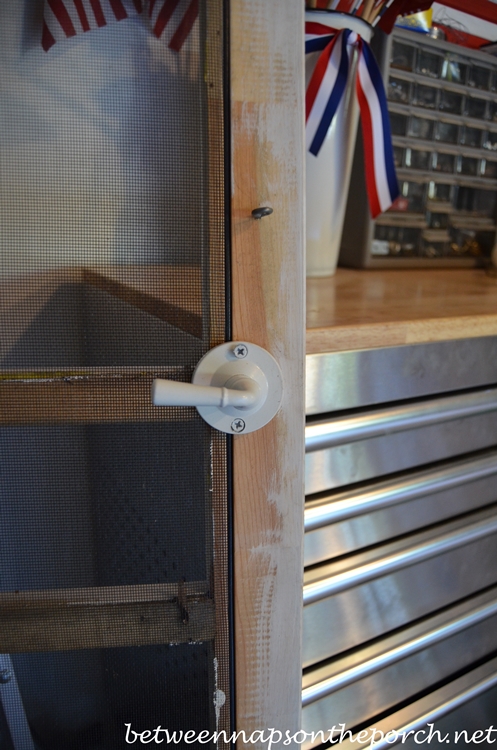
I brought the door out to the garage where I removed the knobs. I left the little eye-hook latch since it wouldn’t interfere with the painting process.
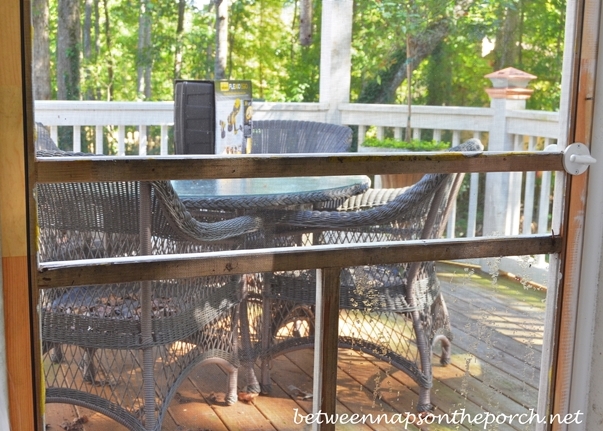
Next I removed the screen. That was easy to do because one of the little black rubbery things that holds the screen in place had already come loose and fallen out across the top of the door. I could put my hand in the edge and just pull it right down since it was missing.
Once I had the door in the garage, I pulled out the rest of the little strips and the screen came right out.

The door was already full primed on one side so I quickly primed the other side. Once the primer was dry, I lightly sanded the whole door. I always like to sand anything made from wood after it’s primed because sometimes primer will raise the grain a bit.

The exterior of my home, including the porch, was painted around five years ago. I remembered I still had some paint left over in the basement. I found it, opened it up and wow, was it thick, like frosting-on-a-cake, thick!
After a bit of research, I discovered latex paint can be thinned out with just water. So there was no need to purchase another can of paint, which was great since I still had almost a gallon left over.
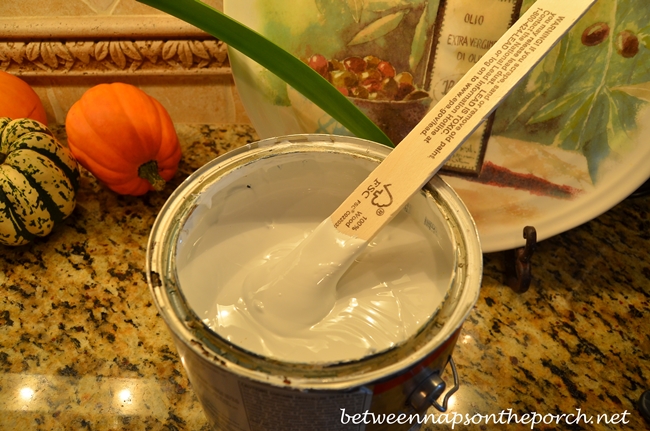
I poured out a good amount of paint into a 4 quart glass measuring bowl and started adding water. I didn’t want to stir it in the can because the can looked a little corroded and I didn’t want that to end up in the paint. After adding water multiple times and a lot of stirring, it finally felt and looked right for painting.

I loaded up Mr. Wagner and headed for the garage.

Before painting, I took a large plastic drop cloth and masking-taped it to the garage wall creating a large painting station.

Painting the door was so easy. I set the sprayer on a narrow spray and adjusted the settings for latex paint and went to work. It only took a minute to paint the door and it came out looking great! I was so emboldened by my first spray-painting job, I decided to go for bigger game!

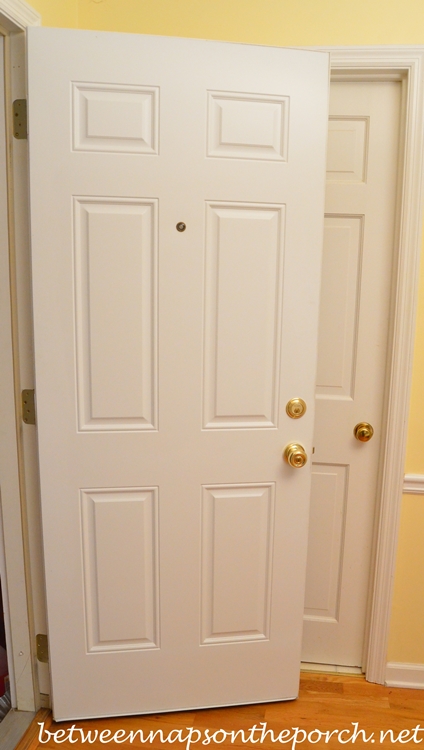
When my house was painted 5 years ago, somehow the painters missed painting the newly installed kitchen/garage door. The door had been the kind with glass panes on the top half. I never understood why the builder had used that style door leading out to a garage. Looking out into the garage from the breakfast room was never an attractive view so I had shuttered the glass area years ago.
While the porch was under construction, I had the contractor change out that door for a 6-panel door, adding a peep-hole in case I left the garage door up and someone came knocking. I don’t like opening a door unless I know who is on the other side.
Somehow the painters had not thought to paint the garage side of the door when they painted the porch and the exterior of my home. Maybe it’s not considered part of the exterior. I had painted the inside long ago, one of those paint-running attempts that cured me of ever painting doors. But now I was eager to give it a try with Mr. Wagner.
The results were great! I had a few spots that showed a little “orange peel” effect but I know what I did wrong. I stood a bit too far away from the door. The directions recommend you stay about 6-12 inches out from the surface you’re spraying and I forgot that a couple of times. It’s barely noticeable though and now I know to be careful of the distance I am from the surface I’m spraying. It was still wet in the picture below.

The best part is there was not a single drip or run. Not one! I think I’m going to set up a little paint station in the hallway upstairs and tackle all the hall and bedroom doors I’ve ignored over the years. I know I can paint them now and I won’t have to fear the paint gremlins!
Have you ever painted with a sprayer? I am amazed how fast and easy it is! Definitely the way to go when painting doors!
For more DIY painting tips and inspiration, visit True Value online at www.StartRightStartHere.com or follow True Value on Facebook, Twitterand Pinterest.
I was one of the bloggers selected by True Value to work on the DIY Squad. I have been compensated for my time commitment to the program as well as writing about my experience. I have also been compensated for the materials needed for my DIY project. However, my opinions are entirely my own and I have not been paid to publish positive comments.
Looking forward to the Before and Afters linked for this Met Monday!

If you are participating in Metamorphosis Monday, you will need to link up the “permalink” to your MM post and not your general blog address. To get your permalink, click on your post name, then just copy and paste the address that shows up in the address bar at the top of your blog, into the “url” box for InLinkz.
In order to link up, you’ll need to include a link in your MM post back to the party so the other participants will have an opportunity to receive visits from your wonderful blog readers.
Please observe these few rules:
Only link up Before and After posts that are home, gardening, crafting, painting, sewing, cooking, DIY related.
Do not link up if you’re doing so to promote a website or product.
Do not link up a post that was just linked last week since a lot of readers will have already seen that post.
Do not type in ALL CAPS. It spreads the links waaaay out.
Welcome! Thanks for coming to the party!


Susan, you are a painting master! I can paint a portrait but not a room, I can make a mess of that fast, and have to hire professionals~your sprayer looks awesome, very professional!
Thanks for sharing your great experience Susan! Your doors do look great.
We have one of those sprayers but I think it must be an economy model. It doesn’t look so sleek. 😉 We’ve used it for some outdoor projects…but never anything inside. I always paint my doors with a brush. They look great, but it is a slow and tedious process. I like the idea of FAST. I know it takes a long time to clean up a sprayer…do you think that if you are good at painting doors it would be worth the clean up time?
Wishing you An Extraordinary Day!
~Diane
Diane, I know exactly what you mean. I have one of the old power rollers for painting walls and never use it for just one room, always save it for when I’m doing several rooms because clean-up can take so long. I was really surprised how fast clean up time was with this sprayer. I guess it’s because there’s no long hose to clean out. Took me maybe 10 minutes, max. If you were using oil based paints, that could take a little longer probably but with latex, it went really quickly.
did Mr.Wagner treat you to dinner too? I am actually in the market for a good sprayer for my cabinets so thanks for the tip on this one!
lol Well, I guess he did in a way since he saved me $ not having to hire someone like I normally do for painting doors. 🙂
Thanks for the great painting tips and for the party. Hope you have a wonderful week ahead!
Blessings,
Nici
Susan, I know exactly what you mean about painting doors. Thanks for sharing your tips!
Girl you rock at painting. I’m bookmarking these tips. Thanks for hosting a fun party!!!
Shannon ~ bohemianjunktion.com
Thanks so much for hosting, Susan! Your doors look beautiful!
I’m embarassed to say I’ve never painted a room in my house. I’ve helped my husband a bit but I’m always terrified of making a mistake so I leave it to the pro. =) He’s got a lot of painting coming up as we want to redo our livingroom and diningroom.
Jeanine
Whoops *embarrassed*.
Jeanine
I am trying to find a paint color that is a french white ivory w/o much yellow cast in it. Your door looks like that might be it. Can you give me the name and brand for it or any information?
JW
Sure, it’s Sherwin Willaims Duration, straight from the can. It’s their Super White color. They have one that’s even whiter called Extra White. I may look at using it the next time the house gets painted, although I’ve loved this color.
I’m failing to find a paint color that is a french ivory white w/o much yellow in it. Your door looks similar. Do have any info’ on this color? Thank you.
I do have a paint sprayer, but my daughter and son-in-law borrowed it – I have to get it back! I have doors to paint and would love to check that off my list – I wish I had a garage to create a wind-free station, but I can rig something under the carport – great post – very timely – I hope you have a blessed week – I appreciate you hosting,
Kathy
Your doors look fabulous! I still wouldn’t have been that brave, I don’t think. Thanks for hosting!!
Susan,
Your painting looks fantastic! I’m actually shocked you originally had that kind of a door between the house and garage! In MA and perhaps other states it must be a fire proof door leading to living quarters and that holds true whether the garage is attached or beneath the house. Congrats on changing
Really…that’s interesting! I wonder why? Is the hot water heater usually in the garage or something? My house was built in 1983 so they may have changed the code by now. I just disliked seeing the cars and tools, etc… each time I walked by. Do they require a fireproof door for the front door and the door to a basement or is it just for garage doors?
Susan, the fireproof doors are required in many states now. Mostly for fire and carbon monoxide poisoning prevention ie,leaving your car running, spontaneous combustion in the garage. Both our water heater and furnace are gas and are in the garage. I am grateful for that extra barrier of protection.
PS I love the white color…goes so well with sugar cookie!
Oh, gotcha. My hot water heater is in the basement along with one of the furnaces. The other furnace is in the attic. I do get them inspected regularly. Thanks, Nancy!
WOW! LOOK at YOU!! The door looks fantastic. KUDOS! franki
Thanks so much for hosting! Life to the full! Melissa
Great info Susan, everything turned out great! And thanks so much for hosting!
Blessings,
Cindy
Susan, you amaze me. I would never even consider tackling a project like this. Bravo! Well done.
Thanks, Sarah! The hardest part was unhooking that garage door and hauling it out to the garage and then back in again! lol I sat it on some books to raise it up a tad so I could get it back on the hinges. Got a little workout that day!
I’ve been visited by that same paint gremlin on my front door. It really needs to be repainted, so thanks for the tip on the sprayer !
~Susan~story, toooo funny 🙂
~Susan~
You are a hoot ! I love the way you told your story, toooo funny 🙂
Your doors turned out wonderful, my doors need painted and that just seems like the way to get er done !!
Have a super day
Paula
In.
Yo
Great job on your doors! You are something, I wouldn’t have known I could remove the screen. I want to see how you put it back together. You are super smart!
Thanks, Mary! I took it to a screening company because I don’t think I could pull it taunt enough for it look right. Also, the way it was screened originally was not done well…the top rubber thingy had already started coming out. I’ll share how it looks back in place and rescreened, soon. You won’t believe how many leaves have been coming in on the porch through that one door way while it’s been off! I think a critter or two may have come onto the porch, too. I heard a noise on the porch one night when I was working in my office above the deck with the pergola. It sounded like “something” picked up and set back down one my mercury glass pumpkins out there. I bet it was the raccoon that visits my feeders at night. Fortunately, nothing was broken when I checked the next morning. 🙂 I wish I could get a picture of that stinker!
Your doors look fantastic! Glad the sprayer worked well for you. I’ve put it on my list since I will be repainting my kitchen cabinets. Thanks for hosting and have a delicious week. Toodles, Kathryn @TheDedicatedHouse
Great job and they look beautiful. That is a really good paint sprayer. My son is doing his garage in the new home. They are easy once you get the feel. I just hate cleaning them when they had a hose. You saved yourself a lot of money and time by not having someone in your home. Love how you tackle projects ,Susan. You just go for it !
Thanks so much for hosting!
KC
I just wanted to drop you a line to thank you.
I am so grateful that you share your audience with other bloggers allowing us to build our readership.
Your generosity and kindness do not go unnoticed.
Some of my biggest days on my blog are direct links from your site.
Thank you very, very much.
Shelly
London, ON
Thanks so much, Shelly! You are a sweetheart! That makes my day to hear that…happy to send some other lovely dearhearts your way! 🙂
Susan, you don’t know what you just did for me. We have a little haybarn, that we use to store our goat hay in. It has been half two shades of red for three years… and I’m going to FIX THAT NOW! Thanks for inspiring me, and I’m going to go to True Value today!
Mary Ann, that thing is addictive to use…I kept looking for more things to spray. Those goats better run for the hills when you get going! 🙂
Excellent job! I’m glad the Wagner unit worked for you. We bought one many years ago at Sears and it was awful. We returned it and haven’t tried one again. I’m sure they’ve had time to improve them and from the sounds of it they must have. Sounds like your going to have fun with it!
I wish I was as talented/handy as you. What a great job. I have so many things to do. My problem is I seem to be able to take them apart, but getting them back together is a challenge. 🙂
Thanks Susan for sharing. I too have been afraid of doors. Hopefully you have given me the courage to try it in the future.
Susan,
“Mr. Ed” received a Wagner paint sprayer for Christmas. . .but it’s still in the box!!!
Hm~m~m. . .I have some lanterns that need painting. . .now where did he put that box???
Too, too funny. . .but I do understand about the “paint gremlins”!!!
Thanks for hosting Metamorphosis Monday each week and for sharing your own DIY projects!!!
Fondly,
Pat
P.S. Going now to photograph those “before” pics of the black lanterns!!
Susan – Good job on the doors. I have been putting off painting my front and back doors – only because they both have oval leaded glass insets that have to be taped off. I’ve never used a sprayer to paint with – I’ve always used a brush and one of those itty bitty rollers. It seems like doors are one of those things that benefit from several light coats of paint instead of a couple of heavy coats. My husband put up a decorative vinyl screen door for my pantry door. They are heavier than the wooden ones and he used a long piano hinge to hang it so it didn’t sag. Maybe Santa will be delivering a “Mr. Wagner” at my house this Christmas!
Sharon, that was a great idea with the piano hinge! The vinyl one I first tried was sagging.
I have never painted a door, in fact at the old house all the doors and trim were STAINED….by Joe and I!!! All 36 of them!!! We will have to paint doors in this house though:( But not yet, thank goodness. It is good to know about the sprayer. The builder spray painted our entire house!!! Now I know why:) I also want to thank you for hosting each week and giving us an opportunity to get more looks. XO
Your wood door – best choice………I installed one and painted it ‘spanish tile red’ from valspar…I even like the sound it makes when it slams, it reminds me of my younger days when us kids used to run in and out of my childhood home in the country and my mom would holler to not let the door slam….the wood door held up like a pro all throughout our childhood……….enjoy…
I prefer wood doors and wood windows, too…like how they feel and sound when closing. Funny how those things do take you back to your childhood!
Susan, You’re simply amazing. I need to have the “professional” painter who did the doors in our new house come read your blog because they did a lousy job on our doors. Now repainting our interior door is on the punch list. (By the way, the little rubber thing is call the spline.)
Thanks, Pam! So that’s what it’s called! 🙂
I’m impressed! Both doors look great. Congratulations! Thank you for hosting the linky. laurie
The doors look great, but what about Mr. Wagner (sorry for getting so personal) does he clean up easy or is he a mess? After painting, I wouldn’t want to linger with Mr. Wagner, I want a quick and clean good-bye.
Yup, it was a quick clean up…I was amazed how quickly it went. Nothing like the power roller painter I bought years ago for painting walls.
That sprayer looks like something I might want to get my hands on. I would be interested in knowing how the clean up of the machine went.???
Linda, it went fast…only took me about 10 minutes. I was pleasantly surprised!
Hi Susan. Your doors look great and it sounds like you had fun painting them. I am in the middle of painting my house, including doors, and this sounds like something I need from Santa. Thanks for sharing your experience and opinion and thank you so much for hosting.
K.
I hate painting doors. No ands, ifs, or buts about it. One of the things I hate most about painting a room. LOL I am glad you put a wood screen door back on, so when I come over and sit on your porch one day – I can hear it slam. Cause nothing beats a wood screen door slamming. 🙂 Hope you are well. xxoo
Susan, we put up a new screen door a few months ago and I painted it by hand several times. It’s a wooden one with an easily removed screen. I remember your post about the bottom of your old one not being painted, and I insisted that the guys paint the bottom when it needed to be trimmed just a bit. Thanks for showing the spray painter. I have a feeling that it will be on quite a few wish lists soon!
Jane, you were so smart to do that! I notice the other door on the porch is sticking a little. I need to get out there and sand the bottom and little and add some paint to it before it does the same thing my old one did.
Your doors are looking glorious! I will be taking on this job at my house over the winter, only the inside of the house though (I am hoping to install new woodwork around the doors and windows too). I will assume these little spray painters have improved over the years. I think I remember having nightmares from a project that I used a spray gun on about 20 years ago. It may be worth giving this spray gun a shot if it makes the job easier.
Candy
Candy
Candy, this was the first time I’ve used one but I was amazed how easy it was to use. Once Christmas is behind me, I’m going to tackle my upstairs hallway doors next. I’ll be thinking about you painting this winter while I’m doing the same thing. 🙂 Winter just seems like such a great time to take on these inside jobs.
Wow Susan…what a great job that sprayer did…the door looks great!…No, we have never used a sprayer…Have a great week!
Thanks, Shirley!
You make it look so easy, Susan! Thanks so much for hosting!…hugs…Debbie
The sprayer looks like great fun, I’d love to try that some day. Thanks so much for hosting!
Hi Susan,
I just installed a new screen door on our porch. Yes, you do have to remove the screen before painting . I just did it old school with a brush, but it turned out nice. I just stopped by to say hi.
Thanks, Leo…I’m hoping the new one last even longer than the first door did.
You did a fabulous job Susan ….and guess what Brenda is putting on her Wish List from Santa this year? Thanks for the heads up as I am always on the look out for gadgets to add to my arsenal of home improvement and hobby tools. It looks like a perfect size for we gals (like the little Black and Decker Mouse that you appear to be using.)
Not confirming that I will be using it on all my doors though since I often paint each side differently using a sponge roller and a brush for more control. (One colour to co-ordinate with its surrounding space and even have colour blocked their design on occasion. Yes I am such ‘a beggar for punishment’ ….. ha.)
WISHING YOU A BEAUTIFUL DAY …. and Happy Painting! Warm hugs -Brenda-
Susan,
Cut a circle from wax paper using the bottom of your paint can to trace the circle. Lay it over top of the paint before replacing the lid. Your paint will store well and never develop a hard shell over it. Latex will rust out the bottom over time, so if your can is more than five years old, I’d consider buying a new can for storage. I’ve had the bottom drop right out!
Hi Susan! Your door looks great and I love your screen door! I completely agree about a wooden screen door, plus they make that great squeaky/bangy noise you just can’t get with vinyl! Now to the nitty gritty! I’m wondering how Mr. Wagners sprayer cleaned up? When I had a really cheap one a million and one years ago it took 642.3 steps and 34hours and 42.2 minutes to clean up, and no…..I’m not prone to overdramatazation at all, why do you ask? Anyhow, how long did it take you to clean up and approximately how painful was it really? Inquiring minds need to know!
Thank you for sharing that painting sprayer from Mr.Wagner….he is wonderful!! I want to take all of my mom’s shutters down this spring , prime them then paint them. TIP….We got a professional painter to come give mom an estimate and he said he ALWAYS uses oil based primer on outdoor wood then he paints it with Latex paint. His statement was “the paint will hold up twice as long as if you primed and painted with latex. I love DIY stuff and I love using fun and time saving tools to get the job done right the first time! Thank you Susan. Hope you have a very Happy New Year!!