Welcome to the 445th Metamorphosis Monday!
When I last left you in the saga of what I’m now dubbing CabinetGate, 😉 I had just two of six cabinets in place, the other four having been completely destroyed during delivery.
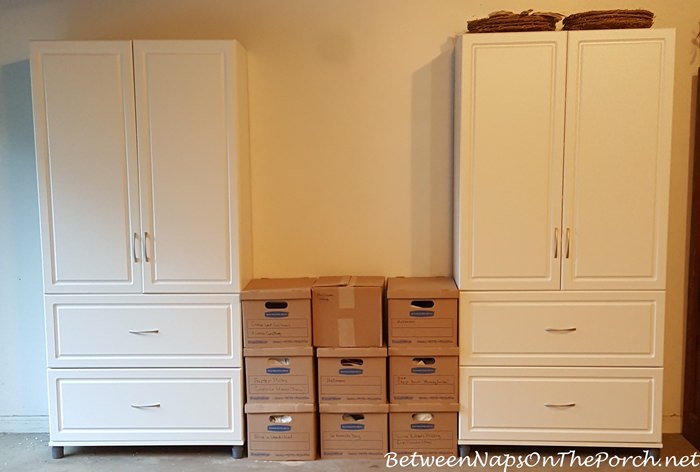
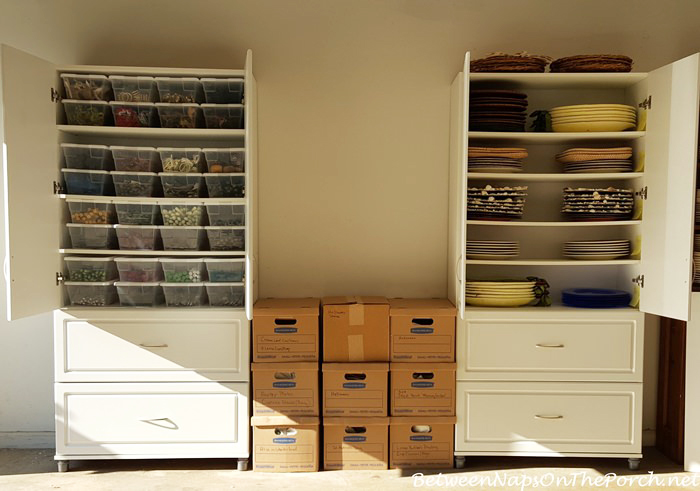
Little recap: After assembling the two cabinets that arrived in good shape (they were delivered by a different delivery company) I filled them with napkin rings, flatware, charger plates and napkins.
I’ve made some significant progress this past week. In order to avoid a repeat of receiving all broken cabinets again, (my UPS guy says they are being damaged in the UPS facility for lack of the proper equipment for moving them) I ordered the rest of the cabinets via Wal-Mart and had them delivered to the Wal-Mart Market that’s very close to my home. If I had taken advantage of their free delivery (which I would have loved) and had them delivered to my home, they were going to use UPS. I couldn’t go through that again!
Two cabinets arrived last week, the day before I left to go out-of-town to visit family. Once back, I got busy putting them together.

So here’s where we are now: I’ve decided to go back to my original plan of adding six cabinets (not five) to this wall. More on why I changed my mind in just a sec.

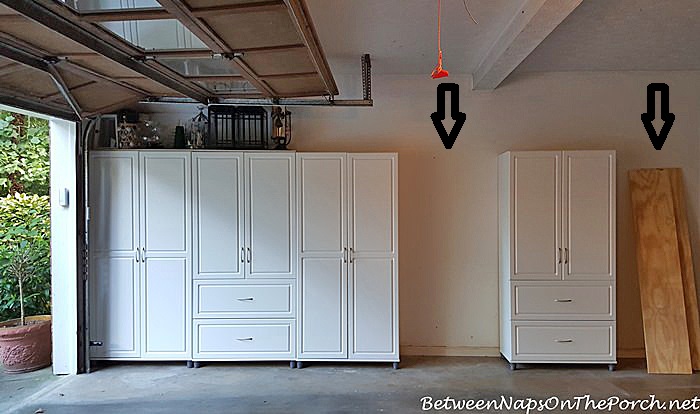
See those two gaps where the arrows are pointing? Those will be filled with two more of the non-drawer style, the cabinet style you see at the very end on the left. I decided to stay with that style for the other cabinets.
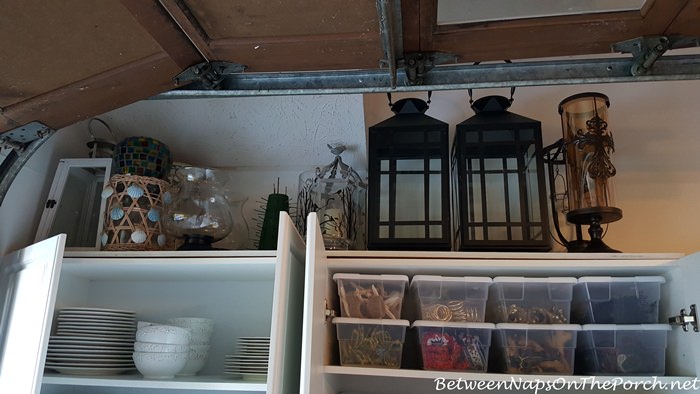
See the narrow, plywood panels leaning against the wall on the far right? Those will go across the top of cabinets (once the other two cabinets arrive) to provide shelving for lanterns and other decorative centerpieces that I like to use in table settings. I’ve already begun the process of adding those to the top of the cabinets.
Let’s take a closer look at how I’m using these cabinets and how the above cabinet storage is going to work.

As mentioned, initially I wanted to place six cabinets on this wall since I knew I had the room, with just three inches left over to spare. I changed my mind and decided to go with five cabinets because I was worried about the garage door laser thingy that you can see down on the bottom left part in the picture below. I was concerned it would block the door of the cabinet at that end, making it a pain to access anything I stored there.
Once I had that cabinet assembled and in place, I was delighted to see I could still access the contents of that cabinet quite easily. So I decided to go back to my original plan of having six cabinets along this wall. The more storage, the better!
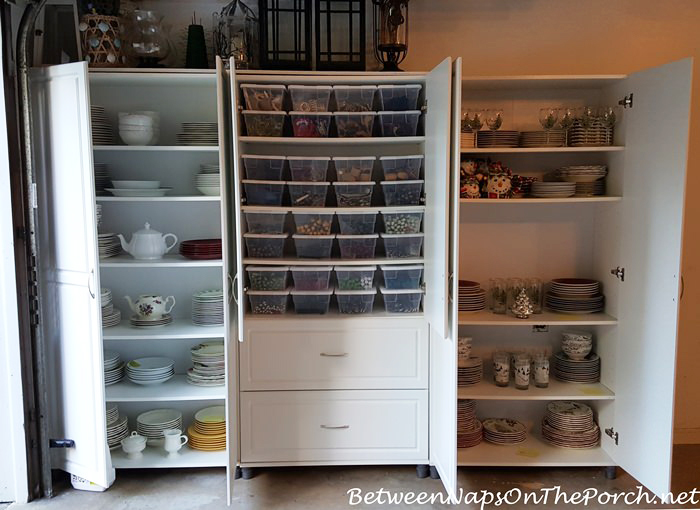
This is the cabinet that’s partially blocked by the laser device, but it really doesn’t impede access to the cabinet that much. Ignore the little stickers/papers on the dishes, that’s where I’ve weighed each stack to make sure I’m not exceeding the weight limit for each shelf. I’ll remove all those once this project is complete and everything is where it’s going to live permanently.

The other new cabinet, when complete, will house all my Christmas dishware. The only thing that won’t be stored here is my Lenox Holiday and Lenox Winter Greetings china. Those will remain in the china cabinet in my dining room.
I’m still waiting on an extra shelf that I’ve ordered from the manufacturer, Ameriwood. It supposed to arrive today and will go in the big gap below. I’m looking forward to drilling the holes for that shelf and finishing off the storage for this cabinet.

I know the second shelf appears to be bowing a bit, have no idea why since I’m not exceeding the weight limit for the shelf. I think I’ll remove everything and turn the shelf over and see if that fixes it.
BTW, Home Depot has melamine shelves that are slightly bigger than these and they will cut them down to the size needed. They are only $7 each which is less than they cost when buying them from Ameriwood. I may buy one to see if they are sturdier, and if they match okay in color, I may replace any shelves that have a tendency to bow.
A few folks recommended in the comments that I anchor the cabinets to the wall. Don’t worry, each cabinet comes with a little kit for that purpose. I had always planned on doing that, just had to wait until each cabinet was in its permanent spot. Since the three cabinets on the left are where they are going to stay…
…I’ve gone ahead and anchored all three of those to the wall, putting the screw right into a stud. During the assembly of these cabinets, the instructions have you attach the anchor bracket to the top center of the cabinet using a hole that’s already there for that purpose. That is a complete waste of time to do during assembly because not a single time did it ever line up with a stud in the end.
The cabinets come with a little plastic wall anchor that you can use when a stud isn’t available, but when I talked to one of the employees at Ameriwood, he said to not use it, that it probably wouldn’t be enough to hold the cabinet in sheet rock if it started to tilt. I agree!
I used my stud finder that I’ve had for years, to locate the studs and made sure each cabinet was solidly attached to the wall. These cabinets aren’t going anywhere!

By the way, if you don’t have a Stud Finder, I definitely recommend getting one. I can’t tell you how often I’ve used mine over the years! This one below is the same brand that I have, only this one is a bit fancier since it detects metal and wire, too. I think it’s time I upgraded mine. This stud finder is available here: Stud Finder.
Tip: When using a stud finder, I recommend you run it over the wall at least 3-4 times before putting a hole in the wall. It’s like the old adage of measuring twice and cutting once. I’ve found it works every time for me, as long as I take the time to run it over the wall several times to really verify that I’ve got it right.
Also, one more little trick that I do sometimes is once I am 99.9% sure I know where the stud is, I will hammer a long T-pin into the wall, to see if I hit the stud. That’s just a final way to verify you have it before making a larger hole. It’s very rare that the stud finder has let me down, though. I think it’s more operator error when that happens. I’ve found it to be very accurate, but you do need to run it over the wall several times to double-check that you have it before making your hole.
The cabinet on the far right that I’m using to hold charger plates isn’t anchored yet since I’ll be sliding it down a bit to the left once the missing cabinet is in place. Right now that cabinet is empty; I took out all the chargers so it would be easier to move. The other two cabinets are supposed to arrive either today or tomorrow. I’ll get busy assembling those this week.
I really like these cabinets but there are certain tricks that you need to know to make them come out just right. When I write that final post showing them all in place, I’ll try to bullet point some of the key things I’ve learned that are important to know when putting them together.
Lantern Storage On Top
So, remember how I mentioned I’d like to store my lanterns and other large centerpiece items across the top of the cabinets? The instructions that came with the cabinets say to not place anything on top because that top shelf/panel isn’t really designed to hold a lot of weight. Well, it was killing me–all that wasted space. I just couldn’t deal with not using it somehow.
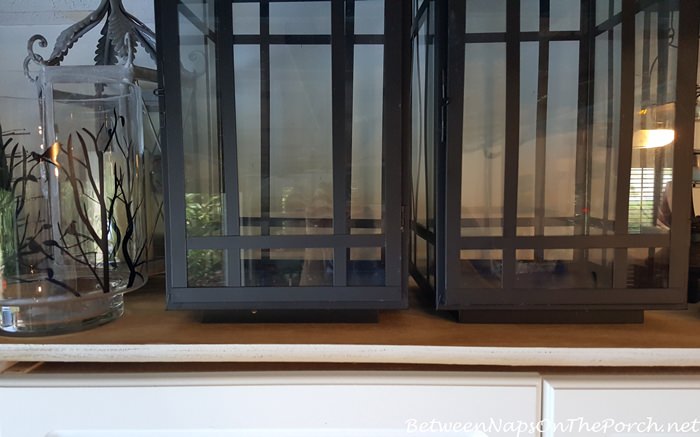
I sought the advice of a young associate late one night in Home Depot, showing him photos on my phone and asking what product I could use that would be sturdy enough to rest on the side walls of the cabinets without sagging. He recommended a product called Luon.
Womp, womp…total fail. He cut three long panels from one big sheet of Luon, and as you see in the photo below, it totally didn’t do the job of supporting anything. Even my flashlight made it sink down and rest on the top of the cabinet.

I went back to Home Depot the next day and talked to an older, more experienced associate in the lumber department. We considered two options: 3/4 inch plywood and a melamine product that looked similar to the cabinets, themselves.
I ultimately decided to go with the plywood for two reasons: 1. It was drastically cheaper, $25 for a 4 x 8 panel vs $75 for the same size melamine panel. 2. It was much lighter, so easier for me to lift onto the top of the cabinets. Also, the sales associate acknowledged it would be easier to put a screw through, something I planned to do.
The Home Depot associate cut three long pieces from the 4 x 8 panel to the size I requested: 14 inches x 71 inches. I wanted each plywood piece to span the distance over the top of two cabinets. I thought that would offer even more support and stability than cutting individual panels to go atop each cabinet.
Once home, I laid one plywood strip across the top of two cabinets, then screwed it into the top of the cabinet side walls. I wanted the plywood shelf “fixed” into place so when I pull lanterns on and off, it won’t budge. So not only are these cabinets anchored to the wall, they are anchored to their neighboring cabinet.
Tip: I pre-drilled the screw holes before attempting to attach the plywood to the top. That made this process go much easier since it can be difficult to put a screw into plywood when you’re standing on a ladder and can’t really position yourself properly above the screw to lean into it.
The 3/4 inch plywood worked great–no bending or sagging at all.

I painted the front edge of the plywood with my white exterior house paint just so it would blend in better with the cabinets. I think it needs one more coat.
Disclaimer: This technique for storing items atop the cabinets is working fine in my situation, but I can’t promise you’ll have the same results. Always use your best judgement, and if in doubt, don’t follow what I’ve done to add additional storage to the top. I can’t be responsible if your cabinets fail or collapse.
Once I have the rest of the cabinets assembled and anchored to the wall, I’ll attach the other two plywood strips across the top. I’ve already moved all my lanterns to the garage in anticipation of doing that.
And so ends this episode of Cabinetgate. lol I must say, I’ve become a bit of an expert at assembling these cabinets. It’s true, practice does make perfect. Ha! I still need to adjust a couple of doors downward, so don’t look too closely. Adjusting the doors is my least favorite part of the assembly process, but it really does make everything look better.
What did you work (or play) at this weekend? Any major projects completed or are you mid-project like I am?
Pssst: I post almost daily to Instagram. Follow Between Naps on the Porch on Instagram here: Between Naps On The Porch.
Looking forward to all the great Before and Afters linked for this week’s Metamorphosis Monday!
Metamorphosis Monday
Metamorphosis Monday is a party that’s all about Before and Afters. If you are participating in Met Monday, please link up using the “permalink” to your MM post and not your general blog address.
To get your permalink, click on your post name, then just copy and paste the address that shows up in the address bar at the top of your blog, into the “url” box for InLinkz.
In order to link up, you’ll need to include a link in your MM post back to the party so the other participants will have an opportunity to receive visits from your wonderful blog readers.
Please observe these few rules:
Please link up Before and After posts that are home, gardening, decorating, crafting, painting, sewing, cooking, fashion or DIY related.
Be sure to include a link back to the party in your post, so your readers will be able to find and visit the other bloggers who are participating.
Do not link up to the party if you’re doing so to promote or sell a product.
To those who are linking up: If you notice a shop or store linking up to sell products (yes, unfortunately that does happen) please let me know so I can remove their link from the party. No one wants to click a link expecting a Before and After, only to find a spam link to an online business/store.


Susan, you are the Lady Macguyver, you get it done! That would be a reference to the show in the 90s? I would be whining for someone to come help me.
lol Thanks, Jan! Oh, I’ve done a bit of whining along the way, just ask my UPS delivery guy. hee, hee
Your cabinets look great! I used open wire shelves, and the “menfolk” have done their best to decorate for me. 🙂 Thanks for hosting the party!
Ha, I bet! They have a tendency to do that! 🙂
Excellent progress, Susan, and I sure hope those things stand up to all the obstacles you’ve been challenged with. The addition of the plywood is great for the added storage. I should do that with my sectional wall units in the house. 😉 I know the weight thing has been a continuous concern, but I even sometimes wonder if what I have in my wood wall units isn’t an overload! This has been a great summer project that you’ll enjoy for many years. And even if you move, the next homeowner would probably welcome the storage as well.
Thanks for hosting us for Met Monday.
Thanks, Rita! If/when I move, these babies are coming with me. lol I should be able to just unscrew the anchors and the plywood shelf on top and take it all with me. I guess I could buy them all again but would prefer not having to assemble them all again. It has been a great summer project. I love going out in the garage, turning on my big box fan and an Audible book and putting them together. It’s actually very relaxing once you’ve done one and know how it works.
I just have to give you credit for lots of planning and effort in getting your dish storage planned. Love the look of the cabinets and am thinking of this for my laundry room. My garage is the dirtiest room of my home and I wonder about spiders, bugs, etc.
Jean, you may want to buy the one with two drawers for your laundry room, if you think drawers would come in handy. That one gets delivered by a professional moving type company (for free) and both were delivered in excellent shape. I purchased them on Amazon here: http://amzn.to/2hDsJN2
It’s the other style (without the drawers) that UPS destroyed during delivery.
Oh my, Susan you are unbelievable in your accomplishments. Looks professional and the added space for all your goodies must feel refreshing.
Thanks so much, Kem! I’m excited to get it completed!
Shelves like this always bow, sadly. The options are either to flip the shelves periodically or replace with something sturdier.
I know, they are prone to do that. My IKEA shelves in my office do that a bit, too. I may buy a shelf at Home Depot just to see if their white melamine shelves are sturdier. One of the guys I talked to at HD claims they are.
Susan, you are one busy woman. I still think I would buy that shelf and cut it in pieces the width of the shelves and make dividers/supports between the shelves to keep them from bowing. One of the problems I have had over the years with KD bookcases is they tend to separate in the row. By anchoring the top shelf that should prevent the units from swaying apart from each other. Because I didn’t put a board on top, I bought little metal rectangle plates with holes to attach them together on top.
That sounds like a great idea…not sure I would know how to do that, though. No telling what it would look like with me doing it! lol
The metal rectangle plates sounds brilliant! I noticed these cam screws that are used on these cabinets, have a tendency to loosen as you move the cabinets around. I’ve re-tightened up a few. I hadn’t thought about it but having that board screwed in on top should help prevent that, but I love your metal plate idea! Defininitely filing that away in case I need it sometime!
Impressive work ! Bravo ! I wish I could do the same with all those tools but I am better at knitting, weaving, sewing, decorating, etc. Having many sets of dishes must be thrilling when receiving guests or only for the pleasure of oneself. Your are an organized . Sorry for my english, if any mistakes. Good day !
Thanks so much, Jianne and your English is excellent! So wonderful that you knit, weave and sew! I tried knitting once and chose gloves as my first project. lol Those were some pitiful looking gloves! Ha! I’d love to try again, only start with an easier project, maybe a throw. 🙂
Oups made a mistake while typing : name is Joanne. Sorry
This is looking fantastic! Oh, how I wish for this storage opportunity. I’m working on a similar project (much smaller scale) in my outside storage, but it won’t be nearly as nice as this. Sorry for your struggles with getting the cabinets delivered, but glad you were able to make it happen! Yay for your tenacity! Congratulations on your efforts and I’m excited to see the complete project!
Thanks, Myra! This has definitely been an interesting project! It’s a good thing we don’t know all the details before we start some projects, we might change our minds! lol Best of luck with your outside storage, I know it will be awesome if you’re doing it!
Looking good!! I wish my garage had enough available space.
It’s so nice to be organized. You’re doing a great job.
Thanks, Mary! 🙂
Are the shelves solid wood? If not, I’d really watch them for any kind of bowing, over time. The whole thing looks lovely. Hope it gives you everything desired. Storage is a happy-happy! 🙂 Julie W.
No, I’m not sure exactly what you call it…pressboard, maybe melamine or laminate…not sure. I think it’s that typical stuff that you see in IKEA and places like that. Thanks, Julie! I’ll do a post a few months to share how it has done.
In the words of Longfellow….”FORWARD ever….!!!” Nice work!! franki
Yes! Forward ever…love it! 🙂
You rock girl! Your cabinets look great. I’d love to have that much storage in my garage.
Thanks for all the helpful info, too.
Thanks, Anne! I’ve been dreaming for years of having storage shelves (with doors) built down this wall, but knew it would be expensive. This is a less expensive option and hopefully it will hold up for me.
Your organization has inspired me to challenge myself with one organizational task monthly to try and scale down and organize my “stuff,” thank you and keep it coming!!
Jenna, that sounds great! It feels so much more doable when we look at it that way. I did something similar last year with the closets in my home. I still have the one in the upstairs family room to go through, but the others are looking and functioning much better now.
Those look good lined up in the garage. I like the idea of the additional shelf above. You are quite the hard worker!
Thanks, Liz! It feels really good to be finally getting this done. 🙂
Why don’t you just put a vericle support in the middle of each shelf from front to back!
I’m not sure exactly how I would attach it. Would love to see a diagram or something of that. Thanks, Raef!
Oh Susan Girlfriend! You are SUCH an inspiration to me! You are Miss CanDo. You must have a Frye Toolbelt 🙂 Your details and photos are so helpful; I almost believe I could do this! If you get a lot of snow, make sure it gets cleared from the foot of the cabinet closest to the garage. Are the base feet plastic?
How do you get this done through starts and stops without losing confidence? Do you have any help? I would love to do this but I am afraid I would grow frustrated and throw up my arms. The brace you show to anchor the top is genius to me. How did you decide on this one with groves open for the screws? What is your favorite drill?
I love your blog!
P.S.Looking forward to more on the Ireland trip. We are going next year so I am reading all you suggest.
P.S.S. I always love seeing your Napoleonic Bee pillow. If you didn’t make it, where could I find one please? I love a little French.
~Your Summer Breeze fan
lol I love it! Do you think Frye makes one? 😉
Thanks for that tip! We rarely get snow but we do get a lot of rain. That was one thing I really liked about these cabinets is that they are up off the floor and have plastic feet. The feet are adjustable, as well…so that’s how you level the cabinet.
Well, it was definitely discouraging when four cabinets arrived chipped and broken, but I was just determined to not let it stop me. I knew there had to be some way to get them to my home in one piece.
I just now got a text message from Walmart that the last two cabinets are there ready for pickup, so I’ll be heading there to get those shortly. I hope they are in good shape like the last two were.
No, I don’t have any help. I have wonderful neighbors who would be happy to help me, but I really don’t like to ask for help if I can avoid it. I can usually find a way to do what I need to do.
For example, take these cabinets…when I get to Walmart, I’ll open the boxes there to make sure the cabinets aren’t broken, then an employee there will help me load them into my SUV. Once home, I’ll back into the garage and remove the pieces from the boxes one at the time.
Building these has helped my arms, back and core get stronger, I can really tell. The more we do, the more we can do. And the opposite is true…the less we do, the less we can do. I learned that from a home health nurse when I was working as an Adult Protective Services Case Manager. She saw so many people who had become decompensated/deconditioned from sitting and doing nothing all day. I made a decision back then that I would never let that happen to me. It’s true, if you don’t use it, you lose it! lol
That anchor/brace came with each cabinet, but Home Depot or Lowes probably has something similar. Ameriwood, the company that makes these cabinets, may sell them to you if you call them. They definitely sell extra shelves so don’t see why they wouldn’t sell these little anchors.
My favorite drill is definitely my DeWalt cordless drill! I love it! It has a light that comes on that’s genius and has really come in handy working in the garage where the lighting isn’t the greatest. This is the one I have: http://amzn.to/2vflJJs
Check out the reviews…it’s a popular drill and I know why…it’s excellent! Worth every penny!
Thanks, Sheryl! I’m looking forward to sharing Ireland with you!
Oh, about the pillow, I purchased that in the Ballard Designs Outlet in Alpharetta a few years back. They were also in the Ballard Designs catalogs and on their website for a while, but not sure if they still carry them now.
Susan, you are so right about “use it or lose it”, and I need to take that to heart. I realize that I’ve become more lethargic in the last year or so due to the stress and grief regarding my sister. I’ve gained weight and have lost energy.
This needs to stop, and you are inspiring me to get off the sofa and become more active! My husband has been prodding me nicely for a while, so I need to get it together for sure. The fact that I still work full time as an engineer has forced me to get up and out of the house– that has definitely helped me not get seriously depressed and go down a rabbit hole.
Your enthusiasm and industriousness inspire me, thanks for another great Metamorphosis Monday!
Elena, that is so understandable, I know how hard it hit me when my sister became so sick and passed. I have no doubt we will see our sisters again one day. ♥♥ In the meantime, we still have a lot of living to do!
Looking good! You are so smart to put all of that storage in your garage. It looks good and so practical. Can’t wait to see the finished results!
Thanks, Charlotte! ♥
Your project looks great! In a similar situation I had trouble with non-wooden shelves that started to bow and ended up placing thick round wooden dowels (I painted them white) in the center at the front and back of each shelf for additional support to prevent bowing. It was a lot of work, but solved the problem! I decided next time I encounter this issue I’d use wooden shelves.
Jan, how did you attach those? Yeah, shelves like this are a pain about bowing, my IKEA bookshelves in my office bow a bit, but I do have them fairly loaded down with books.
I didn’t attach them, per se. A friend held the dowels in place while I placed the shelf on top of said dowels. Pressure holds them in place, kind of like how a shim works. Of course, once I reloaded the shelves the additional weight increased the downward pressure and those dowels weren’t going anywhere. I originally wanted to prevent the bowing by using a length of wood equal to the depth and height of the shelves…but that was more costly. Dowels were much more budget friendly and did the trick.
Whoa, amazing collection you have there! I understand better now how difficult it would have been remembering what and where it all was.( I’d be tempted to turn over items on the cabinet tops, like bowls, for less dust and fewer critters.) Even with the same amount of stuff, doesn’t your house just feel lighter with it all in one place, and not in all the nooks and crannies.
It really does feel lighter. I’ve completely freed up a few cabinets in my kitchen. I don’t really have anything I need to put in them but I know when the time comes to sell my home, it will be better not having my cabinets and closets so full.
I’ve been using these pest thingies in the garage that scare away bugs and I haven’t seen as many since then. Still a few spiders but not that many. Another reader just left a comment about something she buys at Lowes that keeps them out, too. So I’m going to look for that!
Susan, I am always so impressed what you assemble all by yourself and how you can move it once put together. You encourage me to try things that aren’t in my comfort zone. I always learn from you! Your cabinets look wonderful. I have wondered if you have come up with a way to keep them bug free. My garage seems to attract them. I look forward to the finished post.
I love those plug in things for bugs and pests. You find them in the pesticide section of places like Lowes. If a bug gets in, you will find it dead in a couple of days.
Myrna, I just added one to my garage a month or so ago and unplugged it to put the cabinets down that wall. I’ve seen a few spiders but not many. I can plug this one back in to another outlet in the garage, but I’m wondering which one you’re using. This was the one I purchased: http://amzn.to/2vfqm6x . I can’t really tell if it’s working though, since I’ve still had a few spiders camping out in the garage. lol Would love to know what you’re using!
I don’t see them on the link you sent. I buy them off the shelf in Lowes. They are round and hum. They also make a bug spray for spiders. Try spraying before you leave for Ireland and the garage will be closed up for awhile.
When I bought this house, I was the second owner. Giant spiders would walk across the room and wave at me. One day I was looking in the bathroom mirror and saw one on the wall behind me. All gone.
lol about them waving! I hate spiders, those and the GIANT wood roaches that come out at night here in the south. My pest control company sprays around the outside of my home and that keeps them outside, thankfully!
Susan, it’s important not to block the path in front of the plug ins. Not sure what brand I bought last time, but they also run off mice. The only thing they don’t seem to work on are silverfish.
Pam, I’m going to experiment around with some of the products they have out now that are supposed to keep bugs away. I purchased these a few weeks ago for the garage: http://amzn.to/2vIUbPI and I think they are working pretty well. I’ve seen a few Daddy Longlegs, but other than that, I haven’t seen any bugs. I’m going to look at Lowes to see if I can find what Myrna is using, maybe it will keep the Daddy Longlegs out, too.
You are amazing! Now, what are you going to put in all that empty space in the house? Just kidding. More room for more important gear!
lol I’m not sure, some of the cabinets are looking a lot more open and bare now.
Susan, you have completed the job of the century! You do nice work. What an accomplishment. Very proud of you. Looks fantastic.
Fast approaching is your Ireland trip! Very excited for you.
Thanks so much, Dawn! I finally got it all finished yesterday, worked all day long but it’s done. Will share it all in tomorrow’s post. 🙂
Susan, your cabinets look great! We had the same problem with our TV armoire shelf sagging in the middle from our (old) very heavy TV. (Remember those that weighed like 400 lbs.!!). Lol! I went to Lowes and purchased one of the laminated shelves in the wood finish, (on the shelving isle), and my husband cut it to size vertically to place in the middle to help the weight be distributed evenly. Worked like a charm!! He cut it to be a “tight” fit also. I can’t believe the (young) associate recommended you put Luan on top since it is only 1/4″ thick! Lol! I am so impressed that you have put all of these cabinets together. That is a chore in itself!! I love being organized, so this post has been fun to read.
That’s awesome! I know, I was so shocked when I purchased a TV for my living room a few years ago. It was like a billionth of the weight of the one it replaced! lol
Thanks, Rhonda! Yeah, that Luan stuff is so flexible…it was a joke!
Thanks so much for the party each week!!
HUgs,
Debbie
Thanks, Debbie…have a great week!
This came out fabulous!!!! I LOOVE how nice and organized everything looks!! Great job!
Thanks, Mamey!
XX
Thanks for a very informative post!
Thanks, Diane!
Susan, I have garage envy. Love those cabinets. You are amazing.
Anxious to see all of them up ..and filled.
I never mastered the hinges on KD (knock down) furniture. For those that have never put together bookcases or cabinets, it’s not as easy as Susan makes it look.
Those hinges are a pain in the you-know-what. lol
I’m looking forward to sharing them all up and done tomorrow, Myrna! 🙂
Hi Susan,
They look great, and I have to say you are one persistent lady! I may be a little late to the game here, but how did you decide on these particular cabinets. I know you shop carefully and are budget conscious, and am wondering where you searched. Thanks so much.
Thanks, Lisa! I had looked at some in Home Depot and didn’t like them, they were falling all apart. I’m not sure these are much stronger but I really liked that they had plastic feet that kept them up off the ground since water drips off cars in a garage.
I just mostly loved the look of these…the doors have a pretty design. The price is pretty reasonable, too…although it fluctuates a lot at both Walmart and on Amazon. I don’t know why it changes so much, but it can be one price today and $50 less tomorrow, then back up again a few days later.
I have a feeling I’m going to end up replacing a lot of the shelves inside the cabinets with some shelves I found in Home Depot that appear to be a lot sturdier and hold more weight.
Re. Susan, “She persists!” You are nearly through with your cabinet project, and it looks fabulous! What wonderful storage you have! I had cabinets built in my new laundry room 2 or 3 years ago, and my cabinet maker made them all from the melamine bought from Home Depot or Lowe’s. They look fabulous and are so strong. They are 30″ wide, comparable to yours. I have 2 rows of very heavy dishes stacked on all shelves and there has been no bowing. The melamine looks just like your cabinets and is way stronger than a lot of wood. Those cabinets cost me, but I have been so happy with them. I will send you a picture. Congratulations on a project nearly complete.
That is awesome to hear, Martha! I needed two more shelves last night so I drove over to Home Depot and had them cut two of their melamine shelves down to the size I needed. When I got home with them, I noticed they are definitely thicker than the shelves that come with these cabinets. So I think I’m going to replace some of the ones that look like they may be slightly bowing. The shelves under the flatware are the first ones I’m going to replace since I can tell a couple of those are bowing a little. I would love to see a picture of your cabinets!
I look forward to getting my emails with your blogs! I would love to have your new garage storage system you are doing. It looks amazing and how great to have all your tablescaping items in one area. For my lanterns and bigger items I cover them with small clear garbage bags to keep the dust off but can still see the item easily. So glad you are using the top of your cupboards, I like to use every space available! Looking forward to viewing the finish wall of cupboards!
That is so smart, Deri! If I see mine are getting really dirty/dusty, I will totally borrow idea! I looked just now and Amazon has clear bags in all sizes. That’s a genius idea, thanks for sharing that!
Great storage – appreciate seeing/reading the how and why etc. as you planned and put them together. Impressed !
Thank you Susan for hosting today.
Joy
Thanks so much, Joy! It’s definitely been a journey. 🙂
Great job, Susan! You are a very meticulous problem solver, if you had chosen to study engineering, you would have sailed through engineering school with straight A’s! Have a great day. :0)
Thanks, Elena! The math may have been a problem, but I do tend to obsess over the details. lol 🙂
Fantastic storage solution, Susan. I’m inspired to figure out better storage options here. Working in that direction.
Kudos on a job well done.
Thanks, Sarah! Now that I’ve done this, I’m kicking myself for not having done it sooner. I think it’s going to make life a lot easier. My cabinets and pantries inside are heaving a big sigh of relief! 😉
Bravo, Susan!! I am so impressed with your abilities, persistence and courage. I would have NEVER attempted such a feat as large as the one you just completed. Your garage storage is the envy of many a tablescaper, myself included! You are really an inspiration. I’m glad your Ireland trip is very soon because you have earned every minute of leisure and adventure for your home efforts in organization!
Awww, thanks Rosie! Appreciate that so much! lol I worked yesterday non-stop from around 7 AM until 9 PM finishing up and I was thinking how much I need this upcoming vacation! 🙂
Oh my! You have one cabinet with only christmas dishes? I think I am in love. Would love to see a post about all the christmasstuff. In the Netherlands we don’t have that many options.
Thanks, Anita! I do love decorating for Christmas so much and apparently, I love Christmas dishware. I hadn’t realized how much until I started gathering it all together! I will try to do a post sometime in the next few months sharing all my Christmas patterns/dishware. That would be a fun post to create!
I just purchased 4 new salad plates on eBay, they arrived today. I had wanted 8, but could only find 4. I’ll take a photo of those in the morning in natural lighting and try to include it in tomorrow’s post.
In case you’re interested, you’ll find all the tables I’ve created for Christmas at this link: https://betweennapsontheporch.net/category/holiday/christmas-tablescapes/
Click on any picture link at that link above to view that particular table.
Also, you may enjoy this post that shows a few patterns: https://betweennapsontheporch.net/tartan-plaid-chargers-for-the-holiday-table/
Thanks. I will have a look at your links and I certainly look forward to your talk on christmas dishware. I love everything christmas and you are the one who inspired me to not only decorate my trees, but also start looking at nice christmas plates for the table (my husband did mind I am afraid). I bought 4 breakfastplates of Villeroy and Boch Toy’s delight. But I want more… Lots more lol.
Susan,
Thanks for responding to our posts, even the brief ones. It makes it so much more personal.
Thanks so much, Diane! That truly is the best part of blogging, reading your comments! XX
Susan, all I can say is Halleluiah!!!! I too have been ordering from Walmart with the free shipping when we pick it up. In fact, we’re changing our office into another guest bedroom. I ordered a mattress set, & they shipped the wrong size. I told them right at the store when we went to pick it up, came home & re-ordered. And you & I both know we can check for damage, woo hoo! Happy for your progress! You surely do deserve another vacation and quick. Take care, Tina Carpenter, devoted follower
lol You are not kidding…definitely looking forward to a bit of rest after this marathon! 😉 I’m so glad you were able to catch their mistake at the store…so much easier that way than having to deal with it after it’s delivered. Thanks, Tina! XXX
Love how it’s all coming together, Susan. We don’t have a garage, but hopefully I can eventually get my basement better organized and set up something similar. I love the look of white cabinets and shelves. Right now I’m too busy painting my kitchen cabinets and then we have to stain our deck if the weather cooperates! I don’t know how you did all this by yourself; I definitely need helpers!
Applaud, applaud and am so happy for you that ‘mission is finally accomplished’. You did a fantastic job! Warm hugs -Brenda-