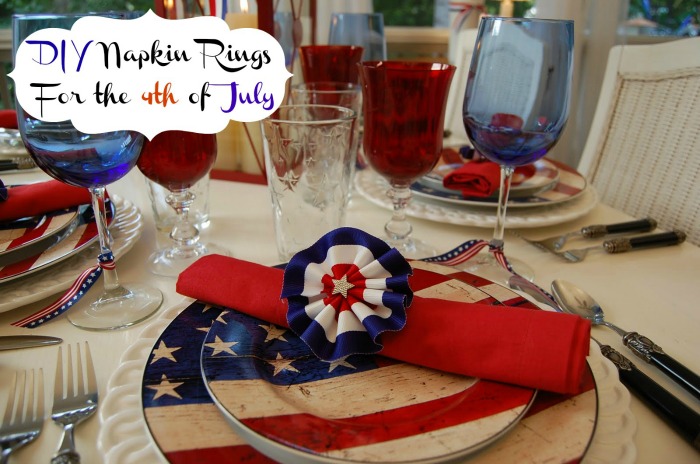
While we continue enjoying all the wonderful tablescapes linked yesterday for Tablescape Thursday, here’s a little tutorial for the napkin ring I used in the 4th of July tablescape I shared.

This is a super easy napkin ring to make. It reminds me of beautiful patriotic bunting.

I found this napkin ring craft design online HERE, but I changed it up a bit using a different size/width ribbon and adding stars to the center.
Supplies you’ll need to make 6 napkin rings:
♦Grosgrain ribbon: You’ll need at least 7 feet, 5 inches to make 6 napkin rings. Buy a little more to be on the safe side. My ribbon was 1.5 inches wide, although the original directions only called for 1/2 inch wide ribbon.
♦Elastic Beading Cord (Available at fabric stores)
♦Buttons (they don’t have to match or be the same, I used ones from my button jar)
♦Fabric glue (available at fabric stores and Michaels)
♦Thread (I used embroidery thread since it’s thicker/stronger than sewing thread)
♦Needle (I used an embroidery needle)
♦Star Buttons: Optional

I also added a star to the center of my napkin rings. I found these star buttons at Michaels and they worked well since they have a plastic loop underneath for sewing them onto shirts and such.

Cut a 15 inch long piece of ribbon. I experimented around and tried longer pieces, but found 15 inches really was the best length. If you go any longer, the napkin rings are too bunchy and won’t lay flat.

Fold your ribbon back and forth, back and forth like you’re making a paper fan. You want your little accordion-like folds to be about 1/2 inch wide.
Tip: It’s easy for the little fan sections to accidentally start getting wider as you fold, so watch for that and try to keep them pretty close to the same width.

Holding the ribbon tightly in your hands, push your threaded needle through the layers close to one end of the ribbon as shown below. In this case, I wanted the red to be in the center when the napkin ring was finished, so I ran the thread through the red end of the ribbon.

Here’s how it looks gathered together.

In the pic below, I spread the ribbon out so you could see where I ran the thread. Tip: Use thread that’s the same color as the ribbon section where you’ll be inserting the thread. That will help hide the thread.

Pull the threads together and tie them into a knot to form a nice circle. Spread your folds out evenly. Doesn’t it remind you of 4th of July bunting?

Snip off the excess thread.

Now it’s time to do something about those raw open edges/ends.

Run a small amount of fabric glue along the edge of one of the open ends of ribbon.

Press the open ends together. Fabric glue dries amazingly fast.

Cut a piece of the elastic-beading-cord, about the length you’ll need for your napkins. This may vary a little depending on the size napkins you’ll be using and how you’ll be folding them.

Take a button and thread the elastic through as shown below.

Tie the ends of the elastic in a knot. This is a good time to test the elastic on your napkins to determine if the length you cut your elastic cording will be a good fit for your napkins.

Snip off the excess cording, but not so short it comes untied. Put some fabric glue on the button. (See picture below.) Be sure to put it on the side where the elastic cord was tied so when you glue the button down, the cording knot will be hidden.
Tip: While you are waiting for your fabric glue to dry at different stages, you can use that time to cut the ribbon and cording for your other napkin rings or to tie the elastic cording through your buttons.

Press the button onto the center of your napkin ring. Tip: It’s a great idea to put the button on the side where the raw edges of the ends of the ribbon meet and are glued. That way the raw edge will be facing downward and not visible. You can see the raw edges of the ribbon on the right side of the pic below, so I glued the button to this side.

If you’ll be using a star button or some other decorative item in the center of your napkin ring as I did, turn your napkin ring over and put a drop of fabric glue in the center. I pulled my ribbon together pretty tightly when I tied the thread, so the center hole was small and the glue rested right on top and filled the hole. (See pic below.)

Then, just poke a star button down into the hole. The star buttons I bought have the little hard, plastic loop underneath them so they can be sewn onto a shirt. That provided plenty of surface for the glue to grab. Plus, the plastic loop fit just right into the center of the napkin ring. I bought the last pack of the star buttons at the Michaels nearest me. Hopefully you can still find them in your local craft store. Check the fabric stores, too. They were called “Twinklers” and the brand was “Dress It Up.” The package contained both gold and silver buttons.

For most of my place settings, I put the thread through the red end of my ribbon because my napkins were red and I thought the napkin ring would look best with the red in the center and blue edge of the ribbon napkin ring resting against the red napkins.

Here’s how it would have looked if I had threaded the needle through the blue section of the ribbon. The red part of the ribbon isn’t as pretty against the red napkins as the blue edge, is it? If you have blue napkins, you may like it this way, below. I liked pairing the silver star buttons with the red centers and the gold star buttons with the blue centers, but either way would look great. 🙂

Hope you found this tutorial helpful for your patriotic table settings!


Great idea! Your instructions are very easy to follow. What a beautiful table!
They really turned out cute Susan, the napkin rings were the first thing I noticed! Thanks for the easy to follow tutorial. Happy July 4th Weekend:@)
Love it! Thanks!
Love these napkin rings! They're perfect for the 4th. The star buttons were the perfect added touch. Thanks for sharing.
This is so simple but looks so wonderful! I will be sharing on Facebook 😀
Thank you Susan for the tutorial, you explained perfectly and it's quite easy! I thought they were store bought!, it looks professional, wow! I love the addition of the little star, better than the original! Have a wonderful 4th. weekend! I'm off to my daughter and grands, catching a plain in an hour! Love, FABBY
This tutorial is so good even I can do this. I'll add this as a bookmark for how to's for next fourth. Thanks for sharing…..
~Emily
The French Hutch
Susan,I loved your table! The napkin rings are wonderful. Hope to follow your directions and will make them for next year. I always enjoy your posts. From another hot place in the south, Pam
So when's the barbecue? Your porch always looks so amazing and inviting.
Now this is a sewing project I can handle! Pinning to my pinterest now!
Those are darling! Thank you for the tutorial. Have a safe & happy 4th!
Thank you for sharing this idea, what a wonderful addition to the July 4th celebration. Your table, as usual, is beautiful.
I love your site it is the first thing I look at daily.
I was just thinking that this same idea could be made to look like a flower for a ladies tea party. I could use pink or even lacey ribbon and put a center button that looked like a flower center. Or how about yellow ribbon with brown buttons for brown-eyed susans or sunflowers….I can feel inspiration coming…
Hollace…that's an awesome idea!
Thanks for this wonderful tutorial. You explained each step so perfectly that even I could follow your instructions. Next year I'd like to hang bunting on my front porch and these napkin rings would coordinate so wonderfully. Have a happy July 4th!
I love that!!! I can't wait to see your newest sewing project 🙂
These napkin rings are just precious! Love the bunting look for the fourth and your tutorial was great! I think the same idea with a solid ribbon would make cute "flowers" as well!!! Thanks for sharing!
These are fantastic!!! I love this idea and am going to try it! Thanks so much!!!!! XO, Pinky
You do the best instuctions! Thank you so much!!
Mary
Susan,
When I first saw these napkin rings on your tablescape. . . I thought you had purchased them! Amazing look. Your tutorial makes it appear to be easy! Thank you for sharing your talents and tablescapes with us!
Fondly,
Pat
Susan – You tell "Martha" a
what for….I stutter..
Just love it when someone
of your talent takes center
stage and gives the Marthas
of the world a lesson in
sharing creative spirit
in a generous and giving
way.
A great Fourth to you and
yours. Many thanks.
Mary
Ingenious and adorable!!!!
Thanks!
These are too cute! I think it will go nice with the star napkins I picked up from Pottery Barn.
I think if I do make these I should make the red on the outside to contrast the blue of the napkins.
I like that, Jeri…should be really cute!
I love these napkin rings. It seems like a alot of work for me!!! LOL
This is what I wonder…do you think that the plastic shower curtain rings are to big to use for napkins rings…at the Dollar Tree they have many bright colors, and then glue your flower or decorative item on the ring. What do you think?
It probably depends on the size of the curtain rings and the thickness of the napkin/cloth. I often double up my napkins in table settings to layer them, which would probably also help.
A friend came up with a faster way to pleats. Measure 1/2 inch from the cut edge and Mark a dot on the long ribbon edge. Then Mark a second dot 1/2 inch from that. After that Mark 1 inch apart across the length of the ribbon. Now start a running stitch starting at the first dot and continue through all the dots. Pull the thread and it will gather into ruffles!
I luv these more than ever…AND, now that granddaughters are “craftier” than ever…it’s a slam dunk!! SALUTE!! franki