Welcome to the 638th Metamorphosis Monday, a blog party sharing fabulous Before and Afters!
A few weeks back I shared this wonderful table setting Elena created for her daughter’s birthday. Elena went with a whimsical Alice in Wonderland theme, a favorite of her daughter’s.
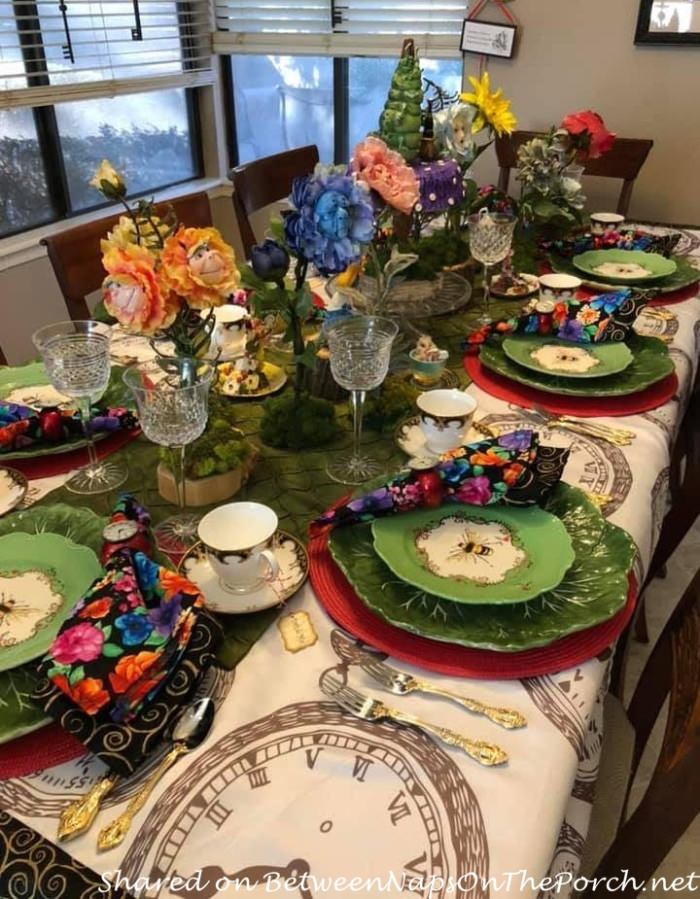
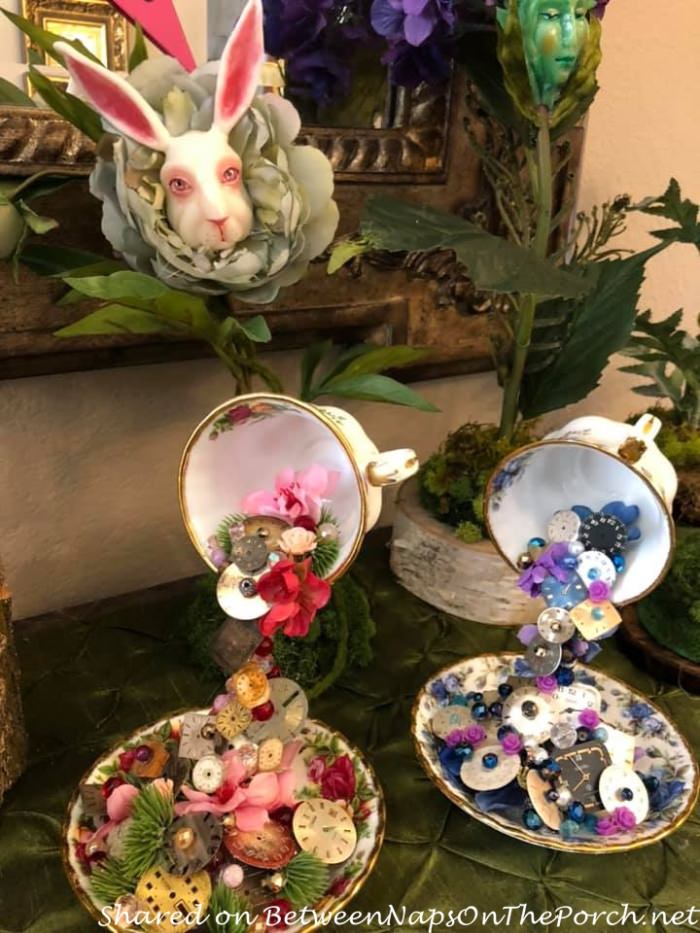
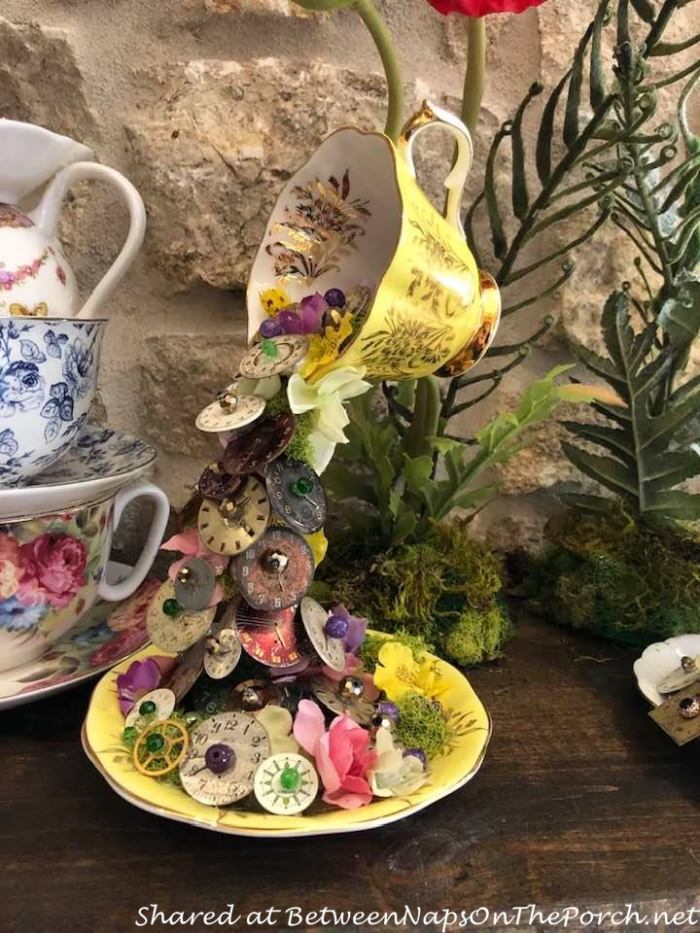
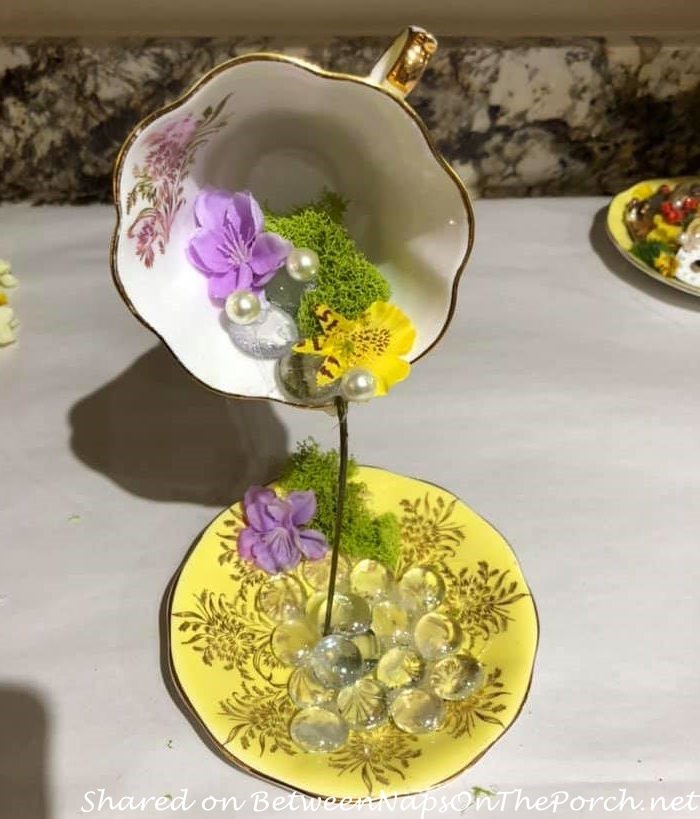
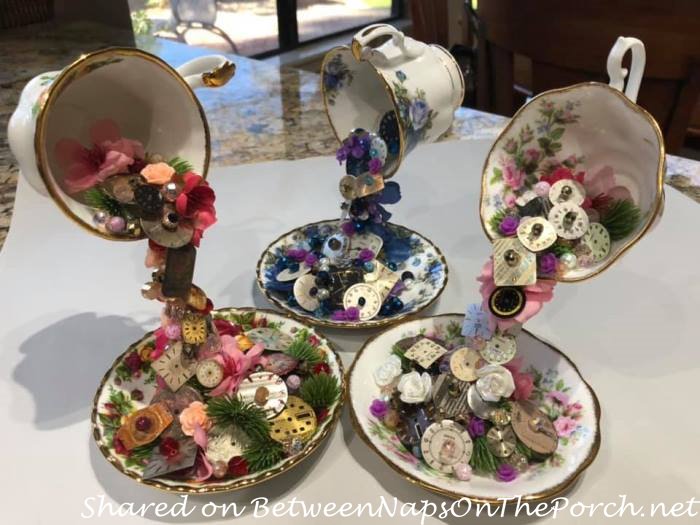
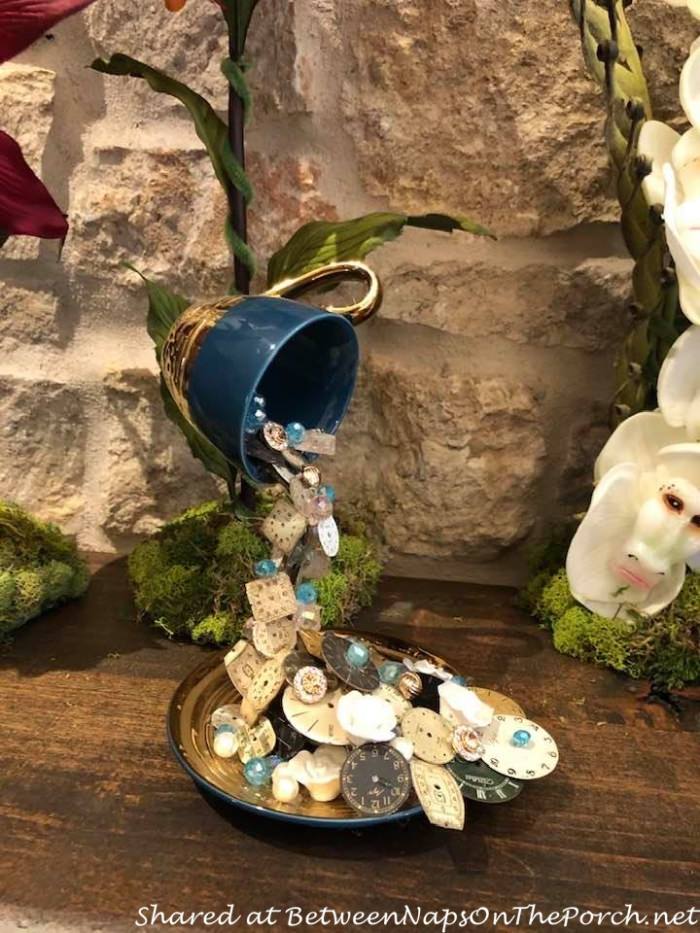
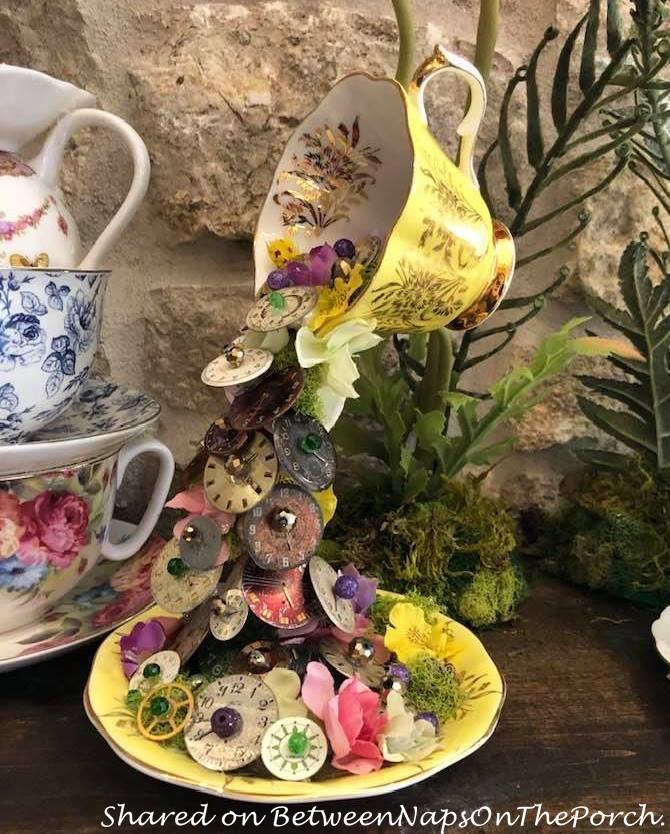
As part of the decorations, Elena created these beautiful, magical floating teacups.
Every birthday celebration needs a bit of whimsy and a touch of magic!
Elena has kindly shared a detailed tutorial with photos showing just how she created these whimsical teacups. Elena said, “I made nine teacups for the birthday party. My favorite ones were the Royal Albert Moonlight Roses and Old Country Roses teacups. I absolutely loved the color in the Moonlight Roses pattern.”
I loved them all and couldn’t wait to see the magic behind making these amazing floating teacups! To make a floating teacup, these are the materials Elena recommends below.
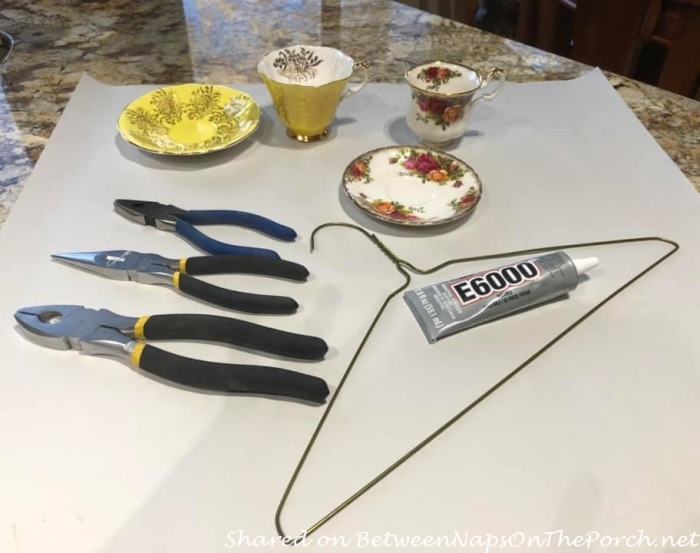
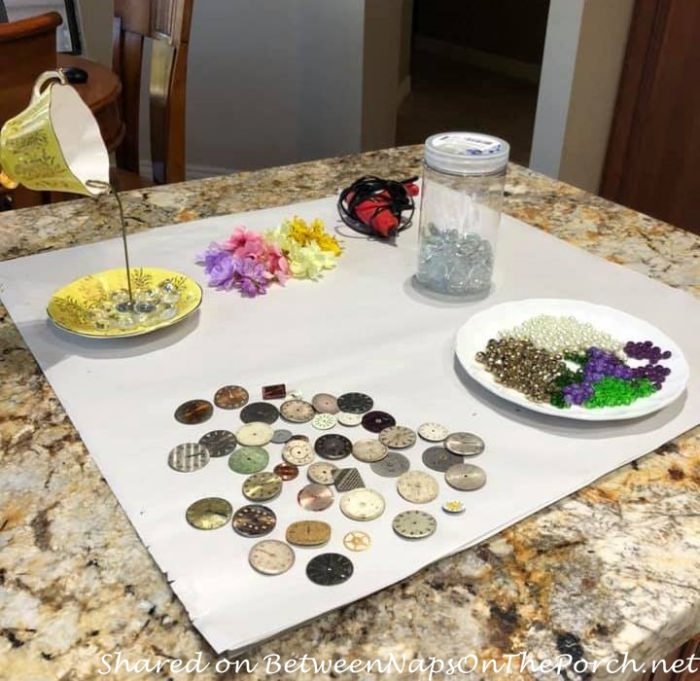
Materials needed:
- Lightweight china teacup and saucer. DO NOT use the big heavy teacups and saucers which are cheap and can be bought at Home Goods. They’re too heavy. IMHO genuine vintage and fine bone china from eBay is a better choice. I bought all of my teacups from Etsy or eBay
- Stout coat hanger wire from the dry cleaners. The flimsy white dry cleaner wire isn’t strong enough. Some similar tutorials use small forks instead of stout wire; I tried that, didn’t like it. The stout wire is quite strong and you can bend/manipulate it more easily than you can manipulate a fork.
- Two sets of wide nose pliers/wire cutters and a needle nose plier—for manipulating the stout wire easily.
- E6000 Glue—This is the best glue for gluing the wire and teacups together, and I’ve tried many kinds of glue. It’s extremely strong but also pliable, it doesn’t dry brittle. 527 Ceramic Glue is good, but it’s too brittle when dried, and it can crack. Do not use a hot glue gun, there’s always a risk of the cooled glue popping off the smooth china surface in one chunk, so I don’t trust it. Note: E6000 takes 24 hours to harden, don’t shortcut the 24 hours. Also, E6000 smells BAD, like diesel fuel; it takes a couple of weeks for the bad smell to go away. So if you’re going to make a floating teacup for a special event, make your floating teacup at least a couple of weeks beforehand.
- Hot glue gun and glue sticks—for gluing down the saucer weights and various lightweight decorations for the floating teacup.
- Various plastic jars, cups, bowls, bags of rice or beans—for when you get to the point when you’re propping up the teacup and gluing each end of the bent wire to the cup and saucer
- Clear package sealing tape—for holding the teacup, saucer and wire ends in place while the glue dries for 24 hours.
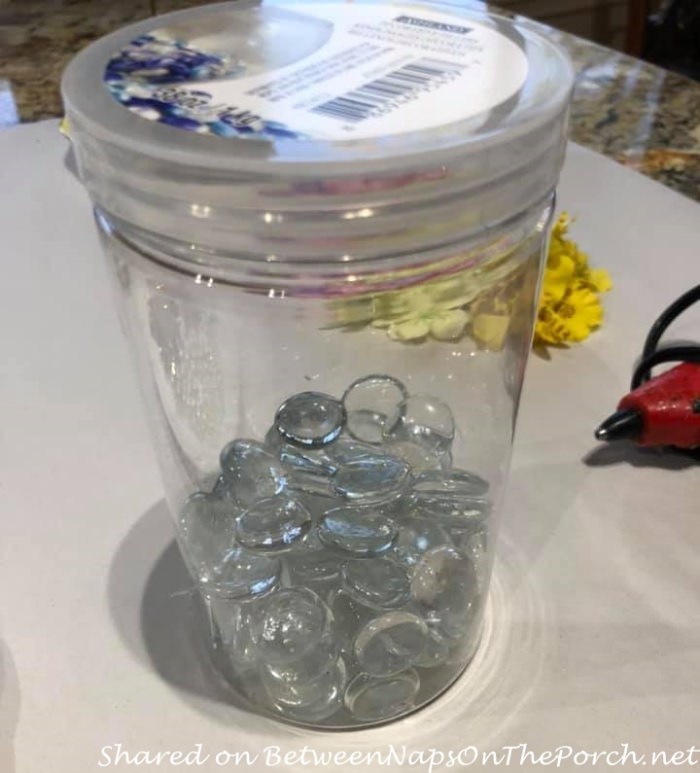
- Clear flattened glass marbles (from Michaels)—for weighting down the saucer for stability, also if you want to build up the height of the decorations inside the lip of the teacup
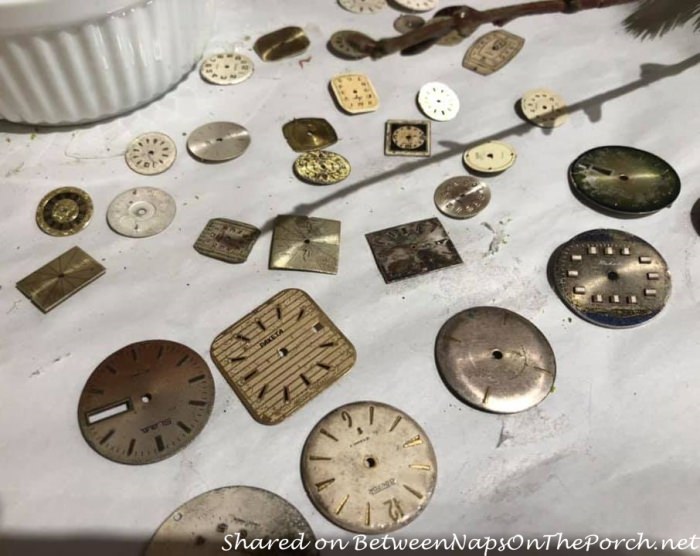
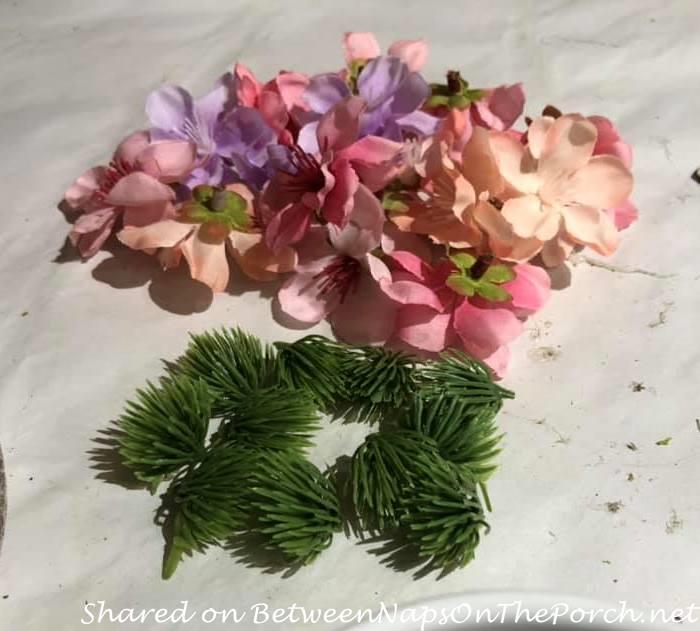
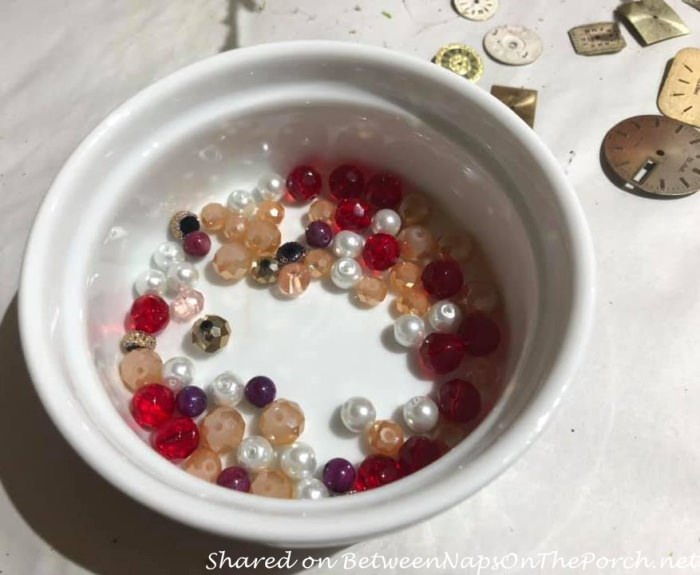
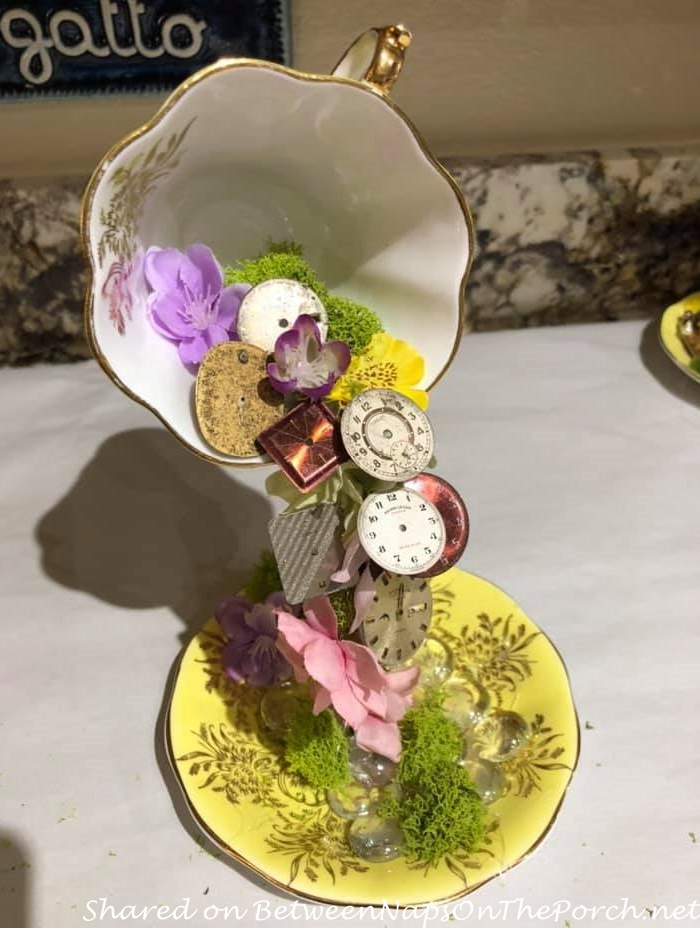
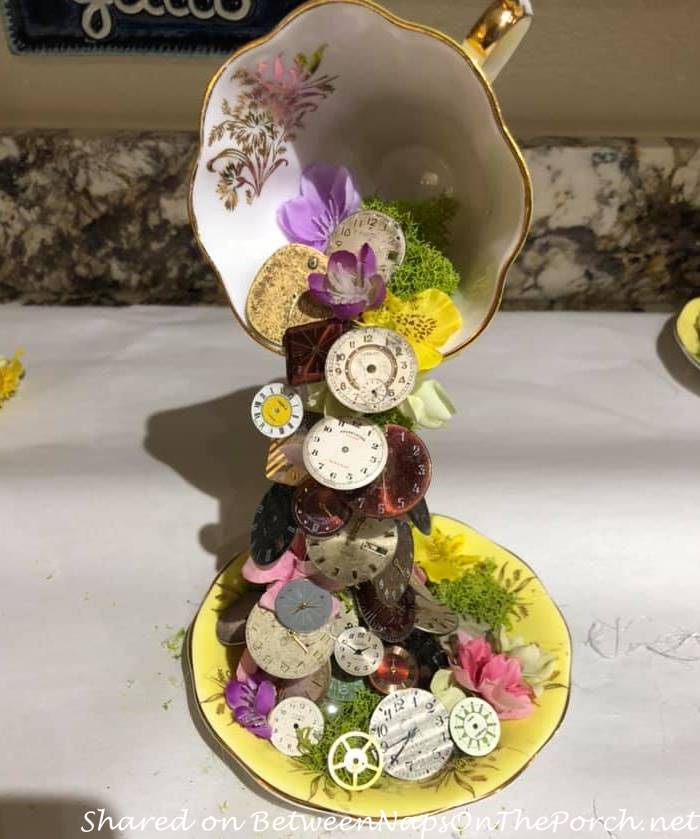
- Decorations (the fun part!!)—vintage watch faces (from Etsy), small silk flower florets, small greenery florets, decorative moss, beads in various colors and sizes (from Michaels or Hobby Lobby). I don’t like to use larger silk flowers because they usually look fake and tacky. Shop carefully for realistic-looking floret-type flowers, they will look much more realistic and nicer.
- Fine tip tweezers—for removing all the fine hot glue strings after you’re done decorating your teacup.
Below, in Elena’s own words, you’ll find detailed steps for making a floating teacup.
Steps for making your floating teacup:
Lay out all of the materials you will need in your crafting area.
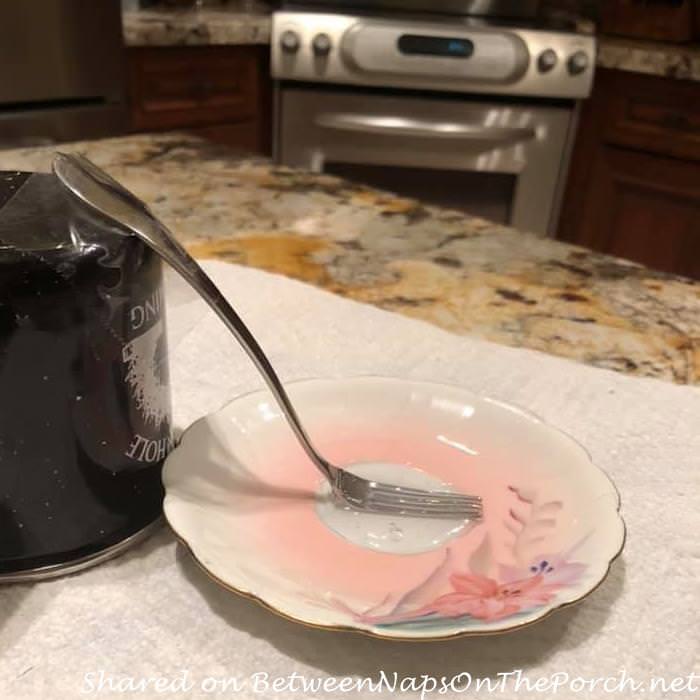
Using your wire cutters, cut a 6 to 7-inch section of the coat hanger wire, including one of the bottom bends in the wire (that will make it easier to make a wire loop at one end).
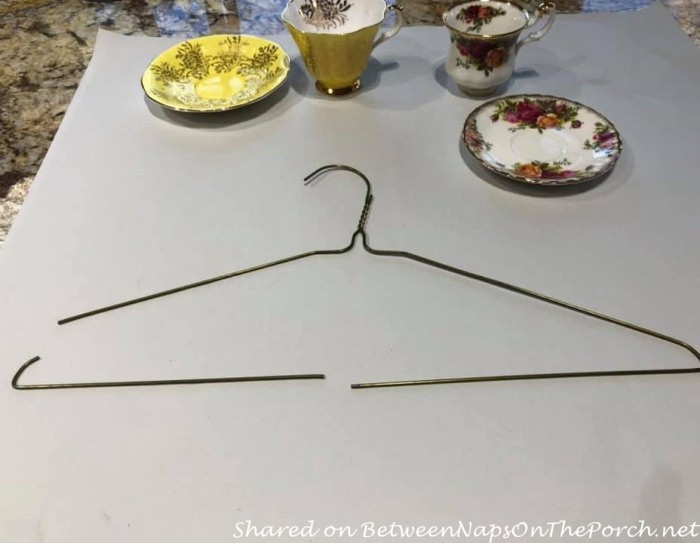
Using regular pliers to hold the wire, use the needle-nose pliers to create loops at each end of the wire section.
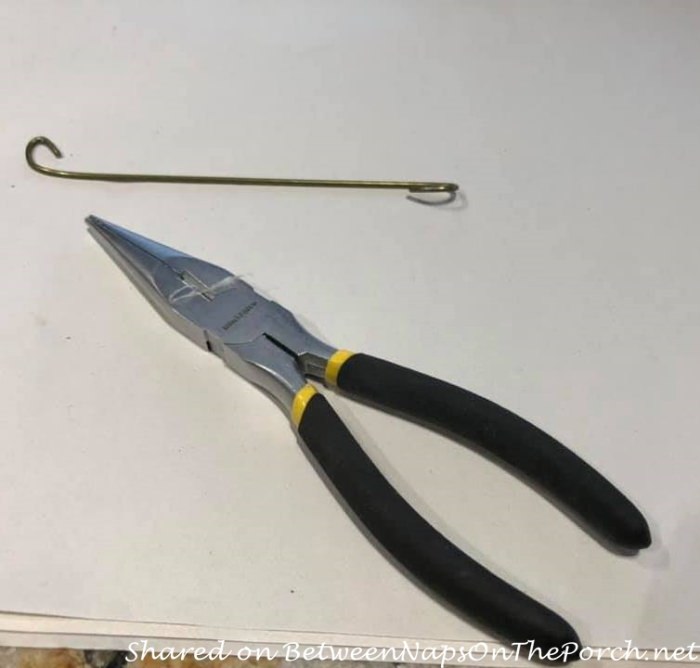
Using the same pliers, bend the looped ends of the wire at angles to fit flatly on the saucer and at an angle inside the lip of your teacup. You want the angle of the bends to fit as snugly as possible, that’s where the glue will be applied.
First glue (E6000) the loop-ended wire to the saucer. You can use various items to prop up the wire section at the right angle. Use the package sealing tape to hold things together if needed. Apply the E6000 glue to the looped wire touching the saucer, be generous with how much glue you use. Let the glue harden for 24 hours.
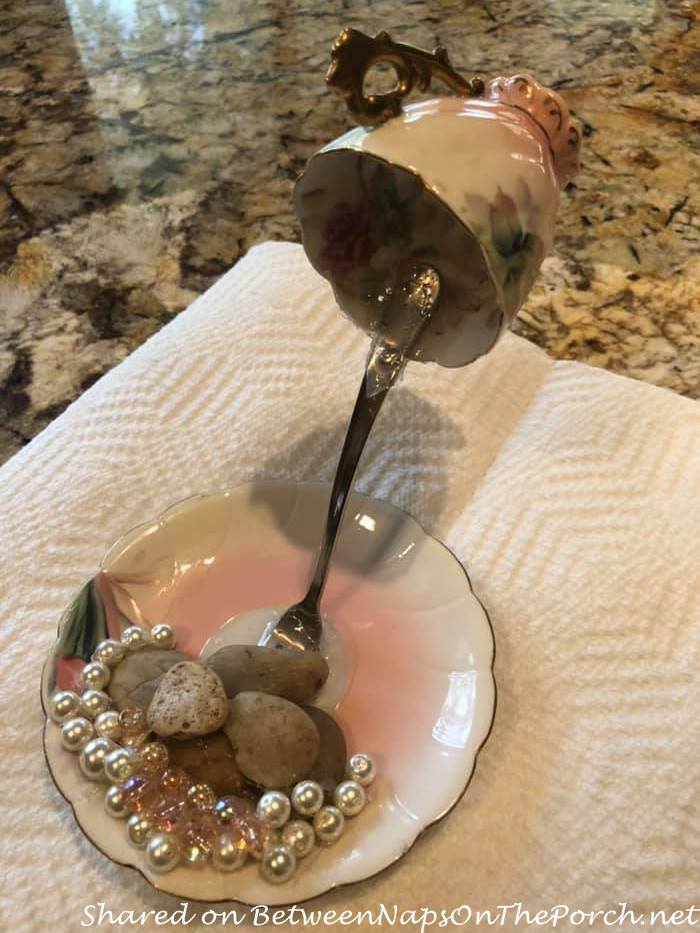
Next, prop up the teacup into its proper position so that the top wire loop is snug inside the lip of the teacup. You want the teacup to tip forward so eventually it looks like flowers and watch faces are spilling out of the lip. Turn the teacup handle slightly to the side, it looks better than having the teacup handle sticking straight up. Experiment with whatever you have to prop up the teacup. Apply the glue over the wire loop, and tape things into place.
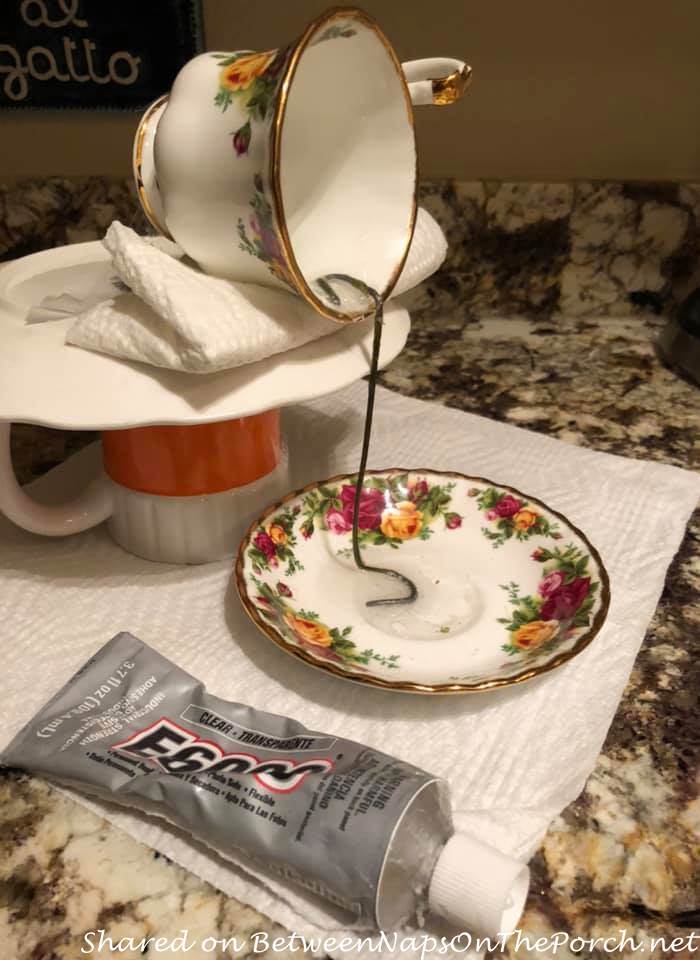
Allow the glue to dry for another 24 hours. Now you can remove the props and tape, your teacup will be floating proudly on its own over the saucer.
Now you’re ready to use the flattened marbles to make the floating teacup more stable.
Using the flattened glass marbles and the hot glue gun, start gluing the marbles onto the saucer, enough to make the teacup stable and not likely to flip over. I’ve also tried big beads and small stones as counterweights. I think the flattened clear marbles work the best and they’re easier to cover with decorations.

You can also glue a few of the flattened marbles to inside the back of the teacup—to give the decorations some height as you layer flowers, beads, and watch faces to spill out of the teacup.

Now For The Really Fun Part…
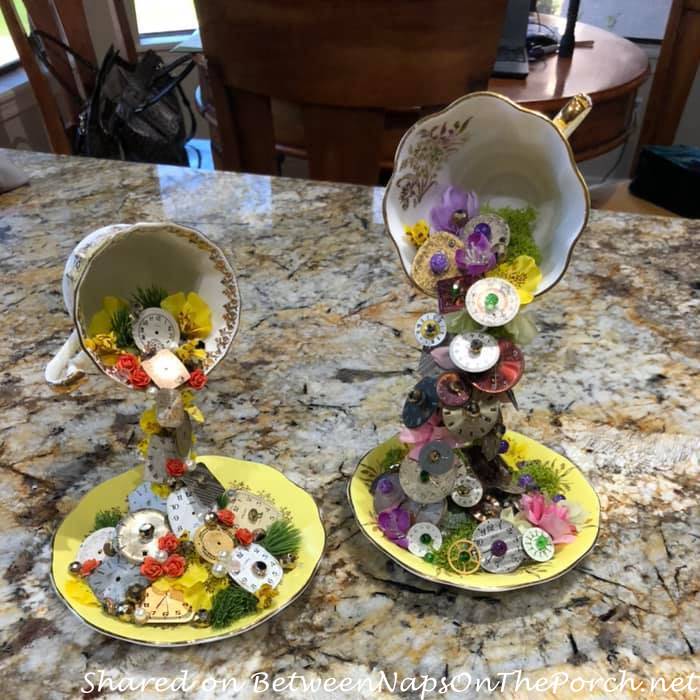
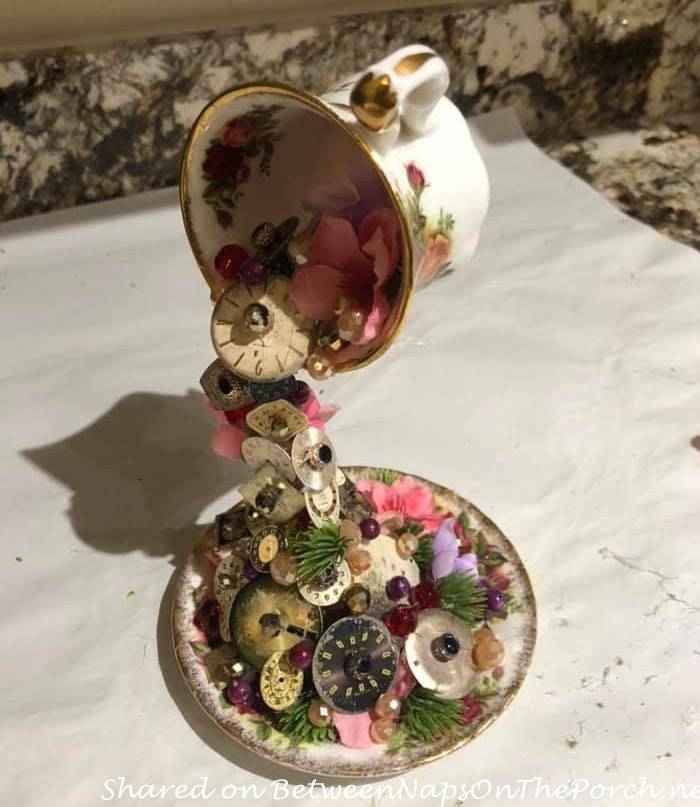
Start applying the watch faces…
…florets, greenery…
…large beads, and moss.
I used the vintage watch faces because I loved the look of them and they fit so well with the Alice in Wonderland theme. I typically used between 24 to 30 watch faces of various sizes and colors for each floating teacup.
Be sure to cover all sides of the wire with beads, florets, greenery, and a few large beads.
Keep applying the watch faces in layers and at correct angles–so it appears the watch faces are cascading like a waterfall from the teacup to the saucer. Be sure to cover all the flat marbles on the saucer with decorations.
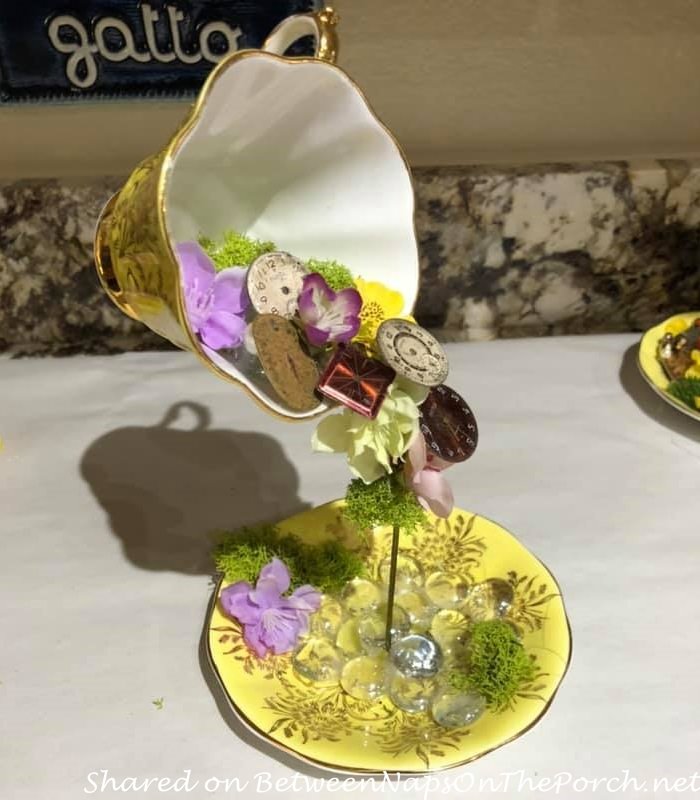
For the final touch, I glued the smallest sparkly/faceted beads in the center of most of the watch faces—the sparkle catches peoples’ eyes, and it’s a very pretty effect.
Last step: using your tweezers, pick off all the fine glue strings that will be all over the place from where you’re been hot gluing. Do this under bright light, you’d be amazed how many tiny glue strings you’ll have to pick off.
You’re done, enjoy!
Elena shared two additional photos showing how you can use a fork instead of a wire to make a floating teacup.
Another twist could be adding a faux cupcake or something similar to the plate. Endless possibilities with these fun floating teacups!
Thanks so much to Elena for sharing this detailed tutorial for making these adorable floating teacups–Alice in Wonderland style! From past experience, I know when creating a tutorial, it takes a long time to take photos and to write out all the individual steps, so this tutorial is very much appreciated! ♥
I’ll leave you with a bit more eye candy of some of the teacups Elena made for her daughter’s birthday.
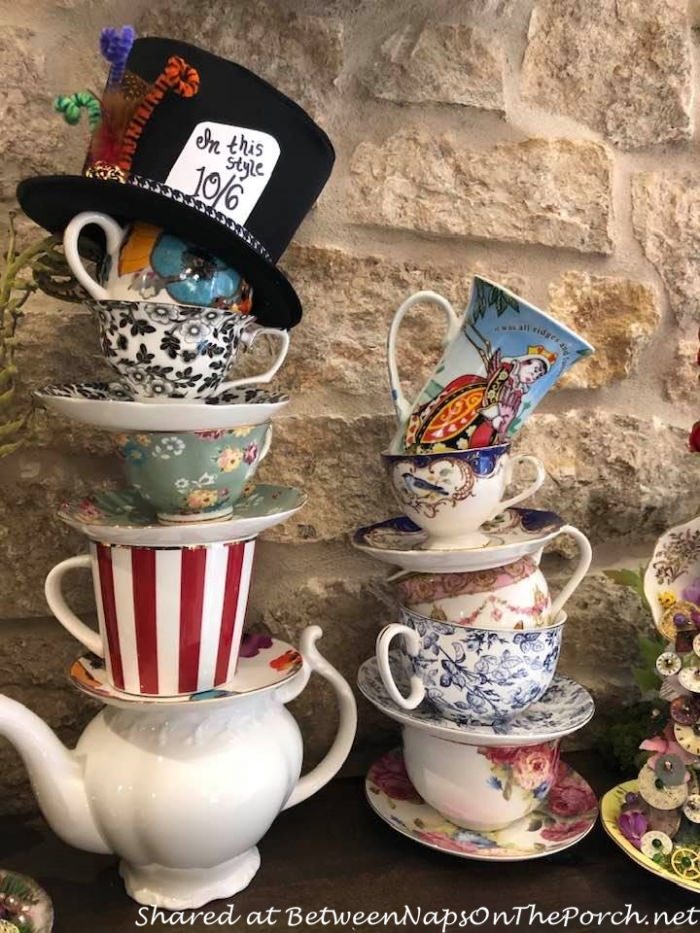
Check out these fun, topsy turvy stacked teacups Elena created for a whimsical Mad Hatter Dinner Party! You’ll find that party here: Mad Hatter Dinner Party.
Looking forward to all the great Before and Afters linked for this week’s Metamorphosis Monday!
Pssst: Did you know Between Naps On The Porch is on Instagram? You’ll find me on Instagram here: Between Naps On The Porch.
Like to know when a new blog post is up and available to read? Subscribe for email updates, it’s free and your email will never be shared.
Subscribe for free post updates via email here: Subscribe.
Metamorphosis Monday
Metamorphosis Monday is a party that’s all about Before and Afters. Please link up your Before and After projects like DIY projects, room makeovers, craft projects even recipes. Any Before and After is great! Please do not link up Table Settings, save those for our Tablescape Thursday party on Thursday.
If you are participating in Met Monday, please link up using the “permalink” to your MM post and not your general blog address. To get your permalink, click on your post name, then just copy and paste the address that shows up in the address bar at the top of your blog, into the “url” box for InLinkz when prompted.
In order to link up, you’ll need to include a link in your MM post back to the party so the other participants will have an opportunity to receive visits from your wonderful blog readers.
This party has ended, click button below for the links to all who participated.


This is such a cute idea…tea cups hiding in my cupboard will get a new life!
Thanks Susan! I just made a pouring arrangement last week, so much fun!
How creative is Elena! The tutorial was clear and concise showing the process which is not difficult. Susan thank you for sharing. I enjoyed this post immensely.
These whimsical floating teacups are amazing, thanks so much for sharing it with us. Pinned! thanks for hosting, Susan!
Now I can use the tea cups for something more fun
Love the blue thanks for sharing lillian
Hi Lillian, I love the Royal Albert Moonlight Roses (blue) pattern. The colors are so intense and pretty. I think my Moonlight Roses floating teacups are my very favorite.
Since Susan posted your Alice tablescape, I have been viewing videos on making floating teacups, Christmas ornaments, etc. Elena, you are a master of the craft. Thanks for posting.
Thank you Warren for your kind words.
What a great tutorial – the photos are so easy to follow and make so much sense! Thanks Elena and Susan – this table has inspired me more than once! Wonderful!
A great tutorial for Elena! This is how I knew how to make them, so glad that it was the same. Fork or wire, both work. Love Elena’s cups, they really do look like they belong with the Alice and Wonderland theme! Hugs, Brenda
I just find this to be incredible…absolutely incredible! My lack of talent with anything crafty may be showing. Ha! Thanks for sharing!
Hi, Susan. I love this tutorial and thanks to Elena for taking the time to produce one that is clear and understandable. I do have one question, however: where can I find such a wonderful assortment of watch faces? I’d appreciate any help with this. Thanks!
Hello, on Etsy, there are a couple of stores which sell vintage watch faces: Bostonbaglady and Allgearedup. Just go to Etsy and do a search for “vintage watch faces.” Good luck!
Great tutorial. I’ve seen the fork used with some sort of silicone cascading down so it looks like fluid flowing. The teacups are so pretty with their fillers!
Good tutorial Susan – thank you!
Omgosh!! I absolutely love this idea and the step by step was perfect to follow. I think I will make one just as a little decor piece. I love them. Elena’s look amazing. Pinned & inspired. I can’t say enough… XO-MaryJo
Such a great idea! Love it!
These teacups are so cool!
What a nice tutorial! I could see doing this to chipped teacups – I just can’t bring myself to do something permanent to an intact teacup but this would be a fun use for one that’s no longer “perfect”. The flowers, etc., could cover the chip and it would be lovely!
Susan,
ABSOLUTELY loved this post!!! Great tutorial! Pinned and shared on face book!!!! will definitely attempt making these!!!
Thanks so much for taking the time each week to host this charming party!!! It is truly appreciated!! Stay safe, healthy and happy!!
Hugs,
Debbie
So many fun links to dive into this week, Susan! I cannot get over those teacups – they are so cool and super creative too! Thanks so much for hosting. I hope your week is a special one, CoCo
OMGOSH!!! (excuse the screaming!!!) this is the cutest and most creative thing ever!!! I read this – (and such perfectly clear directions from your BNOTP reader btw) and my mind just went crazy with all the other ways to use this as a table decor/setting! Think Terra cotta pots, decorative pots in color, bowls… !!! This was AWESOME – thank you for the share!!!