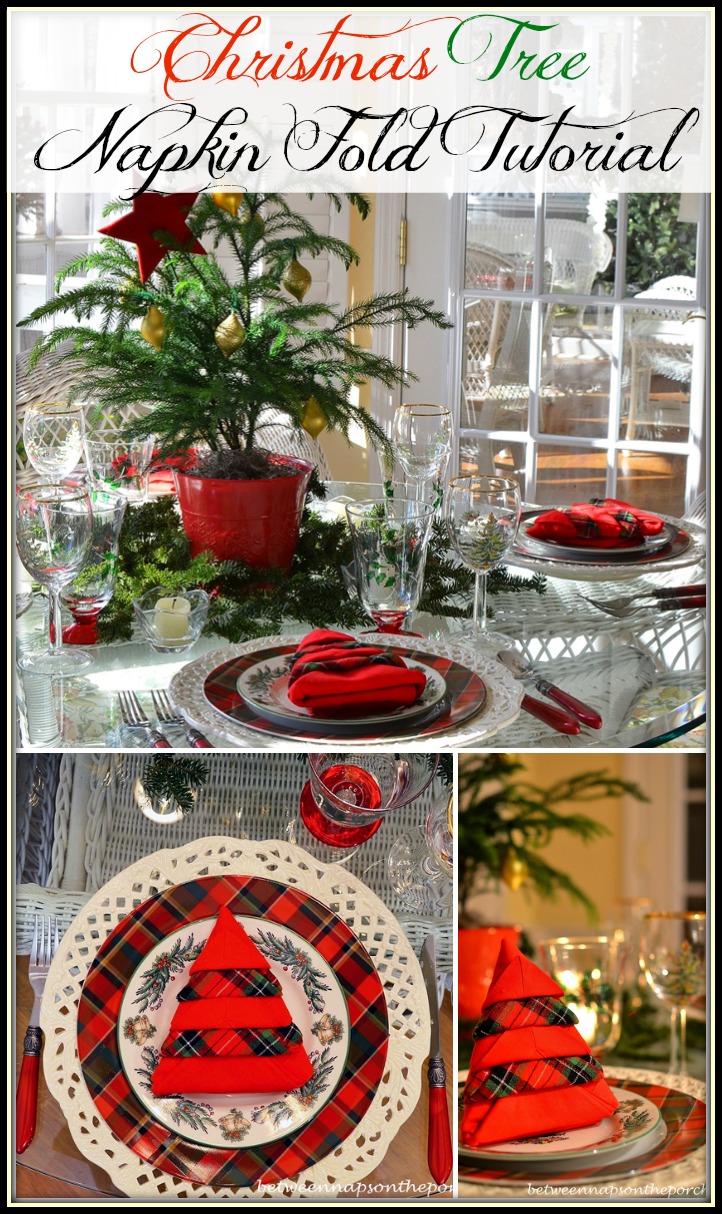
Welcome to the 256th Metamorphosis Monday!
I’m putting Met Monday up early since this next week is going to be super busy for us all. Also, this “Before and After” is something you may want to use for Christmas so figured getting it up today will give you a little more time to plan.
This past week, I posted a Christmas tablescape with a Christmas-tree theme. Tablescape can be viewed here: Christmas Table Setting with a Christmas Tree Theme

That tablescape included a cute Christmas tree napkin fold.
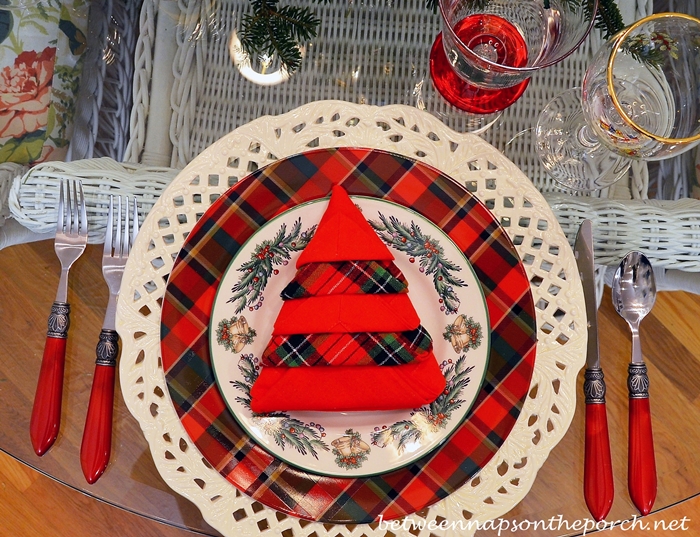
Today for Met Monday, I’m sharing how to make this Christmas-tree-shaped napkin fold in case you would like to use it for your Christmas table this year.
I actually folded six of these last week before I decided to set the table in the breakfast room where the table seats just four.

Please read this information below, it will help this fold make more sense.
A little background info. before we get started: I saw this fold on YouTube made two different ways. One way used a single, solid-colored napkin and it produced a tree with the layering down the front as shown above, but of course all the layers were one color since the napkin was one color.
The second tutorial I found on YouTube showed how to get the two-pattern look using a single napkin that was two-sided, meaning a napkin with one design (solid color or print) on one side and a different print on the other side.
The thing I didn’t like about that tutorial was, though the fold did come out with alternating patterns down the front, the last two layers ended up being the same color. That was bugging me, I just didn’t like the last two layers being the exact same when all the others had nicely alternated down the front.
How I Made My Christmas Tree Fold:
I didn’t have any 2-sided napkins with patterns suitable for a Christmas table setting, but I really liked the two-pattern design down the front. So, I decided to try making the fold using two napkins instead of one to get the two-pattern look. This decision led to two “side-effects” that turned out to be great. They were:
1. The patterns alternated correctly all the way down the front, including the last two layers. (Yay!)
AND
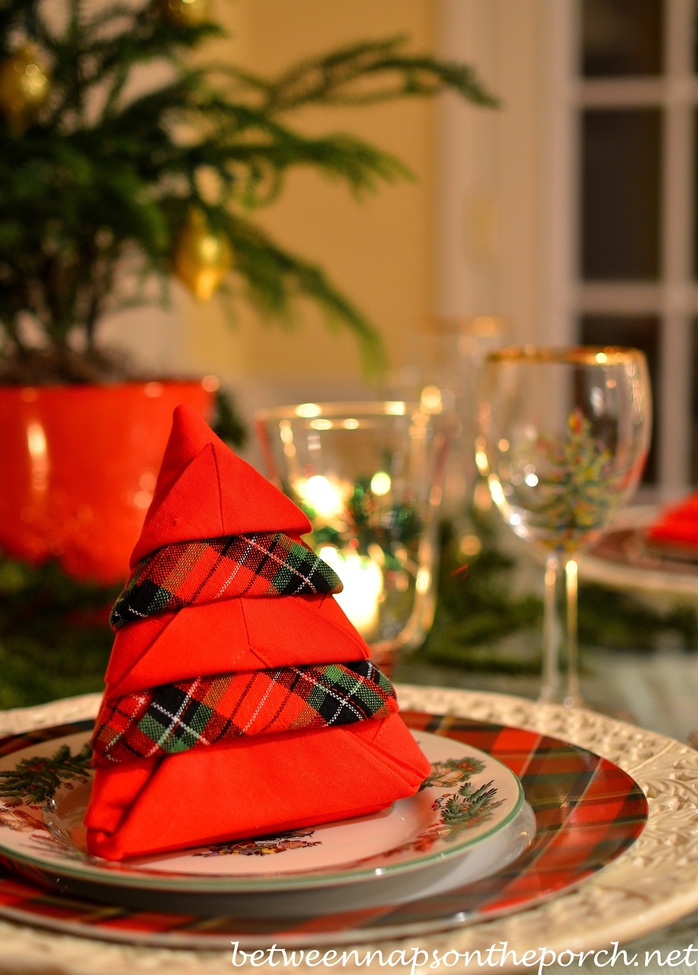
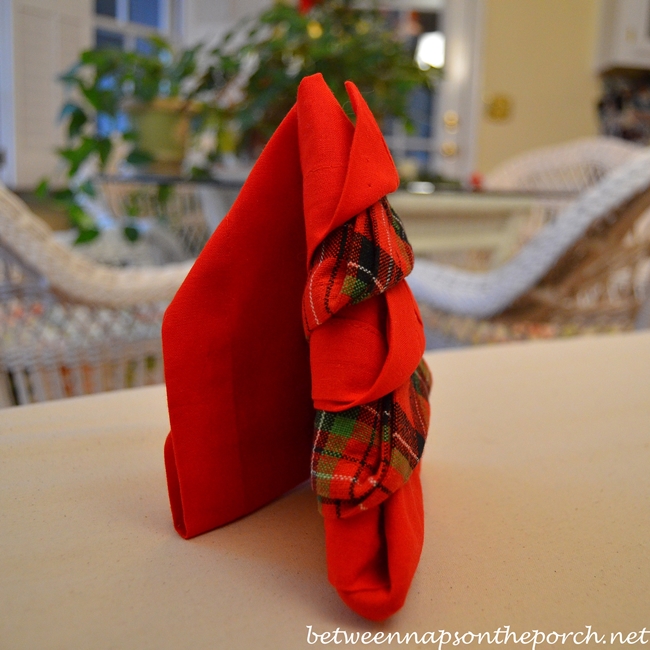
2. Because I used two napkins, the Christmas tree fold ended up nice and hefty which allowed the fold to actually stand upright as shown below. If you make it this way using two napkins, you can either lay the napkin down on the plate as it appears in the pictures at the beginning of this post, or you can stand it up as shown below. I’ll show how that works at the end of this tutorial.
If you have Christmas napkins that are two-sided (with two different patterns, front and back) you may want to make this fold with just one napkin. I ended up preferring the two-napkin fold because of the two reasons listed above.
Note: This tutorial shows how I made this fold using two napkins. If you wish to make the fold with just one napkin, follow the exact same steps I’m sharing below. These instructions will work for that, too.
What You’ll Need:
To make this fold you’ll need napkins that are square. If you’re using two napkins as I did, the napkins need to be very, very close to the same size. It’s best if they are the same size but if there’s a slight difference in size like I had, it will still work fine. This tutorial will not work well if the napkins are very different in size.
Important: If your napkins are wrinkled, take time to iron them first. This fold will be much harder and not turn out well with wrinkled napkins. I tested folding mine with wrinkled napkins when I was learning how to make this fold and it was not fun! So, for best results and less frustration, be sure to iron your napkins before beginning.
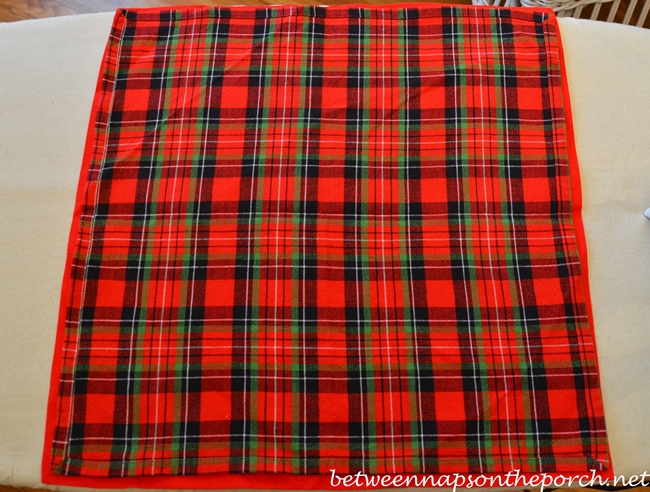
To get the two-pattern look I wanted for my Christmas tree fold, I used a solid red napkin and a plaid napkin. Since my red napkin was just slightly larger than the plaid napkin, I placed it down first with the plaid napkin on top. I found the fold just came out better with the larger of the two napkins on the bottom.
I started with the hemmed side facing upward toward me on both napkins but I’m not sure it really matters.
So let’s get going.
Fold your napkins in half by folding the top half of your napkins downward.

Then fold them in half again, as shown.

Rotate your folded napkins around so the open ends are all facing downward toward you.

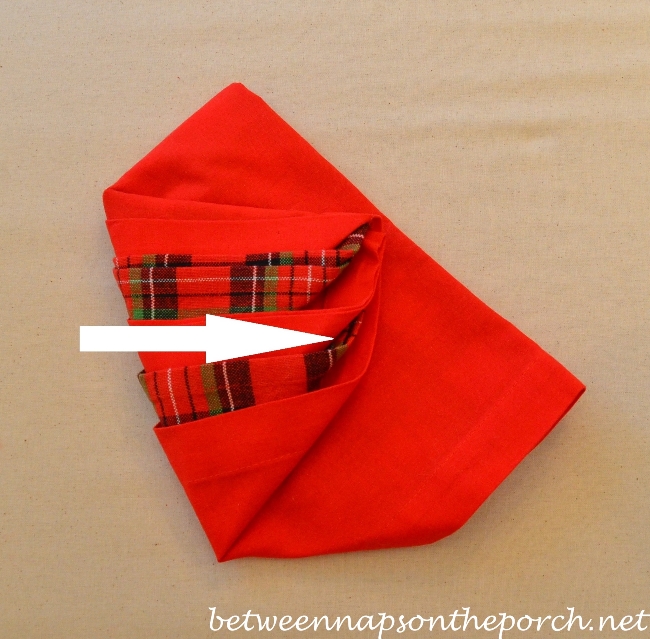
Lift up the first layer (the solid red napkin in my case) toward the top, stopping about an inch down from the top edge. Just look at the photo below for comparison.

Turn the next layer up (plaid layer in my case) stopping again about an inch below the edge of the previous layer. It may not be a full inch, so you may need to adjust as you go along. Just keep looking at my photos below to help judge where to stop with each layer.

Repeat again with the next layer, which in my case was the solid red. Each time you’ll stop about an inch down from the edge of the layer above, as shown below.

Keep repeating the step with each layer.

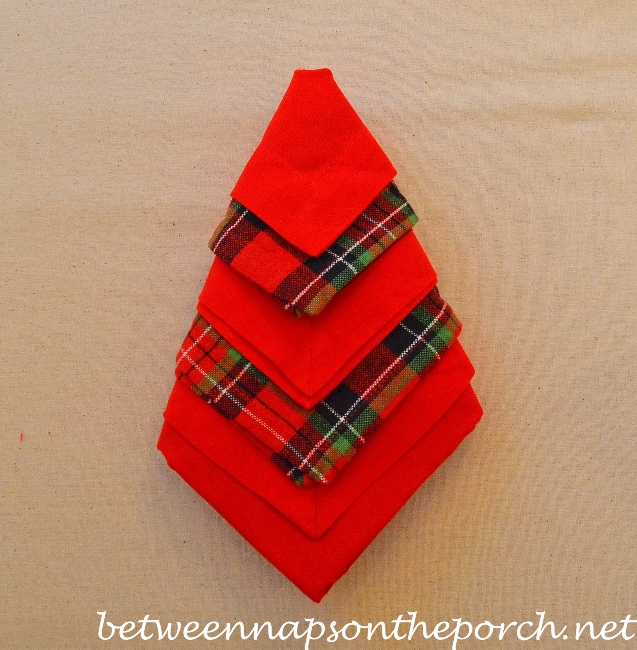
When I got to the bottom, my last layer was actually two solid red layers, so I just turned both of those upward together. Once you have all your layers turned up as shown below…

…you’ll want to turn the whole thing over, being careful to not let your layers fall out of place. Just use both hands and brace the layers you just created with one hand while using the other hand to turn the napkin over. The layers should still all be facing upward, just flipped over now so you can see the back side of the napkin.

Fold the left side over, as shown below.
Repeat with the right side.

Turn you napkin back over again, once again being careful to keep all your layers in place.
Okay, you’re almost done. Starting at the top, turn the first little layer upward toward the top of the tree.
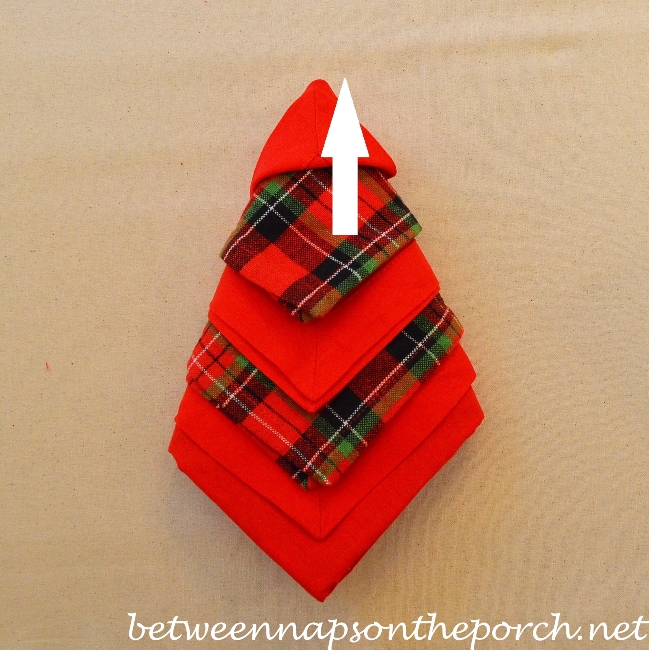
Repeat that with the next layer (in my case the plaid layer) and tuck the tip of that layer up underneath the layer above it. Just look at my pictures below to gauge about how far to tuck it under.

Continue moving down the tree, tucking the tip of each layer up under the layer that’s above it. In the picture below, I had just tucked the tip of the red layer up under the plaid one just above it.

After all the layers have been turned upward, tucked under the layer above and you have reached the bottom, just tuck the remaining layer(s) up under the layer above, in my case it was the red layers that were tucked underneath the plaid.
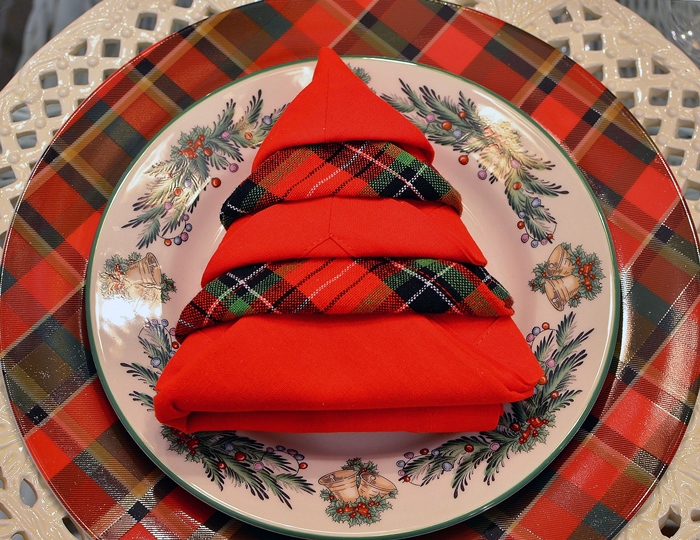
That’s it…you’re all done! Your tree should look something like this.

You can display your Christmas tree napkin flat on a plate or table or display it standing. If you display it laying down, it might be fun to put a little KISS candy at the top for the star. I just googled “star candy” out of curiosity and found star-shaped chocolates in silver foil wrap, as well as several other star-shaped candies available online. Too late to order those for this year, but you may find something in the grocery or discount store that works for a star.
You can also display your Christmas tree fold standing up on the table or on a plate.
To stand it up, carefully pull back one part of the folded section on the back as shown. Just pull it back a small amount, the amount needed to prop up your tree. If you make this fold with one napkin, I’m not sure it will be sturdy enough to stand up. It stood up well using two napkins.
Hope you enjoyed this little tutorial! Have fun making your Christmas trees!
Looking forward to the Before and Afters linked for this Met Monday!

If you are participating in Metamorphosis Monday, you will need to link up the “permalink” to your MM post and not your general blog address. To get your permalink, click on your post name, then just copy and paste the address that shows up in the address bar at the top of your blog, into the “url” box for InLinkz.
In order to link up, you’ll need to include a link in your MM post back to the party so the other participants will have an opportunity to receive visits from your wonderful blog readers.
Please observe these few rules:
Only link up Before and After posts that are home, gardening, crafting, painting, sewing, cooking, DIY related.
Do not link up if you’re doing so to promote a website or product.
Do not link up a post that was just linked last week since a lot of readers will have already seen that post.
Do not type in ALL CAPS. It spreads the links waaaay out.
Welcome! Thanks for coming to the party!


Susan, Thanks so much for sharing your Christmas tree napkin fold! Wishing you and your family a Merry Christmas!
Thanks, Mary! Merry Christmas to you and your family!
wow Susan, beautuful table setting!!! Merry Christmas . Christine from Little BRags
Thanks, Christine! Merry Christmas!
I LOVE IT! That is just darling!!
This is so stinkin cute I can hardly stand it:):) I am going to ask my daughter if she wants me to do this for her table. I am doing Christmas Eve and my table is set. Wishing you the bEST Christmas ever. Thank yiou so much for being such a gracious and generous hostess ALL the time! XO, Pinky
Thanks, Pinky! Merry Christmas! XO
Susan! Those napkin trees are the cutest! I have never seen that before. 🙂 I truly hope you and yours have a very merry Christmas!
Thanks, Luisa…Merry Christmas!
Wooo hooo! How cute are these? You are genius! What an adorable twist to a plain napkin….. I doubt I will have time to use this now, but you can bet I’ll save and use it in the future. Thanks for sharing. Vicki in Louisville KY
Great post Susan. I had to pin it.
Hope you and your family have a Merry Christmas and a Happy New Year.
Susan, just in time, I will do this napkin fold for my family dinner Monday night! Wishing you and your
family a Wonderful Christmas!
Susan,
Not only is this adorable but you make me think even I could do it!
Merry Christmas to you and your family as well as the Happiest of New Years!
Thank you for all the inspiration!
Denise
Wouldn’t you know…”we” (I use that term loosely) tried the You Tube on folding a Christmas tree napkin…10 done and then YOU pop up…yup, yours is way better! Back to the folding board. I put a cocktail pick on the top…this one happened to have a red pom pom on the pick…but, I have a star one, too…(just not 10 of them.) You are the CHAMP!!! franki
Sorry Franki…wish I could have gotten this tutorial done sooner. I LOVE the idea of putting a little pom pom or star at the top…so cute!
This is great, Susan! I really wanted to know how to do this. Thank you!
I am dropping by to wish you and yours a very Merry Christmas! I wish you all the happiness your heart can hold.
Love you,
Sheila
Susan, Thanks for the tutorial. I have double plaid and solid green napkins on the breakfast table already. I am going to try this napkin fold.
Wishing you and your family a Blessed Christmas.
Ginger
Susan, these are ADORABLE!!! I’ve already set the table…..BUT, your tutorial made it look SO easy, I may give it a try!
Merry Christmas to you and yours!
Camille
Merry Christmas Susan!
Thanks for hosting, Susan! I posted the 7 ft porch tree. Pretty windy and she is still standing!
Merry Christmas!
This is adorable! I really enjoy looking at your tablescapes–thanks for the great tutorial too. Have a wonderful Christmas! Dee 🙂
Susan, thank you for posting this early. I’m worried about trying to remember everything tomorrow. I’m going to have to come back to this post next year to try that wonderful napkin fold. No time left this year. I’ll be doing well to get the napkins on the tables! Wishing you a very merry Christmas and a wonderful 2014! laurie
Thank you for the tutorial. You know I love those napkins! Thanks for hosting Susan. I know that this is such a busy time of the year and you are so generous to host this party. Merry Christmas!
Big Texas Hugs,
Susan and Bentley
Aww, Susan, you found time to post the tutorial. 🙂 That was so good of you. I know you must be busy with Christmas preparations, but all your readers sure love this napkin fold! It is so cute! So festive looking. I am grateful for people who have the patience for figuring these things out. THANK YOU so much for posting this! Merry Christmas. 😀
I felt compelled to attempt this immediately. Never realized my napkins were so many different sizes and I think you really need to that are pretty close in size for this to work correctly. It’s actually pretty easy with your detailed instructions. And it’s best if your napkins are printed on both sides. But it came out really cute!
really need TWO, not to. Maybe shouldn’t be typing at 11:00 at night!
Hi, Susan,
THANK YOU, THANK YOU, THANK YOU for using the last of your precious free moments during this crazy time to not only host MM (I am participating today for the first time!), but for also presenting this very clear and detailed tutorial. I am going to give it a try. Once again, enjoy the special days ahead! Rosie
Susan, you are so creative, loved this tutorial. Hope you have a lovely Christmas with your family!!
Thanks for the detailed tutorial – great job! Just downloaded info and will use next year.
Wishing you the best Christmas ever….be blessed.
Wow Susan, that’s amazing! I pinned it twice, to my Christmas and Tablescaping boards. I’m going to make this later today. I have a white napkin and red swiss dot pair I got at an estate sale I think will look cute. Have a blessed Christmas! -Dawn
I’ll join you for breakfast there! What a cute table setting. I found that on pinterest when I was setting mine, but only had 1 white napkin. It’s on my list for next year once I decided my color scheme. Thanks for hosting and have a blessed Merry Christmas in your gorgeously decorated home.
Shannon ~ bohemianjunktion.com
X°
X°X°
X°X°X°
X°X°X°X°
X°X°X°X°X°
II
MERRY CHRISTMAS, SUSAN!
Susan, Thanks so much for the tutorial for how to make these adorable napkins. Thanks for hosting and have a wonderful Christmas.
xo Babs
Just quickly popping in to wish you Susan and your loved ones A VERY MERRY CHRISTMAS full of peace, joy and seasonal blessings. (Am currently feeling like the White Rabbit in Alice in Wonderland, scurrying around muttering to myself “I’m late, I’m late for a very important date”, so shan’t ramble on. ☺) Wonderful tutorial!
Warmest hugs -Brenda-
Susan, Thanks so much for this tutorial. No one does a better job with explaining things like this than you. I am going to give this a try. You are such an inspiration! I hope you and your family have a very Merry Christmas!!
Thank you for hosting, Susan…..Merry Christmas to you and your family!
Susan,
I adore your tutorials on napkin folding!!!
Years ago, while working in an Antique/ Home Decor Shop,
I shared one of your first tutorials with the owner.
After that we folded many, many napkins in our displays using your tutorials!!!
Thank you for hosting each week!
Inspiration abounds at Between Naps On The Porch!!!
Merry Christmas, dear friend!!!
Fondly,
Pat
Oh, I love that Pat…thanks for sharing that story! So glad someone was getting some use out of them. 🙂
Have a wonderful Christmas!
XO
I have always been a fan of the art of napkin folding but I have never seen them folded this way before!! So cute! Households across America will now have Christmas tree napkins on their tables after seeing this post. Love it!! Thanks for hosting, and have a very Merry Christmas, Susan!
Thanks, Jennifer! Sure would be fun to see all the different combinations, wouldn’t it? 🙂
Merry Christmas to you and your family! XO
Thanks for hosting, Susan! I love those Christmas Tree Napkins! I hope you have a wonderful Christmas!
Blessings,
Nici
Dear Susan: Thank you for sharing how to make these napkins! I love it and I will definitely give it a go. I must say that since I discovered you this year, my home has really benefited from your blog from Met Monday to Tablescape Thursday. Even my husband noticed how much more I am doing AND how I am doing different things. You have inspired me AND awakened the creative juices. I made the ice bucket wine chiller that you posted last week and, because Christmas Eve and Christmas Day are going to cold here in Pittsburgh, I used the same steps and made two beautiful ice luminaries for my front porch.
Christmas is a time to count your blessings and be thankful for those thinsg that are important – blessings of health and family and friends, both near and far. YOU are a blessing that I am counting this year. You have helped me in more ways than you can know. Merry, Merry Christmas to you and yours!
Hear, hear. I second that, Gloria.
Aww, thanks Pam!
Gloria, that’s wonderful and makes me so happy to hear that! Your sweet comment has surely blessed me today! I bet the ice luminaries are going to be beautiful! Have a wonderful Christmas with your family! Looking forward to 2014! XO
How stinkin’ cute are the napkins!? Happy Holidays!
Thanks so much for hosting! I love your Christmas tree napkins…so cute! So smart the way you figured out to fold two napkins together rather than one.
KC
Thank you so much, Susan, for hosting and for sharing the fun napkin fold. Hope you have a wonderful Christmas!
Hi Susan! How sweet of you at this busy time to have Met Monday! I thought I was through posting until after Christmas til I saw your post so I just had to do one more! 🙂 Thank you for all of these years for hosting your parties! I send my very best Christmas wishes to you and yours. Be blessed and love you and here’s to many more Met Mondays!
Be a sweetie,
Shelia 🙂
Susan,
Buon Natale from Umbria. Thanks for hosting. Wishing you all the joy in the world.
Cheers,
Natalie
Your table looks so festive, I love it! Have a wonderful holiday season, Laura
I love this napkin fold! I have always wanted to try, but never found a simple enough shape to thrill me! I pinned and tonight I will have my family folding! Thanks for the party this and every week, Susan, and I wish you and yours a very merry Christmas! 🙂 Kim
Thanks, Kim! Hope you have a wonderful Christmas! XO
Such a wonderful idea! Thanks so much for sharing!
Pinned! =)
Susan, thanks so much for sharing the tree napkin fold! Just too stinkin cute.
Wishing you and your family a Merry Christmas!
Yikes, Susan. I love this napkin fold. I wonder if I have the patience to try this. And, I do still have to set my table for tomorrow.
Thank you for hosting all of this inspiration. Merry Christmas to you and your family.♥
Thanks for this great idea. I ran with it and used white napkins with a holly design in one corner. I figured out how to put the design at the top of the tree and folded the napkin around our traditional final present of the day, (How the sort of strange tradition started, I have no idea.) a lottery scratcher ticket. It was a big hit!
Pinning this for next year!
I am excited to make these for next year. We did not get to decorate this year because we were having all the floors redone in hardwood downstairs. I am searching for ideas to make during this year after buying fabric on sale today!! I will make flat napkins and fold them this way…
Your table sitting is impressive. A few years ago, I purchased several of the PLAID TRIM DINNER PLATES, like the ones you use in your presentation; and once carried by CRACKER BARREL. I need a few more. Where can I buy them?
Sarah, I would check on eBay, searching for the pattern by whatever name is on the back of the plate. Also, check on Replacements.com. You may have to check back every week or so to find them, but hopefully they will show up on there. I’ve filled in with missing pieces that way over the years. Good luck, hope you can find more!
Brilliant! Can’t wait to try it! 🙂