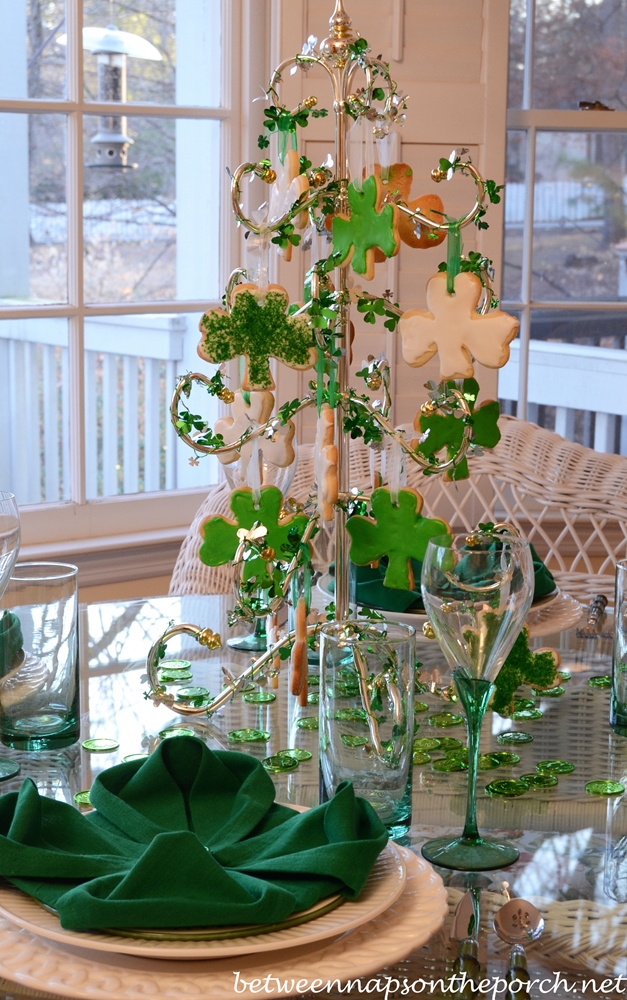
Last week for Tablescape Thursday, I shared a fun St. Patrick’s Day table setting with a Shamrock Cookie Tree centerpiece. If you missed that tablescape you’ll find it here: St. Patrick’s Day Table Setting and you’ll find the recipes for Shamrock cookies and icing here: Shamrock Sugar Cookies and Icing Recipes

The tablescape also included a napkin fold in the shape of a 4-leaf clover. Several folks asked for a tutorial showing how to make this fold so I got busy created one I hope will be helpful.
This fold can be a bit tricky at first but it really isn’t hard once you get the hang of how each leaflet is made. So don’t let it intimidate you; it really isn’t that bad at all. 🙂

Square Napkins Work Best
This fold is best made with napkins that are really good and square. Some of my napkins were not square and it made the fold a lot more challenging. So, save yourself a lot of frustration and use napkins that are nice and square.
Tip: This fold is best made atop an ironing board since you’ll need to press the folds with a hot iron once during the folding process.
Okay, lets get started.
Start by placing your napkin on a flat surface with the non-printed or “wrong” side facing up.

Fold the bottom left and right corners upward and inward toward the center of the napkin.

My napkin had a little shamrock on it but it ended up hidden in the end.

Next, fold the top left and right corners downward toward the center of the napkin, as well.

Here’s the only time you’ll need the iron. Press down the folds you just made with a hot iron.

Now turn your napkin over.

Again, you’ll fold all the corners inward toward the center of the napkin.

Continue folding all the corners inward, as shown.

Here’s how your napkin should look once all the corners are folded inward toward the center.

This is where it gets a little tricky. We’re going to create the four leaves of the clover. Start with one corner and fold it upward to where it’s standing straight up. Just leave it standing up as shown below

See where the arrow is pointing in this picture below? It’s pointing about one and a half inches (1 1/2 inches) or half-way down the back side of that folded up section. With a pinching type motion, using your thumb and forefinger, pull the fabric out and upward where the arrow is pointing. This is going to pull a little fabric up and out from underneath your napkin.

Once you pull out on the fabric with your pinched thumb and forefinger, your napkin will look something like this. Looks kind of messy doesn’t it?

Next you’ll just tuck the fabric down on top, creating a little valley with the extra fabric you pulled out from underneath your napkin. This was the part that threw me for a loop at first.

It isn’t hard once you realize, all you’re doing is pulling some fabric upward from underneath the napkin and then using that excess fabric to create a little valley. (Note the valley created where arrow is pointing below.)

Repeat this process for all four corners, first turning the corner upward as shown below so you can access the fabric on the back. Then pinch up the fabric about half way down the back with your thumb and forefinger so you can pull the fabric outward and upward from underneath the napkin in that corner.

Here’s how it looks right after you’ve pulled the fabric out and upward…kind of messy. But that’s okay because you’re going to use your fingers to make a little valley between that front section and the fabric you just pulled out from underneath.

Again, here’s how it will look once the valley is created.
Tip: There are two ways you can leave these sections looking:
1. You can leave the leaflets flat like you see in the top right section,
or
2. You can leave them looking kind of full and fluffy like I left them on the bottom right section. I personally prefer the fuller, fluffier look so I folded the rest of the napkin that way.

Once you have pulled the fabric out from underneath all four corners and have created the little valleys for each section, your napkin will look like this. Place a mint, coin, shamrock or any decorative piece in the center of your fold to hide where all the sections come together.

This fold creates a large, eye-catching display. It really is a show-stopper of a fold. Place your 4-Leaf Clover napkin in the center of your place setting for a beautiful, dramatic look. Enjoy the ooohs and ahhhs of your family and dinner guests. 🙂
Like creating fun napkin folds? You find 10 additional napkin folds including a bunny fold for Easter and several for beach themed table settings here: Napkin Folding Tutorials They are also listed under the Tablescaping category at the top of BNOTP if you ever need them for the future.


That’s such a fun and festive way to fold a napkin! Looks really nice!
Thanks!
That is so incredibly cute! Thanks for the wonderfully detailed tutorial. Love it!
Thanks, Mary!
What a great tutorial on napkin folding! Your St Patrick tablescape is gorgeous!
All of your items blend in and compliment one another! You did a fabulous job in creating this!
Thanks so much, Gail!
Thanks for the tutorial, Susan — I love this napkin fold! Anything St. Paddy’s related is fun. 🙂
I also like your tablescape and cookie tree. I tried to leave a comment last week, but everytime I clicked on the comment box, it kept taking me to the Texas ad, and I couldn’t leave a comment. Hope you have a wonderful day!
Denise
I know, something was wrong but they fixed it. Sorry that was happening. I was away from home and didn’t realize it was doing that. Thanks, Denise!
Immediately tried the fold since I was ironing early this a.m. I am surprized how easy it is–your fold by fold steps/photos are great. Need to get solid green napkins though, as using a shamrock print on white does not have the same effect .
Anne, I bet you’re right. It was lucky I already had those from previous years.
Oh my, Susan!
Those 4-leaf-clover napkins with the lovely embroidered shamrock hidden in them are sooo pretty
and those bunny napkins are sooo cute… if I were your guest I wouldn’t dare to unfold and use them!
(But I’d really appreciate that you have the patience of a saint! :-))
~Hugs to you~
Cecilia
Cecilia, that’s such a cute way to look at it. It’s like the little shamrock is a hidden surprise once you unfold the napkin. 🙂 Love that!
LOL, too cute about not unfolding the bunny napkins. 🙂
These are adorable! I’m off to find some square green napkins-it might be something I have to make myself! Thanks for the tutorial! Hugs, Meghan
Hope you find some…this is a good time of the year to be looking. 🙂
Thanks Susan! It’s genius! Now all I need is green napkins……ha!
Thanks, Jenna!
Thank you Susan for this great tutorial..I love it!!! Big hugs,
FABBY
Thanks Fabby! ♥
Delicious tablescape Susan ☺ and a great tutorial! Thanks for sharing it. -Brenda-
P.S: This napkin fold reminds me of the Water Lily one (your steps one through nine) and a beverage glass is placed in the middle. The glass is then held in place and then each under corner ‘flap’ is pulled out and so is each under ‘point’ which forms four peaked petals instead of clover leafs.
Oh, that sounds really pretty! Wouldn’t that be beautiful for a spring or summer table. Or a Mother’s Day table setting.
Great tutorial! I think that even I con do this! 😉 However the gigantic Texas popup ad that is larger than the website and prevents full-sizing your article is annoying….
Vikki, I always resize my pics to 650 pixels so they don’t enlarge anyway. I do that to help the post load faster, otherwise it would take a long time to load. Is there a picture or two that you especially want to see larger? I can go in and add that picture in full size and then remove the pixel size in the html view so that it won’t look warped but will enlarge when clicked on. Let me know if there are 2 or 3 pics you would like to see larger and I can add them in larger, although it may make the post load a little bit slower.
Hey I just tried it..I Can Do That!!! thanks for sharing
Jonell
Awesome! 🙂
Love these and they’re so versatile; just use red and you have several holidays. I’m going to give this one a shot. Great tutorial. I hope it’s as easy as it seems. Thanks Susan
Thanks, Ann!
Great tutorial, thanks for sharing this information. Your St. Patrick’s table looks lovely and so inviting.
Cynthia
Thanks, Cynthia!
I love, love, love this. It is absolutely adorable. I hope to be able to do it either this St. Patrick’s Day or next. Great idea. Thanks for sharing.
Thanks, Margo!
Hi Susan,
Love these napkins! So pretty, and the perfect color! Great tutorial!
Thanks Kathy!
I did it! Thanks so much for the tutorial. Your instructions were wonderful. I can’t wait to us this for St. Paddy’s Day!
Yay, glad they worked! 🙂
I agree with the poster who said you have the patience of a saint! Someof us hve the craft skills of a nothing! LOL but you make me want to do this! Do you remember those fortune tellers we did as children, where we took a piece of paper and folded it like the first half of this demonstation, then wrote fortunes or answers to questions on the inside to entertain our friends? That is what the first half of this fold reminded me of! Am I as clear as mud? LOL This is so much fun! I’m going to go look at the bunny fold right now! Helen
Helen, I do remember those…they were so much fun! We made them all the time! 🙂 I don’t remember now how we made them but I loved ’em. lol
This is a great fold…it might even look like a poinsettia with a red napkin! I love your green table. St. Pat’s Day just gets missed around here. When the kids were home, I’d make corn beef but my husband doesn’t like it…so, other than putting on a green shirt, not much celebrating at our house.
Sue, that’s a great idea! It also looks a bit like a dogwood blossom. Maybe a pink napkin could create that for Easter. 🙂 Ummm, corn beef. Sounds so yummy!
Thanks for showing how to fold such a cute napkin. I love napkins! I think a cloth napkin says “sit and stay awhile”. I have 4 sets of china and about 100 napkins! (napkins take less storage room than dishes). I use different napkins to “set” the. Stage of the table. Thanks for all you do helping us with ideas!
Thanks Fidelia! I’ve been buying more napkins lately…so nice when you have just the right napkin for a table, isn’t it?
Susan, what about a magnolia? There must be a way to create that one, too! Love the clover and all the other ideas mentioned. Thanks, Helen
Love that idea, Helen! 🙂
Susan, excellent tutorial. You made it look really easy. I can just imagine how hard this was the first time.. thanks sooo much.. xo marlis
How clever! I love it, but I have to confess that I am allergic to ironing so mine will be a wrinkled mess – ha!!
I just love all your tablescapes! That looks like a real big napkin, what are the measurements? Would you be able to achieve the same results with a smaller one?
Thanks, Kathie! I just measured it and that napkin measures 17 1/2 inches x 17 1/2 inches inches…square. So it’s not that terribly big. I guess the pictures just kind of make it look that way.
That’s the prettiest napkin fold I’ve ever seen! I’m imagining it with a pink napkin, or any other color, looking like a beautiful flower. (No, I didn’t try it yet!)
Susan,
Where did you purchase the ornament/cookie holder tree?
I love it!
Thanks,
Donna Weatherspoon
Thanks! I purchased it many years ago at Ross-Simon. I purchased the first one I bought in their Atlanta store in Phipps Plaza. It has closed and I’m not sure if they still have any physical stores. When I needed a second tree as my ornament collection grew, I purchased one from their store online. I don’t know if they still carry them around Christmastime or not.