Welcome to the 101st Metamorphosis Monday!
Merry Christmas and Happy Holidays! I hope your holidays have been wonderful!
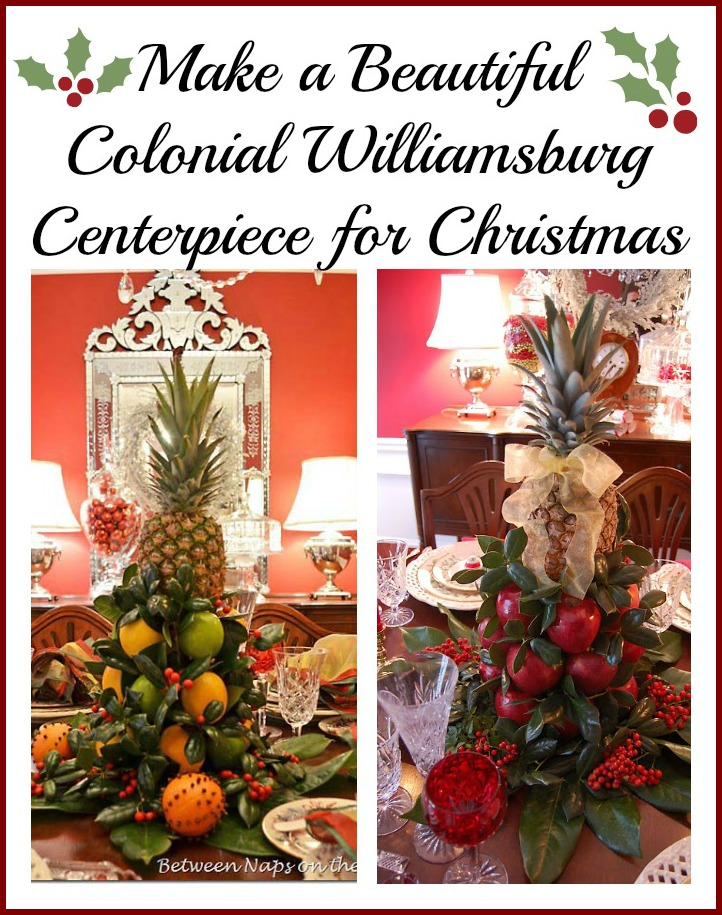
Recently, I created a Colonial Williamsburg style, apple tree centerpiece for our Christmas dinner table setting. See that table setting here: Christmas Tablescape with Colonial Williamsburg Apple Tree Centerpiece
I’ve had several requests in the past for a tutorial showing how this centerpiece is made…so when I made the centerpiece this year, I took pics along the way.
To create the apple tree shown above, you’ll need some greenery. The greenery I gathered from my yard included magnolia, holly and nandina berries, but you can substitute other types of greenery like boxwood, cedar or pine. I guess you could call the photo below my “Before” for this Met Monday.

You’ll also need an apple tree form. Mine was given to me over 15 years ago by a friend with whom I worked. I’m not sure where she found it. They usually have them at the Williamsburg Marketplace online, but when I checked this evening I couldn’t find them. They may be temporarily sold out due to the Christmas holiday because they usually have them in stock. If you are interested in buying a form, check their site again later in the year and hopefully they will have them back in stock.

If you know someone who is crafty or a woodworker, perhaps they can make one for you. As you can see, mine is just a wood cone, attached to a round wood base. It has what appears to be long finishing nails protruding at regular intervals around the cone. Note: The nail that is protruding from the very top of the form in the center, is longer than all the other nails.

I always place the apple form on a towel so I can spin it around as I work without scratching the surface I’m working on. I bought two bags of small apples. I use small apples because large apples tend to be too big and make it difficult to create three rows around the tree, and still leave the top row of apples low enough to not interfere with the pineapple topper.

To get started, just take an apple and push it onto a nail. I always start at the bottom and work my way up. I like to leave a small space under the apple for tucking in greenery later.

Here’s how it looked after the first row. If you finish and there’s a big gap between your first and last apple, you’ll need to pull the last apple you placed back off and find a fatter apple in your stash of apples, or re-adjust the ones that are on the tree over a little. You don’t want to pull apples off and on a lot because the more holes you create in your apples, the sooner the apples will begin to go bad. But don’t fret about that too much. I always end up having to adjust some apples and my trees still last well over a week…even close to two weeks. I don’t remove the stems from the apples since they don’t seem to interfere in any way.

A view from the top…

Start a second row of apples around your tree. I always stagger the rows but inevitably some apples will end up directly over other apples. Again, don’t worry about that…we aren’t shooting for perfection here. 🙂 I don’t leave a space between the rows of apples (or at least, I don’t do so intentionally) because I don’t tuck greenery underneath the apples within the apple tree itself. I only do that under the first row of apples.

In this pic, I’m starting the third row. As I’m working, I’m spinning the towel around and around with the tree sitting on top of it. It slides very easily so the work goes quickly. The whole tree only takes about 25-30 minutes to assemble.

Here’s how it looks with the third row completed…

A view looking down with all the apples in place…

I used almost all of the apples in both bags…just had four left over.

I always purchase the smallest pineapple I can find to use for the top. It’s hard to find a small one sometimes. A really big pineapple can tend to overwhelm your apple tree. I don’t go from store to store looking, though. I just buy the smallest I can find wherever I’m shopping. Also, try to use a pineapple that has pretty foliage on top. You don’t want the top of the pineapple to be too crushed or too beat up, if you can help it.

I always pull the holly I use from this large holly bush in my yard. In years past, it would have been covered in berries, but for the last few years, it has had very few. I think it could be because it is being shaded by a huge oak tree growing nearby.

So, with holly leaves at the ready, I got to work…

I cut little 4-5 inch pieces and tucked them in between the base and the first row of apples and in between the apples….really just anywhere there seems to be a good size gap. Some holly really are prickly so poke the stems in gently. I always end up sticking myself several times.

Here’s how it looked after I had filled in with some of the holly. I don’t use a glue gun…the holly will usually stay in place by itself. If a piece falls out occasionally, just tuck it back in again.

Another view…see the gaps where I still need to add holly or greenery? You could also use boxwood in between the apples and that would be beautiful.

I usually cut a few nice looking magnolia leaves to put underneath the tree. If you don’t have magnolia in your area, just gather some other type of greenery…maybe cedar or pine. I had just tossed them on the table here to show you about how many I had gathered.

I spread the magnolia leaves out in a circle pointing outward and forming sort of a star shape. Then I place the apple tree on top of the leaves. Just adjust the leaves as needed.
Tip: When you are ready to lift the apple tree to place it in the center of the table atop magnolia leaves or whatever greenery you are using, be very careful. The tree is quite heavy. I normally slide the tree on the towel to the edge of the table and pull it partway off the table so I can get under it to lift it up to place it in the center of the table.
Another method to move the tree would be to delay placing the pineapple on the top and grab that tall center nail to aid you in lifting it to the center of the table. Then, just place the pineapple on top and add greenery around the pineapple once it’s in the center of the table.

Since my holly never seems to have many berries, I always cut berries from the nandina in my yard. I don’t use any of the greenery from my nandinas because I have found it wilts after only a day or two. Holly lasts a nice long time without wilting.

I always place the berries at intervals around the base. I tried tucking some in around the top (see below) but didn’t like the way that looked, so I removed them.

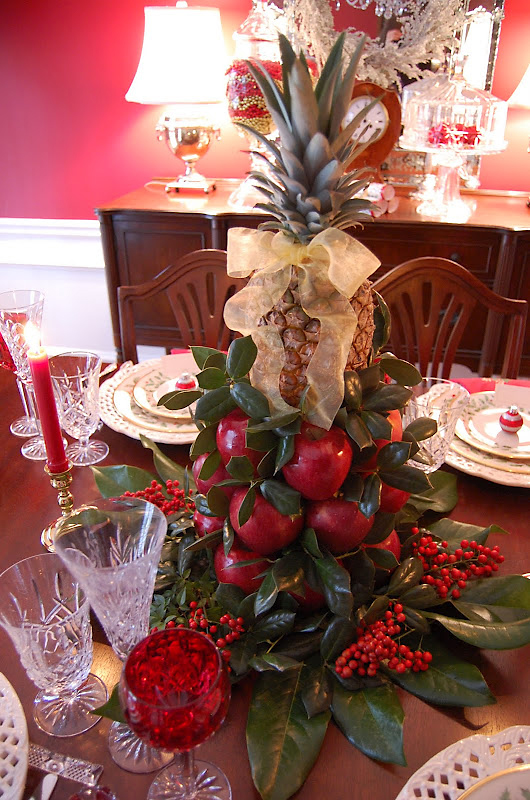
Last year I added a ribbon around the top and I really liked how that looked, so I did it again this year. A red ribbon may have been a better choice, or perhaps even a plaid one. I just reused the sheer gold ribbon I already had. So here’s my “After” photo.
And here’s how it looked in the center of this Christmas table setting. You could also create this centerpiece using apples and limes or apples and lemons…or even all pears. I think the combinations are really almost limitless. It just needs to be a fruit that is small enough to do at least three rows around the cone. I don’t think two rows would look as nice as three.

Last year, when I showed my apple tree on my Christmas tablescape, Kimberly, who reads BNOTP, decided she would create a similar tree for a different occasion…a bachelorette party. I had often thought of using the form for other events or holidays, so I was excited to see what she would create.
Kimberly went with a pink and green theme for her party…and here’s how it turned out. How fun is this! Now unless they are growing pink pineapples somewhere, I’m guessing Kimberly painted the pineapple. I love it with the flowers tucked in between. 🙂 Great job, Kimberly…and thanks so much for sharing this photo!

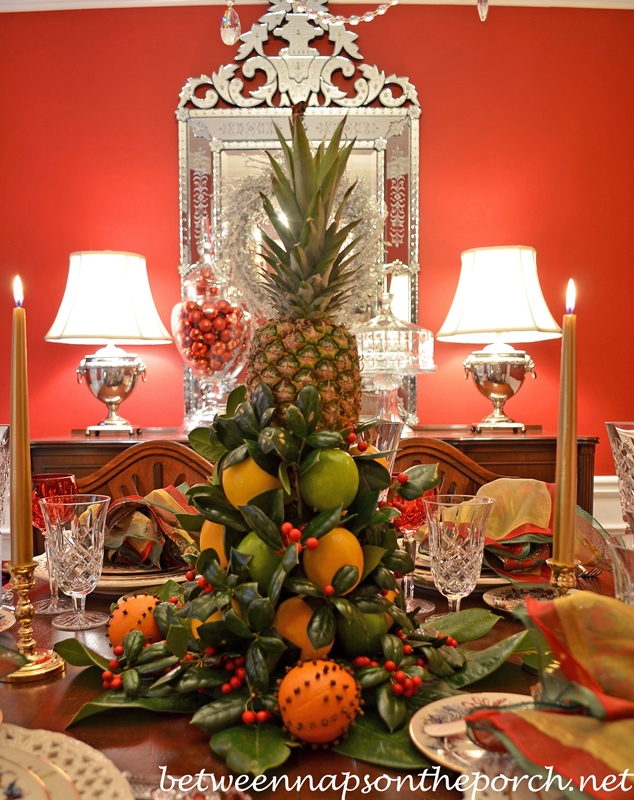
Update: Here’s how the tree turned out in for Christmas 2011 made with lemons and limes. View this table setting here: Christmas Table Setting with a Colonial Williamsburg Lemon-Lime Tree Tree Centerpiece
Hope you enjoyed this tutorial. If you did, please consider subscribing for email updates…they’re free! You can subscribe via the gray subscribe box at the end of this post. Once you subscribe, you’ll get an email whenever a new post is available to read here at the blog.
Looking forward to seeing your Before and Afters!

Metamorphosis Monday:
If you are participating in Metamorphosis Monday: Please be sure to add your permalink below, and not your general blog address. To get your permalink, click on your post name, then just copy and paste the address that shows up in the address bar at the top, into the “url” box for the picture linky. You’ll also need to put your e-mail address in, but don’t worry, it will not be visible to anyone.
If you’d like to include the MM button in your post, just copy and paste the Met Monday button to your computer or grab the html code from underneath the MM logo under the “Join the Party” header at the top.
Please include a link in your MM post back to the host blog, Between Naps on the Porch. Why is this important? When you include a link back to BNOTP, it ensures your regular readers/visitors will find the other awesome “Before and Afters” linked for this Metamorphosis Monday. If everyone links back, this maximizes the visits for all participants.


Thanks for hosting this blog party. Your apple decor is so pretty; I never would have thought about that.
Hi Susan! I remember seeing it in person at your cookie exchange party and I can vouch for the fact that it is impressive! I hope you had a wonderful Christmas and enjoyed our wonderful little surprise on Christmas day! It was a first white Christmas for me! Happy week!…hugs…Debbie
What a lovely apple tree. Love the other variations too! Thank you for sharing this wonderful post,
Kathy
Thanks for the tutorial — I always wondered how on earth those things were held together…
Your table is beautiful as always. Love the green stemware.
wow -how truly beautiful! and how nicw for the lesson.-thanks
Karen
Love the tutorial! thank you! You are the best. The last time I made one, my MIL and I put oranges and apples together. I saw one done with crab-apples that was so cute!
We have lots of snow, did you get any?
Mary
From Virginia
You explained that so well. Thank you for taking the time to document each step. Hope you had a wonderful day.
I love it! Thank you so much for sharing!
Susan! So glad to hear you have had such a Merry Christmas, and looking forward to a very Happy New Year! I LOVE this form…is it a Southern idea? I have never seen this kind of base/idea way out West..but rest assured I will be copying it too (like everything you do lol)and sending you pics. Sent my daughter home today 🙁 but look forward to sharing ideas with you…
Hugs and Happiness
Lisa
That is some heavy duty hardware! I can see it being used in a lot of different ways. Thanks for the great tutorial. I know tutorials take quite a while to put together!
Beautiful, Susan! Thanks for the tutorial! I also love the tree done with the cloved fruit!!! XO, Pinky
Thank you so much for this tutorial. I love what you did with the apples and pineapple, very impressive. So many variations too, and the base will last from year to year. This is a "must try."
Thank you for hosting, I'm looking forward to checking out all the talent.
Happy Holidays to you;-)
Thanks for sharing this again, Susan. I remember it from last year and it is just gorgeous….Christine
Pretty! Thanks for sharing the tutorial.
Have a great week.
Glenda
wonderful centerpiece.
Merveilleux et merci de nous montrer comment vous avez réalisé ce chef d'oeuvre.
Bisous et bonne année à vous.
Thank you for sharing all the crafty goodness and inspiration !
Oh thats such a lovely… gorgeous center peice!!
here is wishing you the best for the festive season!
Wow! The apple centerpiece is so pretty! Thanks for hosting the party! 🙂
How beautiful! Thanks for sharing!
Your apple tree centerpiece is just wonderful. My mind is spinning with other options for using the idea all throughout the year. Thank you for all your great ideas.
CAS
So pretty! I have a Wm'burg cone also. It was given to me years ago, but mine doesn't have the circle piece at the bottom. That's a very good idea…I will add one! Also,thanks for hosting your Monday party!
Angela
How cool are those! {I love the pink one…I can't help myself! ;}
m ^..^
This is amazing… what a neat idea! Thanks for hosting–
Mary
I made one of these one year for my mother-in-law's birthday. Since her birthday is in Oct. I used little mini pumpkins and small gourds. I wish I had taken a picture of it.
Susan,
I used to do this Williamsburg centerpiece for years at Christma time.I would set i out on the porch at night in the cold so the apples and pineapple would stay fresher longer. I live in Florida now and you've inspired me to do the centerpiece again, butI'm thinking about doing it in lemons. Thanks for the inspiration!
Susan,
I used to do this Williamsburg centerpiece every year when I live in Ohio. At night I would set it outside on the porch,so it would stay fresher longer. You've inspired to do it again now that I'm in Florida for most of the year,so I think I'll do lemons instead of apples. Thanks for the inspiration!
I suggest you start off with the whole thing on a lazy Susan (not you of course)and just spin it to work on it then place the whole lazy Susan in the center of the table. Easy to pick up and move and you just cover it with the greenery.
Hi Susan…
Well my friend, I'm so glad to hear that your Christmas was wonderful! Ours was as well…and God it GOOD!!!
Susan, I think your apple/pineapple Christmas centerpiece is absolutely fabulous! I would love to try creating one some time…thank you so much for doing a tutorial for us! Your centerpiece…absolutely gorgeous and ohhh sooo perfect for your fabulous Christmas table! Thank you for sharing your beautiful home with us today…and thank you so much for hosting MM!!!
Warmest wishes,
Chari @Happy To Design
Gorgeous Susan! Thanks for the tutorial. I don't think it would be very hard to make that apple tree….Maybe I could persuade my hubby….*winks* Vanna
I have always loved this centerpiece! I made one 20 some years ago, but I did not use a pineapple, yours is wonderful! Kimberly did a great pink and green centerpiece. Creative! Who would thought to paint the pineapple pink. Looks great
Your talent never ceases to amaze and inspire me! I hope my blog fits the theme for today – it is such a big new change for me, I thought it might work.
I have one of those bases in the attic. Thanks for the tutorial, susan. You table is beautiful with the apple centerpiece. I love the pink and green one too, and that orange clove one…I bet that smells marvelous!
You lined those apples up so perfectly! I never would have been able to get them that straight! Looks beautiful!
Take care,
Lisa
Hi Susan,
You really do the BEST tutorials! Great photos, explanations, and helpful hints throughouts. I laughed at your comment on the pink pineapple (I was thinking, "What???"). 😉
I hope your Christmas was a joyous one and that your new year is blessed with vibrant good health, true happiness, abundance, and treasured moments!
Fondly,
Bill
Susan,
Thank you again for the inspiration. You are so creative! Thank you for MM…
Blessings,
Cindy
That' so pretty! Thanks for sharing. It's funny b/c I had one of those things a few years back: had no idea what it was as I got it at a yard sale. I used it to display earrings at a craft sale! 🙂 I wish I had kept it now: it is pretty when used the way it's supposed to be!!!
That was great to read and now I understand how it's done! Great job…Liz
Better LATE than never… FUN to share paintings that were metamorphosed from photos… ENJOY!
Susan, I love that centerpiece. It reminds me of a cranberry project I did years and years ago. I might have to tackle that one next year 😉
Michelle
New England Style
i have one of these…you have inspired me to use it next year…the centerpiece is stunning! xoxox thanks, Jennifer aka Gigi
I have had one of these forms for many many years and the finished project is always so beautiful. I think it is one of the prettiest Christmas decorations ever. I use short needled Virginia pine and it fills in between the apples so nicely. Your table is just gorgeous and thanks so much for the tute. Happy happy New Year.
Love the apple tree!
CAS
I have loved these centerpieces since childhood. Every year I say I am going to make one, and every year when I think about it the cones are sold out. Scouring eBay and see different sizes. Is your apple cone 12 inches?
Jeanne, I’ll measure it for you, I’m not sure.
Check the Colonial Williamsburg Marketplace online, too…they usually have them.
Jeanne, the form is 10 inches tall, but measuring all the way to the top of the center nail, it’s 13 inches tall.
My husband and I have made several of these if anyone is interested in buying one for Christmas celebrations.
April, I would very much like to buy one from you. Please advise if you still have one and what the cost is. Can you send it Fed Ex?
Bethany Villere
[email protected]
Hi Bethany! Thank you. The link to our Etsy site ColonialDecoe is: https://www.etsy.com/listing/210090041/colonial-apple-tree-form
I’ve looked at this beautiful fruit centerpiece many times. I was going to ask my husband if he could make one for me. What would you estimate the height of the wood cone to be?
It’s 13 inches tall overall from the bottom to the top of the center nail. Just counting the green base (and not the top nail) it’s around 10-1/4 inches tall.
The circumference of the center cone at the bottom is 14 inches. The circumference of the cone at the top is 8-1/4 inches. The circumference of the wood base is 30 inches. The nails stick out about 1-1/2 inches, except the very top center nail which sticks up around 2-7/16 inches.
Hope this helps, Kathy.
Hi: I just bought one of these wooden cones. How long does the fresh apples and greenery last? Thanks. Linda
I find it lasts about a week to 10 days. A lot depends on how much you run the heat in your home. But under normal circumstances, it should look beautiful for about a week or so.
It is beautiful, but that’s not holly.
Thanks! That’s magnolia under the base and I tucked pieces of holly from the huge Nellie R. Stevens holly bush in my yard. You can read about Nellie R. Stevens Holly shrubs here: https://www.monrovia.com/plant-catalog/plants/1547/nellie-r-stevens-holly/