Yesterday, we went spring shopping in some of my fave haunts in THIS post. On our shopping trip, we spied these cuties at Big Lots. I could so see these in a summertime tablescape. Actually, they would look great almost anywhere. Imagine three lined up across a kitchen window sill with the sun lighting them up from behind. Add them to a pretty spring/summer vignette on an entry table. Or, tuck some flowers down inside each bottle and decorate an outdoor patio table for an evening dinner.
They were $6 each which wasn’t terrible, but I knew I already had everything I needed at home to make my own.

Here are the supplies I used. (Ignore the Mod Podge and the bowl/paintbrush. I ended up using a hot glue gun instead…more on that in a sec.)
For this little project you’ll need: a pretty wine or water bottle, scissors, glue gun, drill with a tiny bit, some small seashells or starfish, narrow jute or rope, raffia, and nylon thread or fishing line.

I stole a few blue bottles off the bottle tree you see outside on the deck in this previous Springtime table setting post. (You can read more about bottle trees, HERE and see the one on the deck in THIS post.)

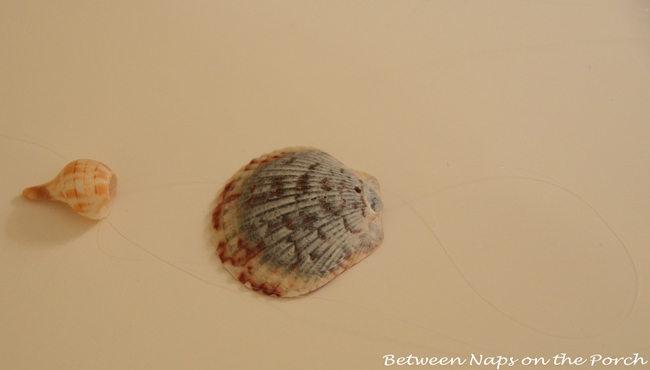
The shells I used for this project were shells collected on Sanibel and Captiva Islands during a beach trip just two months before my son, Chip, was born. So these shells are 28 years old. Yes, I keep stuff forever. lol
Okay, let’s get started. Click on any photo to enlarge it; click twice to REALLY enlarge it. Hit the back arrow on your browser to return to the tutorial post.
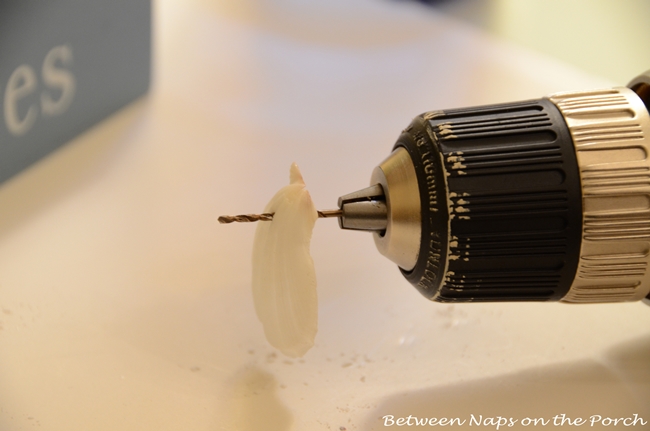
The first step is drilling a tiny hole through the top area of the shells you wish to use. You need to drill the hole fairly high up so the shell will hang properly once it’s attached with nylon thread to the bottle. If the hole is too low on the shell, the shell will hang from the bottle in an awkward manner.
I fully expected to lose some shells in this process. Amazingly not one single shell broke or chipped! I drilled into the underside of the shell with the shell laying on foam cork board. That was so I wouldn’t drill through the glass on my desk when the bit exited out the other side of the thin shell. I couldn’t take a pic while I was drilling so I just took this one afterwards.
There was no need to drill a hole in the tiny shell on the left (in the pic below) due to the design of the shell itself. Mother Nature helped me out with that one. Once I had holes in my shells, I began tying/linking them together with the nylon thread.
Working with nylon thread takes patience and good eyes. I’m extremely near sighted so I can read the inscription inside a ring without contacts or glasses, so threading the nylon thread through the holes was easy for my weird eyes. The tying part is tricky; nylon thread has a mind of its own. Eventually I got the thread tied off and trimmed off the access. If you look hard, you can just barely, barely see the nylon thread in the pics below.

Once the raffia was wrapped around the bottle, I just hot glued the end in place. Since I was trying to duplicate the look of the bottle we saw in Big Lots, I started the raffia down lower on the neck of the bottle so there would be room for the jute above.

I attached the jute string/rope in the same way, starting it off with a drop of hot glue. I wrapped it around and around the bottle and finished it off with a drop at the top.
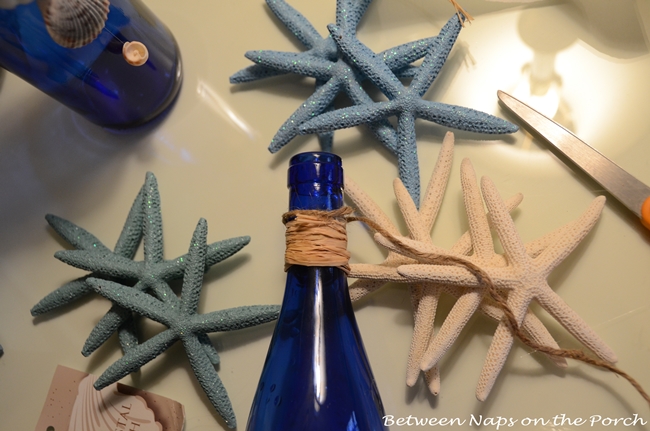
I found these blue and aqua starfish at Big Lots yesterday…I already had the white ones. I’m not sure if the Big Lots starfish are real and just painted or if they are resin. The tag says, “3 Pk Coastal Starfish.” They look pretty real and they were easy to drill through, just like the shells, so they may be real and just painted. They were inexpensive at only $3 for a package of 3 starfish. I thought they would be fun to use in this project or in a future table arrangement.
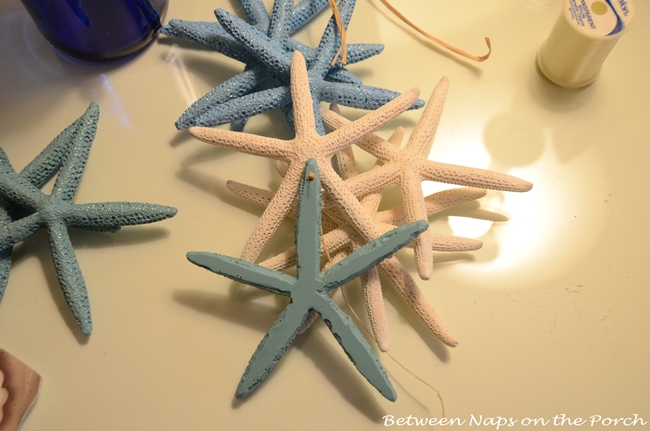
In the pic below, I had just drilled a tiny hole in the top of one of the aqua colored starfish. That’s just starfish “sawdust” you see on the top…the drilling didn’t chip the starfish. I really couldn’t get over how easy it was to drill the holes in the shells and starfish for this project. Isn’t it nice when something is easier than you think it will be?

Then I just added a tiny drop of hot glue to the raffia that I already had on the bottle, stuck the skinny strand of raffia that was attached to the starfish on with a drop of hot glue and then finished it all off by wrapping one little strand of raffia around the bottle to hide where that was attached.

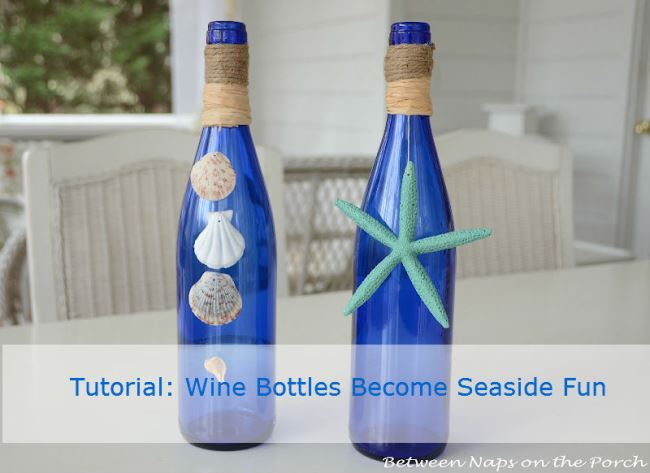
Here’s how the two bottles I made turned out. (Took this pic in the morning light on the porch this morning.)
And here’s a comparison against our inspiration bottles at Big Lots. I’m not sure why I just made it with 4 shells hanging down. Use either 3 or 5 when you make yours…odd numbers always look better.
Cost for this project: Free for the bottle on the left and $1 (for aqua starfish) for the bottle on the right.

Imagine how it would look with all white starfish or all white shells hanging from cobalt blue bottles down the center of a tablescape. Wouldn’t that be gorgeous? I may just have to make some of those for a beachy table setting this summer.
This is a fast, easy, inexpensive project. The blue bottles were originally wine from Trader Joe’s. See this post for some of the bottles I purchased at Trader Joe’s when I was collecting for the bottle tree. Fancy water also comes in pretty blue bottles similar to this.
Here’s a handy photo for Pinterest, just in case you wish to “Pin” this post to refer back to later.
Have fun making your summertime seaside bottles!


I don’t think those are real starfish, the real ones I have seen are not flat on the bottom. Good job on the duplication. Don’t forget to replace with a new bottle on the tree.
I like yours more than the ones from the store!
Yours look better!!! love them!
Wow they look just the like the Big Lots,,,, great idea you had… I will have to find some blue bottles and give it a go,,, I have lots of shells I saved from a couple of trips to Fl… thanks for sharing….. have a great weekend…. Hugs; Alaura
These would make lovely favors for guests at a summer wedding or other summer event. Thanks for making it seem so easy, Susan. Your tutorials are really inspiring for the faint of heart! And your link to the bottle tree has me pining for one again. I posted about bottle trees last year and am determined to have one someday.
I could see adding a few candles for a totally different look. Thanks for the tip on “blue” bottles from Trader Joes.
Susan, thanks for adding this great tutorial! Your bottles look just like the ones in the store and I can’t wait to try this. Fantastic job!
I have 2 window siles full of blue bottles with same idea on them only vinatge buttons. I ahve plenty of shells to copy this idea , easy tutorial to follow
You did good! I like yours the best – cobalt blue is my favorite shade of blue.
Susan I adore this projects! The sea bottles are adorable! xoxo Karena Art by Karena
I too like yours better. I love the one with the starfish. I don’t think you need an odd number of shells because the raffia/jute seems to accomplish the same thing. Beautifully done!
Your sea bottles are so pretty….love the colors! ~Des
I”m ready to head to the beach with these bottles! Great job. Turned out wonderfully!
Susan, You should get those bottle/toppers and turn those beauties into oil candle lamps for the porch!
How funny! I was at Michael’s a couple of weeks ago and took a picture of similar bottles, with the same idea–“I can do that!!” Yours turned out great, Susan!
Hi Susan, your bottles turned out perfect. Nice idea to play around with. Would also look great with mixed bottles in sea colors, blue, aqua and light green. Thanks for the tutorial. Best greetings, Johanna
A beach house to go with the bottles would be extremely nice! 🙂 And your son is 28???? I thought you were like…around 28!!! 🙂
You conduct such great tutorials…Now I will have to save the bottles I usually place in the recycle bin!!…Thanks!
I love this project because it’s easy and I have everything on hand to make it today. Thanks for sharing!
Wow! Yours are so much better. Fun project, thanks for showing us.
Hi Susan – Your tutorial is great and the bottles turned out really beachy and beautiful. There’s just something about the cobalt blue and the white shells or starfish – it’s so summery. March came in like a lion here in northern CT…we got about 6″ of snow yesterday…I’m so done with winter !! Thanks for all your wonderful inspiration, Dorinda
I love your beach-themed bottles, and FYI, your GFC followers look they are still there. Hmm…
How absolutely fabulous are these! i love them!!! thanks for sharing! hugs…
Love the simplicity!!!!
M e gustó mucho encontrar esta pagina, pues yo soy una recicladora de conchas de mar y no tenia idea que hacer con ellas, ahora ya he visto algunas y tus botellas son espectaculares, porque son fáciles de copiar,
gracias por la idea, att= Luz Elena Bernal Alba
Luz, thanks so much. Shells are so fun to decorate and use in crafts. Here are two more posts showing some fun things you can do with shells:
https://betweennapsontheporch.net/pottery-barn-knockoff-shell-chargers-the-184th-metamorphosis-monday/
https://betweennapsontheporch.net/seashell-crafts-for-your-nautical-beach-house-decor/
Sue, love all your projects. After seeing your bottle tree, I decided I needed one. Bought a 12 bottle tree form on line for $34.00. It came yesterday and is really well made Found bottle in shades of green, blue, turquoise, pink, red and gold. Bought 2 of each color. The cost of the bottles were $12.00: $1.00 each at the dollar tree. Really nice size bottles and love the colors. Love the Dollar Tree. Wouldn’t a bottle tree be a great housewarming gift?
Oh, those would be great housewarming gifts! Glad you got one, Kittie. That’s a great price at Dollar Tree for bottles! Unfortunately, a lot of the bottles I purchased at Hobby Lobby faded out drastically in the sun until they had no color left, so I need to buy more now.