n March, right after I purchased cupcake stands from Pottery Barn for this Easter table setting, out of curiosity I typed “Pottery Barn chargers” into the search engine on eBay.

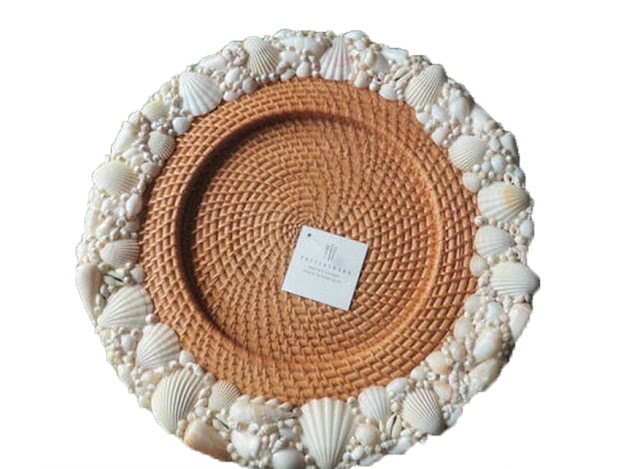
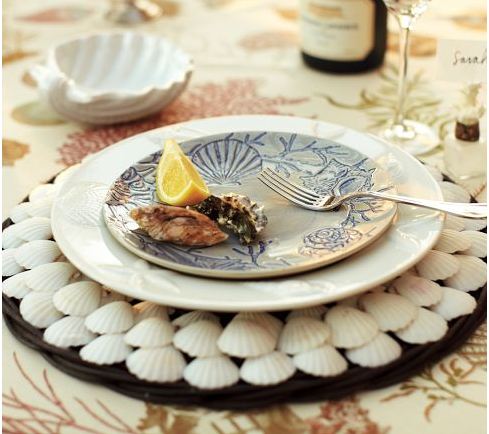
This auction for shell chargers popped up. Wow! Shell chargers! Not great for Easter but perfect for summer dining on the porch. Unfortunately, the bidding quickly escalated way beyond the amount I would have been willing to pay.

Ultimately they sold for $213.49 + $20 for shipping. That’s $233.49 for 6 chargers!
PB has shell chargers for summer this year, too. I don’t like them near as well as the previous year’s model. Which ones do you like best?
I got an idea, a wickedly good idea.

Since I have lots of shells from a trip we took years ago to Sanibel and Captiva Islands and you can find shells in all the discount stores pretty inexpensively, why not make my own shell chargers!
I scrutinized the PB chargers to see how they were made. I really liked how neutral they were in color. Being primarily white, I knew they would go well with almost any dishware. The PB charger almost appears to have little pearls mixed in with the shells.

To supplement my existing shell supply, I purchased this bag of shells at Marshalls for $7.50. I also bought a smaller bag of shells from Big Lots for $4.

I thought about looking for some faux pearls like those in the PB charger, but ultimately I ordered 450 teeny, tiny Dove shells from an online store called, Florida Shells & Gifts, to help fill in the gaps. The Dove shells were $2.99 + $5.95 shipping.

I needed a base for my chargers and knowing how expensive woven/rattan chargers can be, I decided to use these plastic chargers I no longer need. I bought a dozen of these years ago, long before I started blogging.
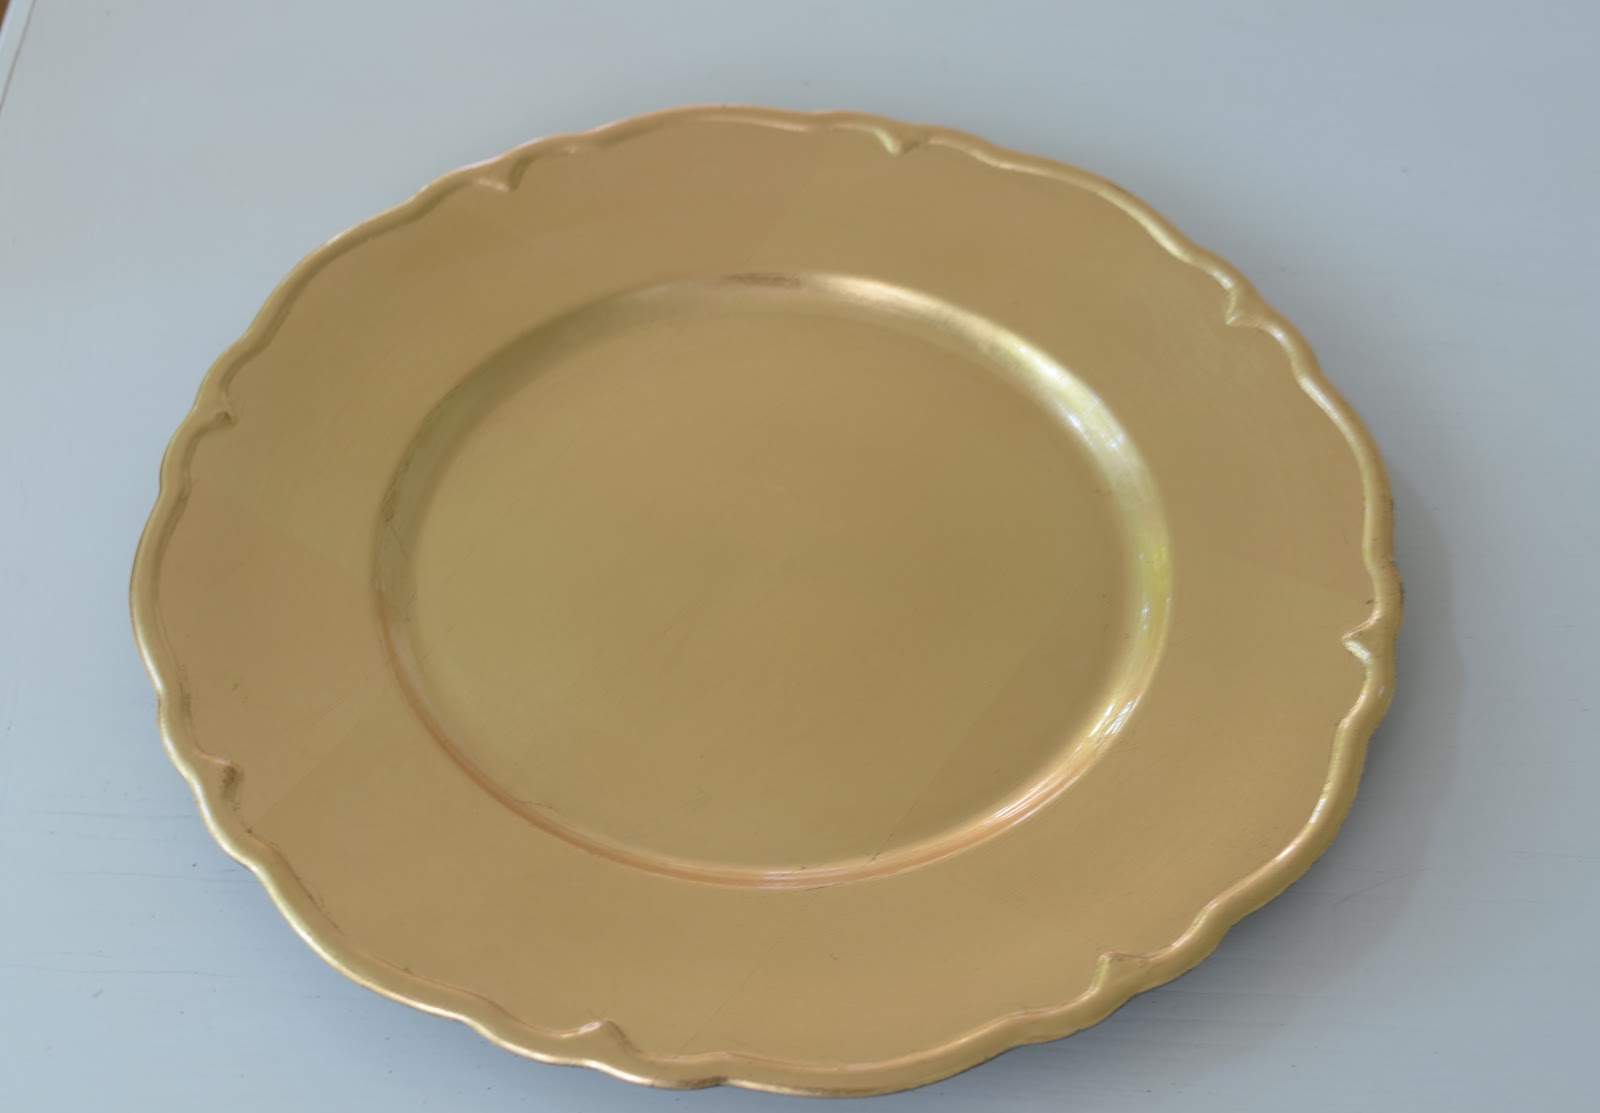
Two years ago I purchased these gold, glass chargers at Hobby Lobby on clearance for around $1.99 each for a fall table setting.

I use them for Christmas table settings, too.

So, since I really don’t need the plastic chargers anymore, I decided to spray paint them and use them as the base for my shell chargers.
I forgot to purchase primer, so it took lots of white paint to completely cover the gold chargers. This pic was taken after a few of coats of paint. I used an entire can of white spray paint from Michaels to cover up the gold on all six chargers. Next time, I’ll definitely remember the primer!

After the chargers were dry, I began placing the largest shells around the outer edge of the charger, alternating the direction of the shells for interest. Initially I tried gluing the shells on with some E6000 glue I already had. That was taking way too long to dry and it just didn’t feel like it was going to hold very well. So I broke out the glue gun and hot glued the shells along the rim of the charger.

Tip: You need to use shells that are fairly flat so they won’t bump into your dinner plate when you use them in a table setting. Bigger/taller shells work well around the outer edge where they won’t interfere with the plate.
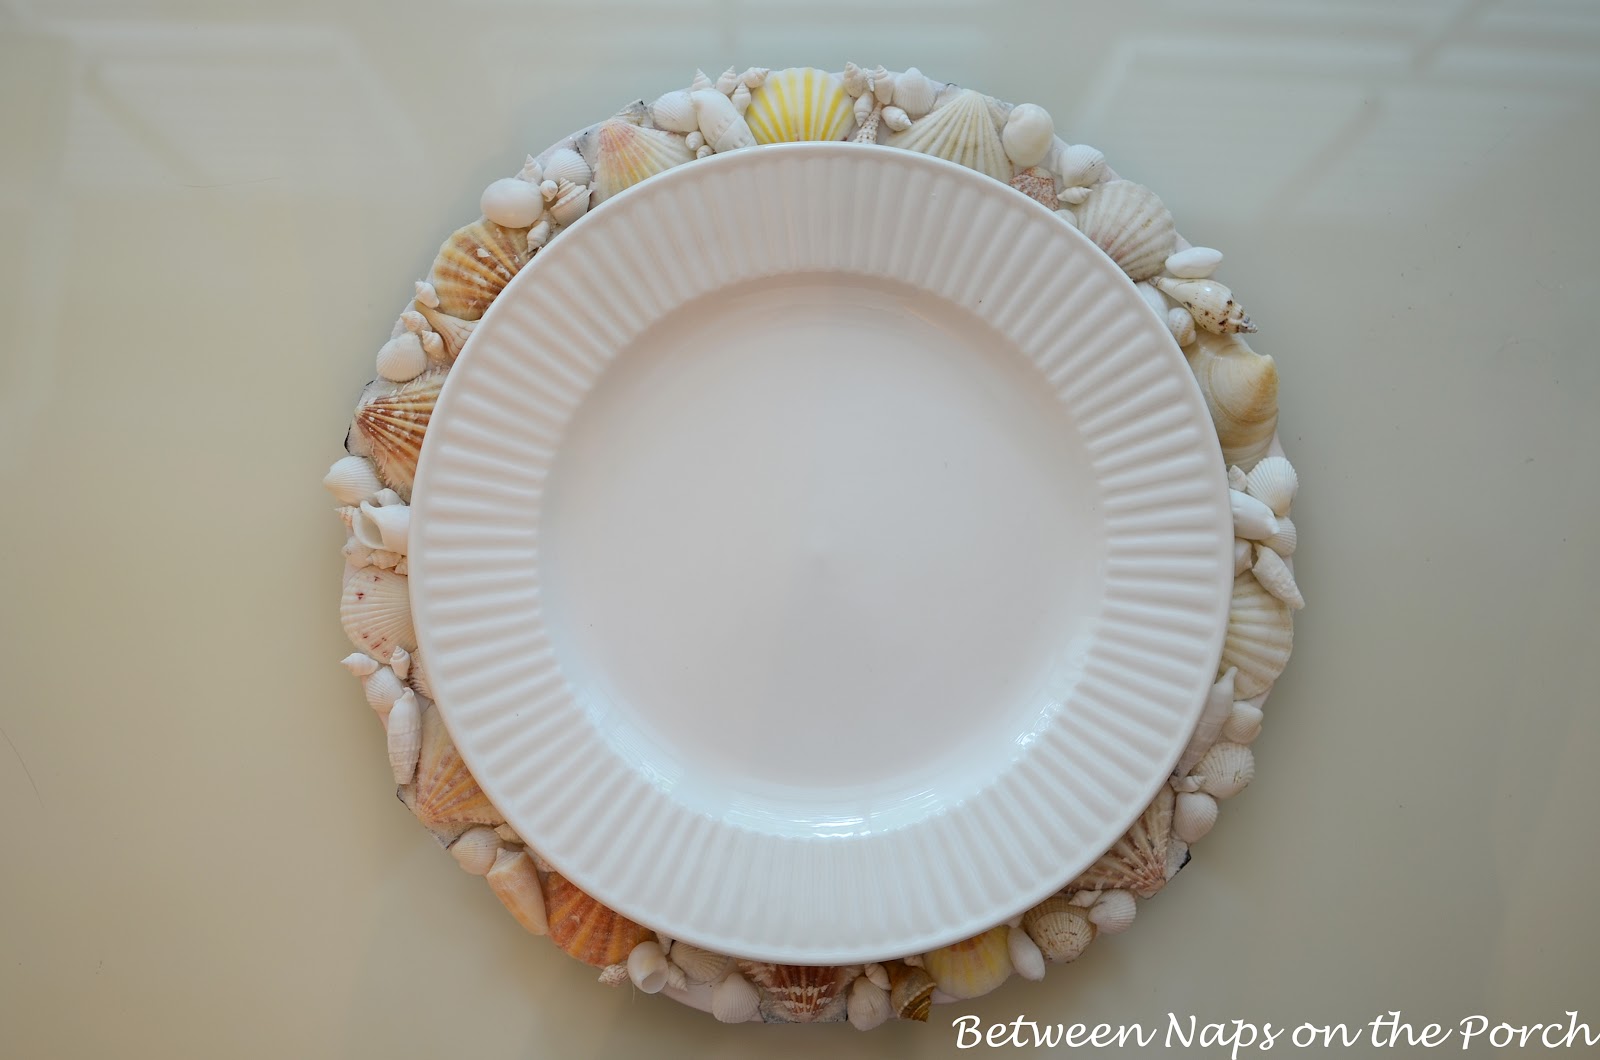
Periodically place the plate you wish to use on the charger to make sure you have clearance.
I didn’t have any trouble with the white plates I knew I’d be using with these chargers, but I did check periodically to make sure the shells weren’t creating a problem for the plates. I placed small shells closer in toward the center to avoid any problems. It’s okay if some of the shells touch your plate, as long as your plate will lay flat without wobbling.

It took a very, very long time to glue on the shells. Here’s how it looked when finished. Actually, I still need to go back and add a few more Dove shells here and there to finish filling in the gaps, but it’s almost completely finished.

Choosing where to place the shells is kind of exhausting…a little like putting together a never-ending puzzle. The process gets faster as you continue along. I pre-arranged the big shells first before starting the gluing process. Then I glued them on and began the process of filling in with medium and small size shells. The teeny, tiny Dove shells were the last to go on. It took a couple of hours to cover this charger while watching An Affair to Remember. Love that movie!
Tip: You can see a couple of scratches where the hot glue accidentally dripped onto the center of the plate and I scraped it off. You may need to do a little bit of touch up painting when done if this happens to you, too.

The dove shells I used to fill in those last little spaces come 450 shells to a bag. I ordered them from here: Florida Shells & Gifts. The dove shells were just $2.99 + $5.95 shipping. I know 450 shells sounds like a lot, but they are tiny, tiny so it takes a lot to fill in the gaps on six chargers.
Since the dove shells only cost $2.99 per bag of 450, if I had to do it over again, I’d order 2-3 bags instead of 1 since the biggest expense is the shipping, not the shells. I ended up ordering more and used almost two full bags of the dove shells to completely fill in and cover six chargers.
The “White Cay Cay” shells (found at the same online store) were also great for covering gaps. They are small, but not as small as the Dove shells. I had lots of those in the bag I found in Marshalls, but did ordered more online.
I let my shells hang over the edge of the charger just a little in some places. I didn’t want the edge of the charger to show, plus I just liked how that looked. Remember, your chargers don’t need to be perfect. Your dinner guest won’t be scrutinizing them like we tend to do when we are actually making them.

Here’s a side by side comparison. Once finished, my final cost should be around $18 for all 6 chargers, $27 if I order more Dove shells. They are a fair amount of work to make, or at least time-consuming, but totally worth it to save over $200.

If you wish, you can spray the finished charger with a matte sealing spray available in hardware and craft stores. That will make clean up a bit easier if something drips on the charger during a summer dinner party.
Imagine doing these with all white shells and touches of blue or aqua sea glass. Wouldn’t that be beautiful? So many possibilities! It will be a while before you see them in a table setting…got about 10-12 more hours of arranging and gluing ahead of me! But once they are done I’ll have ’em forever, so it will be worth all the work.
Update: You can see all six chargers in their completed state in this post: Pottery Barn Knockoff Shell Chargers Completed.
See them in use in a beach themed table setting here: Beachy Tablescape
Happy Summertime!


Susan, I think your charger is far better than PB. You did an amazing job. Thank you for sharing…. Marlene
Look at you and your crafty self! You are so super talented! What a beautifully well done project. I am so impressed, jealous, etc. When are you putting them on ebay? 😉
lol Never! Too much work to sell on eBay. 🙂
Wow! These turned out beautifully! I have the plastic chargers in silver that I don’t use…this may be a good project for the future. Of course anything with shells I love. Did you have any problem with the paint sticking to the plastic and not peeling off?
Sue, the paint stuck great and the hot glue sticks really well to painted charger, along with the shells. I still think it’s a good idea to spray a coat or two of primer on them before painting…just helps you to use less paint. I think I used a Martha Stewart spray paint. They had a few different brands but I’m pretty sure I went with the Martha Stewart brand. I painted them several weeks ago so I’ve long since tossed the can. I purchased the matte finish because I originally planned to glue them on with E6000 and I wanted to make sure the glue had a good surface on which to stick. Since I ended up using a glue gun, a gloss finish may have been okay, too. But once the plates are in place, you never see the painted part anyway.
Wow Susan,I like yours so much more than PB…….Love your site
Susan, What an awesome job you have done! Those are just beautiful!
I just love these. Yours are so much prettier than the PB ones. Yours shells have more color, and they just “pop”! So worth all the work! (Easy for me to say! :)) I hope you don’t mind if I copy your idea?!
Beautifull… What a wonderfull job you did! Love it! Dani Pessoa from porta-guardanapos-dani.blogspot.com
Oh my gosh! Yours are the very best. They are completely awesome. You have such an artistic style. I admire everything you do. You make me want to pull out the craft table and do something!
Yours kicks PB’s butt! giggle. Hugs! P.S> I hope you will join us at the hop tomorrow 🙂
Hi Susan, great idea! Thank you for the inspiration. I saw some year ago wall mirrors with decoration of shells. They looked beautiful but was no chance to send them to Germany. May be your tutorial will give me the kick to make a mirror with my own shell collection. Best greetings, Johanna
what a great idea. I live right by the water. never even thought about this. will definetely do this project.Thanks for all your ideas.
How funny! I saw the same auction and had the same idea! Yours turned out great! Every bit as nice as the PB ones. Well done!
To be honest ~ I like your charger better. I am not so fond of the shells on the rattan because it all looks too busy for me, as though the beauty of the shells must compete for attention with the texture of the rattan. On your charger, the shells are on center stage. You did a beautiful job and what patience for detail you have! You are one inspirational girl. Hugs, Susan and Bentley
Susan, your knock-off is fab! You are so clever to make your own. I would think it would take a lot of patience to complete a set of these. I like the idea of using all white with turquoise glass. So many options for a different look. I also like the shells on the rattan. Wonderful textures! ~ Sarah
LOVELY PICS:) I really like your blog and I will happily follow. If you want some swedish decor inspiration, you can check out my blog:) Have a great week. LOVE Maria at inredningsvis.se (Sweden)
Those are amazing! A chic addition to summer dinner parties. And you could do so many different patterns… great idea!
Yours are far superior to Pottery Barn’s effort.
……amazing, as always. You never cease to fill me with “awe” …..your talent and energy is a blessing, for sure! Your shell chargers are beautiful and will be a great conversation starter at any dinner party! I appreciate you always inspiring us to do creative things with our time…….thanks!!
I like yours better! Chargers are almost non-existent here in Australia!
Deanne, you can make your own and start a trend! 🙂
Your chargers are much prettier!!
Susan, When I started reading I thought this was gona be a story about how we should all make these shell chargers and become independently wealthy selling them on E-Bay. You have the patience of Job! The charger looks magnificent but I can tell this craft is not for me. I like your charger better than the PB version. I’ll keep my eye out for your table settings using these chargers. You come up with the best ideas and your results always look professional. Vikki in Virginia
🙂 Too funny! They definitely take way too long to make to sell on eBay. Thanks, Vikki!
I have never used a charger (non existent in Sri Lanka) but these are so beautiful.
They are beautiful! I can’t wait to see them in a table setting they are going to be fabulous!
These are fantastic. I can’t believe the price on Ebay. That is crazy, especially when so many people are hurting with this economy. I like yours much better. xo
Yours look way better than the PB version, but of course that’s how it usually goes…great idea! Definitely pinning this for when I get my beach house! 😉 And PS soooooo jealous that you have been to captiva!! I want to go sooooo bad! I have been planning to go for 7 years now!! lol One day…
If you could bottle and sell your energy and creativity, you could have afforded the chargers on e-bay, LOLOL!!!!! YOu did a FANTASTIC job on these! You have ALOT of patience. XO, Pinky
Susan, like minds…as soon as you mentioned the price, I was sure I could make these, then I followed on to the rest of your post. Fabulous job. I too have shells and am contemplating attaching them to a blue glass vase and wondered how it would work on glass….now I have my answer! I recently ordered a set of white dishes with a shell pattern around the edge, they would look lovely on those chargers! Thank you Susan.
Susan, I agree that yours are far prettier and have a definite fresh air look. Yes, better than PB!!!! Thanks, Helen
Susan, I agree that yours are much prettier and have a definite fresher look than the PB chargers. Yours are extra nice…it’s the fresh look for sure. Thanks, Helen
Thanks, Helen! ♥
You did an AMAZING job! Actually I like yours so much more than the original PB ones! I think it looks better with the white charger. Since I have 100+ gold chargers used at my son’s wedding several years ago I now know what to do with them. Thank you!
These are AMAZING! I like them so much more than the original PB ones! Since I have 100+ gold chargers left over from my son’s wedding a few years ago I now have something to do with them. Thanks for a wonderful idea! I do love your blog.
Roxie, Wow, that’s a bunch! Just think of all the different style chargers you could make!
Okay, that is amazing!!! What patience you have!!! I bow to you, guru of crafting!!! In truth, I like yours better, the colors of the shells are more natural and warm…anyone can spray paint shells white and then they blend in with everything else…..know what I mean??? Now here’s a thought…very cheaply at Joann’s or Hobbie Lobby using coupons of course….tiny natural colored glass beads, the kind used for stitching, pool white glue in the empty spots and pour in some of the beads, the glue dries clear…..but of course, I would add some glitter in a pearl color…….just sayin…..
Thanks! Oh, I like the glass beads idea! I had thought of using sea glass but I decided to just go with shells this time around. I meant to mention sea glass in the post and forgot. Love the idea of the glass beads, too! I may go look for some before I finish all the others.
Hi Susan, Your chargers are much nicer and natural looking. I love them. We don’t use chargers in Australia, we use placemats.Placemats are good but casual and everyday….I like the idea of chargers being more formal and special. God Bless Barb from Australia
I love your chargers!! And again even more beautiful than the ones from the store! Liz
What a clever girl! I like yours better! You are an artist.
Susan, your chargers are beautiful!!! Well worth all the time they take! You’ll have a gorgeous table setting when you use those. -Nan
Susan yours came out better than the PB ones! You should try selling yours for $200! LOL Great job! Susan
Wow…Beautiful!! What a great idea. You have the patience of a God!
Susan, you are amazing! I have some of those plastic chargers, and I’m going to try my hand at making something similar. I will probably use the sea glass so that it won’t take nearly as much time!
Jane, send me a pic…I’d love to see them and share them!
So so pretty, I’d say it was worth 10 times the money you invested and every bit of the time you spent. Lovely job!
absolutely gorgeous!!! When I get my beach house I will definitely be making 20 of these…ha! Wonder which will come first …..the beach house or the making of the shell chargers? Seriously, yours are so pretty! I found a shell candle holder not to long ago that someone had made. Hundreds of shells on and I am sure it took a long time. They had made the wood base for it too. Have a wonderful day. xo
Lynn, maybe if you build them, the beach house will come. 🙂 Thanks so much! The candle holder sounds wonderful!
Susan, they are gorgeous! You did such an amazing job! They look better than the originals! This is such a great idea!
I am very impressed, with your ingenuity AND your patience. I do prefer your chargers to the PB ones, even though I really like the terra cotta center. HMMM that won’t show once a plate is on the charger anyway! Someone in an earlier comment asked about the size of plate that will work on this. I am sure in your vast experience you have elevated the dinner plate slightly on the charger so it floats above the charger rim. My last comment/question: where do you STORE all your tabletop wealth? I will search your site to see if you have already posted about this. I really enjoy your blog. Keep the lovely tablescapes and ideas coming!
Vicki, I added two pics showing how it looks with the plate in place and the clearance. Just check the FAQ category at the top of BNOTP and you’ll find that question/answer there. The simple answer is in the cabinets in my kitchen and laundry room and in the hutch in the dining room and on the porch. Oh, and I made a small closet into a dish closet…you find that post here: http://bit.ly/1vxMT
Beautiful and such a great idea. Love it!!!
WOW! What a transformation! Nice…But…looks like a ton of work to me! LOL Hugs and blessings, Cindy
I’m “shell shocked!” These are just spectacular…and with a little glass sparkle to catch the candlelight – amazing. KUDOS! franki
What a great idea shell chargers. I actually like yours better than the original.
Yours are much prettier than the Pottery Barn chargers. I love the color variations, so natural. Cindy
Susan, Yours are much prettier than the Pottery Barn chargers. I love the color variations – so natural! Your attention to detail is amazing. And your patience as well!
What a great idea. You are the bomb. How cleaver of you to come up with a way that more of us could afford to have these beautiful chargers. Thank you for sharing. ~m
Oh, my gosh! Yours is by far the most beautiful!!
These are stunning! You did a beautiful job.
These are wonderful….I can see them hung on the wall too!!!…Great project..great copy cat!! Love it!
WOW!! I like yours better because your shells have just a bit of color…very very pretty!! Thanks for sharing!
Beautiful Susan…I like yours better than the expensive eBays ones! You are so talented!
Hi lovely lady. Wow Those are amazing! I need to get some more Shells!!! Thanks so much for this great Idea. XXOO Diane
Lovely. I think these look better than either of the other examples. I think we will be seeing these with those blue bottles that you made a few weeks ago. I am eager to see what creative table you set.
Those are lovely, Susan! What a beautiful job you did. Isn’t it fun to “beat them at their own game” that way? By the way, I meant to tell you that I made your vase-within-a-vase Easter arrangement for my mother’s table using your tutorial. I had two cylinder vases (a large and a small), one dozen pale white tulips (with a pink blush on the edges), pink Easter grass, and multi-colored jelly beans. It looked so pretty! Thank you so much for posting that tutorial.
Beautiful! I think I like yours even better than the rattan version – well done!
Those are amazing and I like them way better than the other one. Fabulous job!
Great job! I like the little bit of extra color that you introduced on your chargers. If you count what your time is worth, I wonder how much each charger cost? I’ll bet it’s more than the PB ones…but I agree, I like the design that you chose over this years PB offering. Thanks for the resource information on the shells….landlocked as I am, it’s nice to know where to find shells. Cherry Kay
They are gorgeous, Susan! I made some too with shells from the beach, but they didn’t come out as pretty as yours. I still use some plastic chargers, they are affordable, and add some color. I have some ceramic ones too, but they are not as easy to find. Nothing wrong with the plastic though.
I love your chargers! I posted my DIY shell chargers on this week’s Met Monday. My inspiration was was an old ad from a couple of years ago that I can’t find. Thanks for sharing, Blessings, Tammy
Holy ocean shell plate…that was a lot of work! Well worth it though. I love yours over the PB ones. Your shell colors are more attractive. Show them off with pride! (and check mine & Sheila’s bag while leaving if we ever come to visit)LOL!
Yours are much nicer!
Your chargers are much more attractive.
That is incredible. What a great knock off. Thanks for sharing this TERRIFIC idea.
Absolutely love this idea! I hope you don’t mind if I try my hand at this with a little twist. I’ll share my blog site with you once its done so you can see what I have managed to accomplish!
Thanks again for sharing this.
Wow! I like your rendition better than PB’s. You are a very creative and PATIENT woman. Love these….you really did a fantastic job, and your attention to detail does not go unnoticed. Makes me “almost” understand why the PB version is so pricey. How many hours do you think it took to make one shell charger?
Juli, that is a good question. I got faster after the first one but it takes several hours just to make one. It’s filling in the tiny spaces with the teeney shells that takes so long. I have mine almost finished. I stopped when I got busy moving the blog from Blogger to WordPress…then my son got married. So I need to get back to it and finish all the others.
Thanks so much for the encouragement! 🙂
Hi! I popped over here from the end of July post where you show all the chargers completed. They are all just amazing. I’m glad to see that someone else besides me is just now finishing up summer decorating projects…where did the Summer go?! We used to have another month of summer until they started getting kids back in school mid-August.
I saw these on HGTV and I was blown away. I searched and search the web for them and couldn’t find them. So I refined my seach and found them. They are BEAUTIFUL!!! Yes you get an A++ I’m going to the craft store and make a set. Thank you for the inspiration. I’m going to make a set for with a Thanksgiving and Christmas theme! I’m even going to make a set for my daughter who is always entertaining.
Lynn, Thanks so much! Was it my charger you saw on HGTV or the Pottery Barn one?
Susan! You did an amazing job and I applaud your hard work! The charger is absolutely gorgeous!! I love it!! Susan
Great job, Susan! It may take a lot of time, but if it’s something you really want, I think it is well worth it.
I love them!, they would also look good hot glued to the wicker charges from Walmart. I’m defintaly going to pin this!!
I honesty like your chargers a whole lot better. It looks fabulous!
I agree, seeing these side by side, I would choose your, hands down, no brainer! Great job!
Et bien ma chère votre assiette est bien largement au-dessus de celle qui s’est vendu si chèrement… En plus vous avez eu le plaisir de la réaliser. FORMIDABLE. Gros bisous
Wow! Yours are gorgeous! I can see how they would be time consuming to make. You have way more patience than I do lol! I look forward to seeing them on your table 🙂
Thanks, Kathe…it’s not too bad if you’re watching a movie. Hopefully I’ll get faster as I go.
Your seashell chargers are beautiful, even more beautiful than the originals. I like the white on white. You did a fantastic job and they are worth the time you are putting into completing the design. xo, Gina
Wow! I admire all your hard work. I’ve been to Sanibel and Captavia — I went cancer-teen and still remember the trip fondly. I love the shells I collected while there. I admire that you used your shells from there. I’m funny– I wouldn’t be able to glue them down!!! I still get them out and often use them on my summer table (I considered being a marine biologist). I can’t wait to see the finished table– it’s going to be wonderful! Great idea!!
Marsha, that bothered me a little but they’ve just been sitting in a bowl and in bags. This way I’ll enjoy them a lot more. Shells are so inexpensive these days, you can just buy them instead of using the ones you collect.
Amazing job, but how is a plate going to fit on there with the shells so close to the center, and being kinda high up? Just wondering. The rattan one is larger, isn’t it? And the shells not so close together? Other than that – it is really WOW. You have the patience of a saint. I would never be able to do that I would scream, haha. Well done.
Michele, I tested it several times along the way with my white Clarendon plates from Big Lots and it worked great. The rim of the plates tilt up a good bit so they don’t touch the shells.
Beautiful!! What a great look for a fraction of the cost from PB!! Can’t wait to see them on a tablescape! May have to try this myself! Thanks for the inspiration! Miss Bloomers
They are gorgeous. Nuff said.
You did an incredible job. I have seen these charger plates in person and they are wonderfully intricate. Yours are just as good.
Maggie, I’d love to have seen some in person. The wicker base doesn’t really look like real wicker in the photo on eBay…kind of looks like plastic. I wonder if it is?
Oh wow! Your amazing! Beautiful!
Wow! I like yours better ! The bit of natural color in your shells seems more realistic. You did good! Also, you have a lot more patience than I do. 😀
Amazing!! You are patience personified!! Sally
wow! so pretty. I think yours is so much more prettier then the PB ones.
Beautiful! I don’t own any chargers, but I would certainly LOVE to own these! Some years ago I made a shell mirror after seeing one in Florida. I bought the wood-framed mirror there and glued on millions of shells at home. I love it, but I can’t imagine making SIX of them! Great job, Susan
Oh, I love the shell mirrors! They are expensive in the stores. I bet it was beautiful, Adie. I may try one of those one day…I love how they look.
I ran across you lovely DIY project while working on a search for paining rattan/woven chargers. We both know that table settings are no different than any other subject of home decor. Different strokes for different folks. Now… having written that, I will share that I MUCH PREFER YOURS!!! They are absolutely lovely! I trust you are proud of yourself for creating such a lovely outcome after all your research and investment of time. On many occasions, I will also scrutinize something I find to be way too expensive and figure out a way to create my own ‘version’. Congratulations for a job very very well done!
Sara from south Florida
Thanks, Sara! They were a lot of work but definitely worth it. Isn’t that the way it usually is…the things that take the most time and effort are often the most rewarding. 🙂
Much prefer yours over PB…especially the price! I also like that yours have more color and yours looks more natural than the PB ones. Amazing job! We recently moved after 21 years and had a yard sale before we moved. My husband had three huge boxes of my seashells in sale. I told him he could leave one box in. He asked what in the world was I ever going to do with all those shells…now I have at least one really great answer for him! Thanks for the constant inspiration to make things beautiful and to DIY when at all possible!
Vicki, you are a smart girl! You’ll be so glad you kept all those shells. Each year I keep finding more things to make and do with shells. I have another project in mind now….just need to get cracking on it. 🙂
Nicely done! I have clipped on beadandcord.com
Dear Susan,
The charger is beautiful. I love the natural color of it as well. It looks handmade & not manufactured as the PB version…. (They are overrated anyway). …I love ALL your DIY projects. You are very creative & I love that you look for realistic ways to duplicate otherwise expensive items within a reasonable budget. Your tutorials are excellent. I love that you show & tell step by step instructions including any problems you encounter & the solution. It’s especially touching that you show your mistakes because you let us know that you are “real” & not everybody does things perfectly every time. I love that you give prices & time investment as well. I can read these, look at the photos, & decide “Can I do this?” “Do I want to?” Etc. I just love your Facebook page & your webpage. “A picture is worth a thousand words,” someone once said so I love that all your blogs & Facebook page has lots of photos. When you visit a house or garden, it’s as if I’m there with you. All of your ideas really resonate with me. We’ve never met but I feel like we’re friends.
Thanks so much, Laura! That’s the nicest thing anyone could say about one of my posts, that they feel like they are they are with me because that’s just how I would want it to be. I do consider you and the other dearhearts who read BNOTP to be my dear friends. When I write a post, that’s who I imagine reading it. Thanks again for your sweet comment, you made my day and reinforced why I love blogging so much! 🙂
XO
Do you ever get 8 hrs. sleep? Do you ever let your brain rest? It is amazine what you come up with; and Ditto! I love your charger that you made better then the PB one too..I can’t imagine anybody paying that kind of price for 6 chargers..obviously, they wanted them real bad or money was no option. Wonder if the buyer has a beach house or condo?
lol Not often…more like 6 hours most nights. 🙂 I know…no way I was spending that, either.
Thanks, Betty! XO
I just found this post, and love your chargers!! Plan to make something similar for this summer.
Love this! Stumbled on this today and LOVE THEM!
As most, if not all of the post say, yours definitely are so much better than the ones from Pottery Barn. Keep those DIY self projects coming. As a single mother I will choose time consuming over spending more than necessary anytime!! I accumulated too much this year for all the of the tablescapes I starting finding from your site last fall. One day soon I will send your pictures, promise 🙂 So, I will have to look for end of the year clearances for great finds on any coastal clearances items. Home Goods had a great selection of the light house lanterns this year. I do love that seagull though to do a coastal tablescape for next year. He is just adorable!!!! For those that have a Garden Ridge, I did see the netting that can be used as a table cloth with a lot of bag of shells. Not sure how they compare to the cost of the online store Susan used. It never hurts to compare. I believe that dollar tree changed the design of their white plates that have the lines around them this year that complement Susan’s plates (versus the dot’s from last year) If I am not mistaken I did see some lobster plates and crab plates at Marshalls this season. It was a few months ago, but there is always next year. Never hurts to look. I am still working on my backyard, but will eventually finish my projects. What fun is it if you get it all done at once. Susan, my daughters wedding in Dahlonega Ga at Wolf Mountain Vineyards2 weeks ago is over. So nice to get back to life at normal. You would have thought I got married, by the time I finished unpacking the car. Anyway. I think my next goal is to start collecting the green Christmas wreaths (yes I said Christmas) a few weeks at a time and make the ones in your tutorial to have a Christmas wreath in every window with a light. I loved the reviews on how so many men used timers at Home Depot and Lowe’s to just come home and turn them all on and off at the same time versus plugging them in all over the house. When you have so many ideas going on I have finally learned that it is best to gradually do a few here and there months before the season is here. It keeps me sane and makes me feel like I can stay proactive and not be the chronic procrastinator I usually am. Have a great rest of the summer. It is brutal in TN, but fall will be here soon. Looking forward to your next set of ideas. Christina 😉
Thanks so much, Christina! Yes, just take it a step at the time or it can feel overwhelming. Those shell chargers were worth the work, I do enjoy using them. Thanks for the tips on places to find shells and netting! I do think the timers are a genius idea for the window wreaths. 🙂 So funny you should mention Dahlonega…I just spent all day last Saturday there with friends. We visited a place intown for a wine tasting (forgotten the name now) then headed over to Wolf for lunch. Next we visited Three Sisters and finally ended the day at Frogtown. I’ve been to Wolf many times before and love it. I bet the wedding was absolutely beautiful…such a wonderful place for it surrounded by the mountains and vineyards.
I love the combination of nautical and patriotic for the summer! I’m loving those shell chargers, but I’m afraid to make them myself after reading how long it took. Maybe I can find some on sale. Have a great holiday!