Recently while reading a Country Living magazine, I came across the cutest heart-shaped sugar cubes. The magazine shared where they could be ordered but I decided to try making my own. I thought they would be fun for parties, especially tea parties or to offer guests with coffee after dinner.
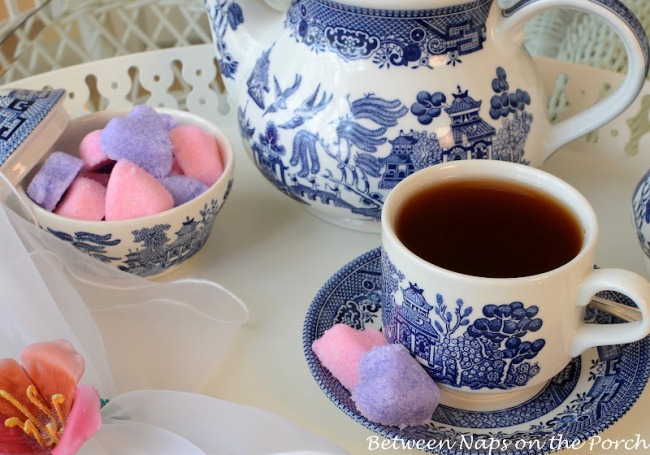
Instead of white cubes as shown in the article, I decided to color mine. Since it’s so close to Easter, I settled on pink and lavender.

You are not going to believe how easy it is to make your own little sugar cubes. You’ll need 1/4 cup sugar, 1/2 teaspoon of water and any shade of food coloring you wish to use. Or, you can skip the food coloring and just let them be white.

I had just added the water and a touch of violet food coloring in the photo below. These Wilton food dyes are super concentrated so the tiniest bit will do.

Just stir up the sugar, water and food coloring with a spoon. Scrape the bottom and corners of your bowl/cup to get all the sugar. I added a touch more food coloring during the process. I always start with less than I think I’ll need and add a teensy bit as I go along. That way I don’t add too much at the start and end up with a darker color than I really want.

Don’t add any more water than just the 1/2 teaspoon or you’ll end up disolving your sugar. The sugar should feel and look a bit like wet sand.

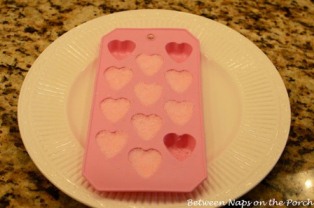
Press your damp sugar into little silicon ice cube molds. You’ll find some similar to the ones I used here: Silicone Ice Cube Mold. Be sure to press really firmly so your sugar will hold tight together. I always buy these molds at Dollar Tree or Michaels. They usually have them in fun shapes depending on the season and time of year. 1/4 cup of sugar makes about 8 sugar hearts. If you wish to make more, just double or triple the recipe.

Once you’ve pressed the sugar firmly down into the mold, turn the mold over and the hearts will fall right out onto a plate. They turn out of the molds very easily.

If one breaks when you turn it out, just press it back into the mold and then turn it back out again.

I placed the plate directly into the freezer uncovered and left it there for a couple of hours. The cubes hardened up nicely. Once they hardened up and were no longer so fragile, I tucked them into a baggy and returned them to the refrigerator. You can store them in either the refrigerator or the freezer. They hold together well once they harden up in the freezer. Update: These keep well for a long time but they look their best when used within 2-3 weeks of making them.

Right after you take them out of the freezer, that’s a good time to clean up the edges of the heart. The little sugar crumbs around the edges break off easily and will leave a cleaner/neater looking edge.

Of course, I had to set up a little tea tray to see how they looked in action.

The silicone ice trays come in every imaginable shape, so make your sugar cubes in whatever shape or motif you wish.
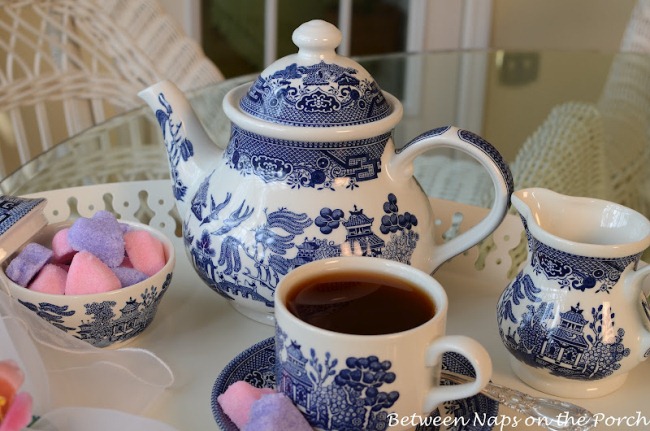
These are so easy to make. Imagine making them in Orange for Halloween, Red for Valentine’s Day. White would be beautiful for a bridal shower. Pink and lavender is pretty for Easter and Mother’s Day.
Here’s a printable version of the above recipe/tutorial. Have fun making your sugar cubes!

Heart-Shaped Sugar Cubes
Ingredients
- 1/4 cup sugar
- 1/2 teaspoon water
- Food Coloring Optional I use Wilton Icing Color.
- Silicone mold in any shape you like To save time use several molds
Instructions
- Measure sugar into a measuring cup
- Add water
- Add a teensy bit of food coloring (err on the side of too little) and stir well
- If the color is too light, add a teensy bit more food coloring.
- Once sugar and water are mixed well and the color is correct, press sugar into a silicone mold of your choosing. They come in all shapes and sizes.

- Turn the mold over just above a plate and the cubes will fall right out.
- Place plate with cubes in a freezer for 1-2 hours until they are well hardened. Once hardened they can be stored in a container in the refrigerator for future use.
Notes
Wilton Icing Colors are super concentrated so I normally just dip a toothpick into the color and then into my recipe. If you need more, use the other end of the tooth pick or a new one to avoid getting any sugar into your Wilton color icing.
If a cube breaks when you're turning them out, just firmly press the sugar back into the mold and turn it out again. This recipe makes approximately 8 sugar cubes so just double or triple the recipe to make the number you need.
Love tea parties? Here are a few you may enjoy:
Fireside Tea
Alice in Wonderland Tea Party
St. Patrick’s Day Tea
Here’s a tutorial for making “flower ice cubes” with square heart ice cube trays. Sorry about my early photography in that post. It’s pretty rough.
Receive BNOTP updates right in your Inbox:
To receive the latest posts, as well as updates about upcoming blog parties, subscribe To BNOTP posts via an RSS Reader. Or, have BNOTP delivered right to your Inbox. You’ll find links to subscribe via RSS and e-mail on the top ride sidebar of the BNOTP home page, OR click HERE to subscribe via RSS Reader and HERE to subscribe via e-mail. Thanks for reading…you are the reason I love blogging!


Adorable idea, thanks for sharing!
Cute!
This is such a great idea, Susan! And depending on the holiday, you could use different shaped trays. Thank you so much for sharing this I see pretty sugar cubes in my future!
Oh sweeeet!! I’m posting this on the ranch’s FB wall! Thanks for the recipe. I’ll definitely be doing this, it’s going on my list!!
I ordered the ones from Country Living and they still haven’t arrived. Thanks for the tutorial. Now I think I’ll cancel my order and make my own. You are so smart Susan to figure out how to make them and to share with all of us.
Oh Susan dear ~ I always leave your blog armed with bright ideas and great instructions…You are such an innovator.These sugar hearts are a tea party must. Only wish Georgia were around the corner…would we have fun! Have a blessed day ~ Mary
I love it!!!! Congratulations the blog is beautiful. Caroline
Very good idea! I will do it!
That’s such a nice idea! Thanks for sharing. I’m sure I will use your idea! Liz
So pretty. Your dishes are beautiful, too.
How sweet are these??!! Lorraine
Hi Susan, Very cute. I have always wanted to make my own sugar cubes. They so expensive in tea shops. Thanks for the tutorial. xo Betty
Hi Susan, thats a gorgeous idea. I love how they look on your tea tray. Thank you so much for this cute inspiration. Best greetings, Johanna
Such a cute idea for a lunch to tea date! 🙂
What a perfectly wonderful idea for parties, showers, everyday! Thank you so very much for sharing that idea with us!
*Sweet* idea Susan. I will definitely use this. I have quite a few of the trays in different designs which I use for ice cubes, chocolate etc. Never thought about the sugar. Thank you for all your innovative ideas.
Thank you so much for this post. I can’t wait to make some for my next tea party! So sweet of you (no pun intended) to set up a tea setting to show how cute they are.
Sooo cute I will make these…they would be cute as stars, too.
Oh Susan, I love this idea. How fun and so pretty. Thanks for the tutorial. Also, I have a question. Do you have a tutorial or direction of how to put the “Miss A Post This Week” buttons on a blog. I would love to add that feature and have googled everything I can dream of and can’t find anything telling me how to do it. Thanks tons. Hugs, Marty
Glad to finally something besides empty dishes in a tablescape(tea tray) hope you sat down and enjoyed every drop of it. Love the sugar cubes, I went thru Dollar Store yesterday, too bad I didn’t see this first.
So wonderful! I’ll be trying this out very soon! Thank you for the tutorial!
Thank you! These are so pretty. I am going to try brown sugar, too, to “imitate” the coffee bar at a restaurant we love.
I didn’t know you can make sugar cubes at home! This is my new favorite thing! I can’t wait to do it for my co-workers as the weather is getting better and we usually have lunch on my back porch!
You did an amazing job detailing how to make them. I will have to give it a try. I can’t wait to do this.
Your tutorials are always so perfect and show just the picture I need to follow step by step. What a wonderful post!
Susan, The sugar cubes have turned out super! You did well. May we attend a lot of Tea Parties and have a delightful time. God bless, d
Excellent post, Susan. And wonderfully pulled together with your gorgeous blue and white tea set!
Oh, Susan, you are awesome! Thank you so much for this wonderful tutorial! These sugar cubes are so pretty and so easy to make! I can’t wait to do this! Thank you Susan!
Love the shaped sugar cubes. How creative you are to be able to make them and kind of you to share.
Votre idée est absolument géniale… vous êtes une fée. Gros bisous à vous et plein de petits coeurs…
Thanks for another sweet idea. Will be doing that today.
This is wonderful! I can’t wait to try it. I also can’t wait to try The Dollar Tree for the molds. I would never have thought to look there.
I like that and saved it so I can make some. Great creative idea.
Who knew sugar cubes were so easy to make?! I’ll have to start having tea parties just so I can get all fancy with my sugar cubes! 🙂
Great idea and the best part is, they’re so easy!
Susan, this is a great idea. I have those little heart trays so will make up some of these soon. Thanks for the tutorial. I brought some back from France for a friend. They had a little slit cut out so they could hang on the side of a tea cup. Clever idea. Don’t know how difficult that would be to do. 😉 ~Sarah
Darling sugar cubes! I love tutorials. Thanks. Love the tea set!
Susan, you always have the best ideas! Can’t wait to find some molds.
These are so easy, who knew? LOL! I hope I remember them when I have my next Red Hat tea party! Hugs, GraceinAZ
Great idea and looks like something even I could do! Thanks for sharing!
I love these! Your site is so awesome, your photos are gorgeous! I love coming here to be inspired to try new things! Thank you so much for all the time and work you put into your blog!
🙁 After taking them out of the freezer a short time, they crumbled. Used a candy mold, packed it in. Will try a recipe with meringue powder. Great idea, gonna figure it out 🙂 Thanks
Umm, I’m not sure why they did that. Mine didn’t crumble. Let me know how the meringue powder works.
How cute! I’m so doing this for Valentine’s Day, as soon as I make enough ice-cubes out of the same mold that I’ll have to use for the sugar-cubes. 😉
-Merry
P.S. I just adore your blog! 😀
Thanks so much, Merry! XO
Just made sugar cubes in star shapes for a Christmas tea next week at church. Simple and fun. Thank you for the easy directions. I left mine white.
Oh, those sound perfect for Christmas, Janice! White sounds perfect for stars. 🙂
Thank you so very much! I’ve used this recipe to make fancy sugars for the tea room I host at steampunk conventions and everyone just loves them! This year it’s pink hearts and purple skulls for Heroes vs Villains.
Love this idea, Susan! So cute (and easy.) This is not something I would have thought of, and that is one reason I love this blog so much. Great ideas and always, always, helpful instructions and great pictures. 🙂
Thanks so much, Pam! ♥♥♥