For Metamorphosis Monday, I shared this wonderful photo from a Pottery Barn Catalog and a little info about how I was inspired to re-create a similar look for my front porch for less than half the price of the PB Garland. As promised, I’m back today with a tutorial on everything you need to know to make this ornament-covered garland for your home.

Before we get started, let me torture you with a couple more photos I found online at Pottery Barn using this same garland. ~~~SIGH~~~

You may remember I mentioned the PB garland is only 5 feet long. Notice anything about the column on the left as compared to the one on the right? Apparently, they didn’t have enough garland to complete the job for the photo shoot. I never would have noticed this if I hadn’t been analyzing these pics so much to make my own. I love the large lanterns they have shown on the ground. Beautiful!

I could stare at these scenes all. day. long! Soooo, pretty! I was curious about this home featured in the PB shoot, so I did a little research online.

Here’s a pic from Google Maps of what it looks like in real life. It was built in 1850 and was the home of Captain Andrew Sampson. It’s located at: 1157 Division Street, Napa, California and apparently it’s home to a business now.

Here’s a fabulous (short) video showing how they transformed this home in the middle of summer to look like the one you see in the photo. It’s nothing short of amazing how they worked their magic.
Pottery Barn Inspired Garland Tutorial:
Okay, let’s get to that tutorial. To make the garland shown below on my front porch (and in this post) for less than half the price of the Pottery Barn garland…

I purchased this lit garland from Lowe’s. It’s 9 feet long so two were all I needed and they were just long enough to wrap three times around each column. (Tip: Make sure the garland you buy to use outside is certified for outdoor use.)
To verify the length garland you will need to purchase, take a long string or rope and wrap it around your columns. Nine foot long garland just barely worked for mine. If you wish to wrap your garland around more than 3 times, you may need additional garland. Also, I bought lit garland but you can find the unlit garland for even less.

If you have lit garland, before you begin to put the ornaments on, plug your garland in and test it to make sure the lights work. You don’t want to get it fully decorated and find that you have a faulty garland. I stretched mine out across my kitchen counter to work on it. It took me around 45 minutes to completely cover each garland in ornaments, so about an 1 1/2 hours to do both. This is fun to do while watching t.v.

I purchased plastic ornaments because that’s what they used to make the PB garland. Glass ornaments would not hold up to temperature/weather changes very well. I bought the ornaments at discount stores: Old Time Pottery and Dollar Tree.
In the close up pics on the PB site, you can see their garland is covered with shiny and satin finish ornaments. So I bought shiny and satin ornaments, too. Also, I bought ornaments that look as if they are covered in glitter.
It took 7 boxes (each containing 24 ornaments) from Old Time Pottery, and two tubes of ornaments from Dollar Tree ($1 each) to completely cover my two garlands. That’s around 180-200 ornaments, total.
To attach the ornaments, I used some green coated twist type wire I already had. I think I bought it years ago in a garden store. It was a little brighter green than I would have preferred, but I already had it and I knew it would be hidden by the ornaments and greenery on the garland. You can just see the wire on the counter to the right of the ornaments in the picture below.

Before you get started, if you have a glue gun, plug it in nearby. Occasionally you are going to have a plastic ornament pop loose from its top. If an ornament pops out, just use a little hot glue and reattach it. (More on that in a sec)
Start by spreading out the branches on your garland. You’ll only need to attach the ornaments to the top side since you’ll want it nice and flat on the other side to wrap around your columns or wherever you’ll be decorating.

It’s best to attach your biggest ornaments first. I initially used some really large ornaments but I decided later they were out of proportion to the rest of the ornaments and I took them off. Medium, small and very small ornaments work best for creating the PB look. The smallest ornaments I used were the ones I found at Dollar Tree…they came in tubes.
Spread out the colors:
To get the different types/colors evenly spaced out, I placed them on or near the garland where I wanted them before wiring them. I first took all the shiny reds and spaced them out and attached them. Then I took all the shiny silver ornaments and spaced them out along the garland and attached them. I continued that process until all the ornaments were attached.
Attaching the ornaments:
I attached the ornaments to the center of the garland with the green wire. Some will fall naturally to the left, some to the right…so that will give it a nice look. On one garland, I cut off the excess wire as I went along. When I worked on the second garland, I decided to attach all of the ornaments first…then I flipped the garland over and cut off all the excess green wire at one time.
In this pic below, you can see the excess wire. While you are wiring on the ornaments, this gives you an opportunity to use the wire to pull in the “lighting wire” a little tighter to the center of the garland. In other words, if the lighting wire is sort of sticking out on your lit garland, pull it inward when you wire on your ornaments for a nicer look when finished. You can see how I did that in this pic below.

Here’s how it looked after I snipped it off. You don’t have to cut that closely. I just didn’t want to risk scratching the paint on my columns. If you leave your wire a little longer, just turn it inward toward the ornament so you don’t scratch your columns. Update: I’ve used this garland for two years on my columns and I’m happy to report, there hasn’t been any problem with scratches.

As you work, occasionally an ornament will pop out of its top or the plastic top might break.

Just reattach with a little hot glue and you’re good to go.

Here are a few pics I took after I was finished. I later removed the really large ornament balls and replaced them with medium size balls.


The garland I purchased from Lowe’s had these long wire pieces on the end.

Since my columns are pretty fat, it helped to stretch my garland a bit so I could wrap each column with just one 9ft. garland. I used the 3M hooks that are supposed to be easy to remove to attach the garland to the column.
Update: When it rained, the 3M hooks let go of the pole. So I hammered a skinny little nail into the top of the pole above the decorative ring that goes around the top of the column. I hooked the end of the garland onto the nail and it has held perfectly all season. Update 2014: I didn’t remove the nail and have left the nail there since it isn’t very tall or noticeable and I continue to use it year after year for hanging the garland.

Here’s a close up of one section on the column…wish I’d pulled that silver ornament up out from under the greenery before I took the picture. Why do we always notice this stuff after we take pics? 😉

I ran into a little snag when plugging in my garland. The plugs on the garland I used only had narrow slits and my extension cords all had the prongs where one side is big and one side is little. (I know there’s a name for that, but I have no idea what it’s called.) I looked at Lowe’s and they didn’t have extension cords that would plug into the garland. So, I bought one of these.

I cut the end off my extension cord and attached this plug. The directions are on the package plus the nice Lowe’s guy told me how to do it.

Then I was able to plug in the extension cord I had run across the top of my porch from one garland to the other garland. If your garland isn’t lit, you won’t run into this. Or, you may be able to find extension cords that work with your garland.

I still have more decorating to do on my porch (wreath, etc…) but I wanted to share the garland tutorial now so you’d have time to plan if you wanted to make some for your porch or stairway rails, etc…
Final Costs:
Final cost for both lit garlands was $88.87 vs $218 from Pottery Barn…and the PB garland isn’t lit. If you chose to use garland that doesn’t have lights, your cost should be closer to $50 to do two columns, using 9 ft garland.
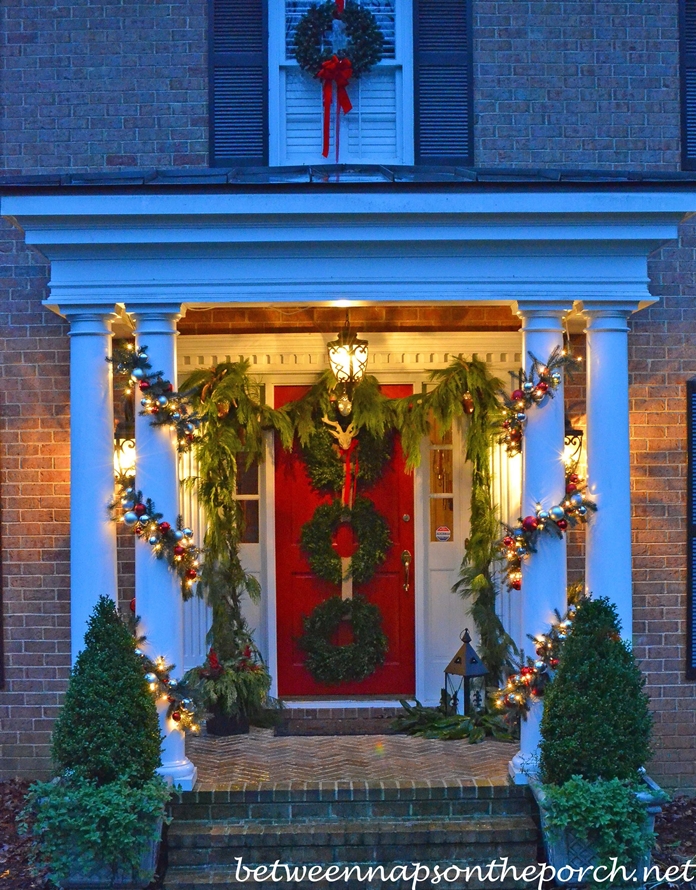
Christmas 2010
Here’s how the porch look decorated for Christmas, 2010, the year this tutorial was written.
 Garland")
Christmas 2011
Pottery Barn inspired garland is still looking great in 2011 (This porch post featuring triple wreaths (a Grandinroad Knock-off) can be viewed here: A Christmas Porch, 2011)

Christmas 2012
Garland is still looking good for Christmas 2012. I decorated with a snowflake wreath and live cedar garland around the door. Additional pictures can be found here: Decorating the Porch with Cedar Garland and a Snowflake Wreath

Christmas 2013:
Decorated again with a triple wreath design, this time using live boxwood wreaths. I hung pine and cedar garland around the door and the top wreath is sporting my faux deerhead that normally decorates my office as seen here: A Bit of Whimsy For The Office.
The porch is still rocking the Pottery Barn inspired garland for Christmas. Very pleased with how it has held up! You can view this porch in full in this post: Decorating the Porch for Christmas.
So, that’s about it. Hope this tutorial helps if you decide to make your own PB inspired garland. Please let me know if you have any questions…I’m happy to help!


thanks for sharing- i have admired that pb ad and clipped it for inspiration
Very pretty, and great How-To instructions. Looking forward to seeing more of your home as you decorate this year.
Thank you Susan, your house looks very pretty! A wonderful tutorial.Easy to follow! Happy Thanksgiving.
Very pretty! Happy Thanksgiving!
Donna
Susan,
Absolutely beautiful! I like your suggestion to hot glue the tops back on a distatched ornament. . .might be necessary if you're in an area with high winds as well! Have a blessed Thanksgiving!
Fondly,
Pat
You make it sound and look so easy and then you had to become an electrician too??! I would have probably been found on my porch crying! You are superwoman! You do a nice job with your tutorials.
The garland is perfect for your house! You have done a wonderful job. Will you put anything on your door?
Mary
This looks so easy to do! I already have the garland … so all I have to do is score some dollar store plastic ornaments and I'll be in business. Can't wait to raid the attic and get started.
Absolutely incredible! your house is so beautiful and the garland looks amazing! No it doesn't snow it Napa so they must have been fake snow. Happy Thanksgiving!
Denise
I was just going to say the same thing, being born and raised in Napa… now living in South Lake Tahoe…LOL! Just beautiful though
I WISH I could do this …
So very, very pretty!!
Happy Thanksgiving, Do you want to come to Buffalo, NY to decorate my pillars????? Great job!
Thank you so much! What a fabulous tutorial. Your house is gorgeous!! -Tammy
FABULOUS!!!!!
needs Pottery Barn?! This looks lovely.
Happy Thanksgiving! La
You my dear are brilliant!
A big effort but it sure paid off. That is spectacular. I love it. Hugs, Deb=^..^=x5
the fact that you re wired it for the plug leave me in more awe than ever!
That has got to be one of the most thorough tutorials I have seen. Thanks for all your work on showing us how to do this. It looks beautiful.
so pretty–nice idea!
Beautiful! And your house looks so similar to the PB one! I did chuckle when you pointed out how they not so discreetly covered the garland they ran out of. Too funny! Great tute!
Jeanine
All this and your an electrician too! I loved the added information regarding the house. Of all the homes in America it seems like they could find one where there was natural snow, hee hee.
Your tutorial is a valuable tool for anyone looking to make these beautiful garlands. By the way your counter is to die for, love your granite and all that space.
Thanks for sharing.
http://www.potterybarn.com/stylehouse/videos/videos/hol_v9.html I put this link on your facebook page also. I think you will like it. There are a lot of videos on the pottery barn website I have never seen them before . you probably already know but just in case. Have a happy thanksgiving. Frances
hi
I know my second message said only Hi i am having trouble getting my comment to publish. I have alos left a comment on facebook. thanks frances
Thanks for the tutorial, you went to a lot of work preparing it for all of us.
Glad your cut is healing ok. Sorry about the shot!:( Those things hurt and my arm hurt for a long time after I got my last one.
Happy Thanksgiving to you and your family!
Are you kidding me? Your house looks amazing!! How in the world do you do it?
I love this!! Thanks for such a great detailed post! I can't wait to make this!
I know you're probably tired of hearing this (LOL) but yours looks better than the PB one…what a great job! I'm going to do a little post of this with a link back to you on my blog (if that's okay).
Happy Thanksgiving!
Judy
Hi Susan, You did a great job on your ornament garland, it looks fabulous! I can't wait to see how you finish up the front of your house. Happy Thanksgiving!
Hugz,
Kim
Your house looks beautiful! And thanks for the detailed instructions!!
Have a Happy Thanksgiving!!
XO,
Jane
Thank you for sharing. I have dreamed of having my front porch look like that….but hate the idea of paying so much! I will certainly give this a shot!
Thanks everyone! Judy, thanks so much…so glad you liked this! 🙂
Absolutely beautiful!!! Thanks for sharing the PB and your tutorial on how to do it.
You did an incredible job creating your own version. I love the kitchen counter work space too – the perfect place to work on the garland without breaking your back!
Got a target catalog today and they have a similar garland, $20 for 6 ft. Doesn't look like it lights up though, which I think makes it look extra pretty 🙂
Sue in Michigan
Absolutely Beautiful! Have a Happy Thanksgiving!
I admired the PB garland last year, and your garland is perfect for your house! I loved the video showing them decorating in June!
Just Fabulous!! Thanks for the tutorial. I went out today & got some supplies after I 1st saw yours. Hoping this weekend I will make my attempt…
Again Just Fabulous!!!
Beautiful!
It's beautiful! Very festive and elegant – looks as good as PB!
Looks beautiful! Very nice!
Fabulous job!! It looks so elegant especially the evening shots!
Happy Thanksgiving!
xoxo
Karena
Art by Karena
Great job! Your home is beautiful.
Hi Susan…
It's so funny because I was just oogling over that beautifully decorated home in the TB catalog today! Hehe! That ornament garland is just gorgeous…isn't it! Girlfriend, you did a magnificent job making yours and it looks just as pretty if not prettier than PB's! Ohhh…and it looks absolutely gorgeous wrapped around your pillars! You're such a creative and talented lady!!! Thank you for sharing the tutorial with us…great job, my friend!!!
Well I just wanted to stop by to wish you and your family a happy and blessed Thanksgiving, sweet friend! I hope that you have safe and wonderful holiday!!!
Love ya,
Chari @Happy To Design
Smart idea with the hook on the back of the columns. Wow what a lot of work, but the payout is beautiful. Happy Thanksgiving.
I am planning on buying the supplies to make this today. Thanks so much for sharing your tutorial with us.
Gaaaa! That garland is gorgeous! I've done garlands on my (much smaller) columns before but I think I'll finding some lit garlands this year. Yours look beautiful lit up. Christmas lights really are cheerful in the middle of a cold and dark winter!
Anybody have any great (ie nearly free) ideas on how to dress up window boxes for the season? Sadly I don't have any evergreens growing in my ten acres of woods so I can't use real greenery.
I'd love to hear some ideas!
Just stopping by to wish you and your family a happy and blessed Thanksgiving holiday.
I love that picture on the PB catalog in fact I hve it in my favorite picture folder. I wanted to buy these as well but could not justify the cost. I am so greatful you shared with us this tutorial! Even down to the plug advice. I have run in to this problem as well. Wow you even do wiring. I am impressed. You did a wonderful job. It looks just like the PB design.
Hugs
Carey
i've shared the link.. thx
Susan,
I love your new blog heading. So cute and pretty.
I can't believe that snow is fake.
Amazing. You did a great job in recreating the garland. Thanks for the tutorial.
D
Susan:
So beautiful! Thank you for the tutorial, I am all thumbs when it comes to this kind of thing and you make it SO simple, will be working on this, Saturday…thanks again!
Lisa
What a beautiful blog you have. Everything is spectacular! Thank you for sharing your Pottery Barn inspired garland tutorial. Well done. I am definitely a fan of your blog.
Connie
Thanks for sharing Susan. I'll put this on the list for next year. Already have the outside done for this year. lol. I hope your little mishap is healing ok. I'm sure you won't believe this but I actually played with my dishes…lol. yes darling I'll be joining you today.. looking forward to seeing all the beautiful tablescapes..
hugs ~lynne~
Great tutorial, Susan! What a wonderful project, and the results are magical — elegant and dignified by day and spectacular at night! I do think the lights add an element that elevate it several degrees above the look that inspired you.
Hope you have a very Happy Thanksgiving!
XOXO,
Bill
Absolutely beautiful. Wish I had columns. I hope to get some garland up on the entry to our new sunroom, but might not happen this year. Bet your neighbors all look for your house to be beautiful.
Beckie in Brentwood, TN
This was an excellent tutorial. I don't have columns, but I can certainly benefit from knowing how to adapt a Lowe's garland into something quite grand. Thank you.
Best tutorial I have ever seen and the most charming outcome…great post!!
awesome tutorial!! I have a similar garland in my diningroom!! I think you have inspired me to make one for my mantle this year!! Thanks!1
My niece showed me the picture in PB saying she would like to do it on her house and I remembered you did a tut Thanks ever so much, she is going to attempt it on her house!
How beautiful! I love the red and silver…it looks just like the PB catalog! Great Job!! Happy Holidays!
Wow, your outside looks STUNNING! You really did it up beautifully with the lighted garland around your columns. And love the lights in your topiaries also. Great job!
(And your kitchen, as always, looks so pretty.)
Best,
Gloria
P.S. I like your Holiday Decorated Header too!
I just linked to this old post today and noticed you put that video I told you about in there I was rightly pleased thanks Frances
Very nice, Susan. It looks spectacular with the lights on. Thanks for the tutorial. My problem would be where to plug them…Christine
I love your garlands…and your front porch too!!!! Hope Lowe's will put their stuff 1/2 off soon, sometimes they do. We're getting new hardwoods installed so no decorating is going on yet. Thanks for the step by step pictures. That helps tremendously!
Your garland looks just beautiful, and your tutorial is nice and clear. Thank you so much!!
That video was a riot! They fooled me..I thought PB had gone to Maine for a photo shoot. LOL If my porch turns out 1/8 as pretty as yours, I will be doing a happy dance. I love the color of your door–and that herringbone!
I cut this picture out a couple of years ago. Think this might be the year to do the front of my house.
Thanks for the tips.
Jo, you’ll love it!
Howdy! I LOVE your decor! I’ve been doing my garland like this for years, but I still had to comment….yours is just lovely. Oh, and the plug thing is called polarized, I believe. 🙂
Have a great day!
Thanks, Missy! 🙂
Oct,27 2012
I just read your story about your PB garland,I don’t know what impressed me more,your finished result or your easy instructions.You made everything so simple and easy to follow.You now have a new fan here in Maine.
Thanks so much, Tammy! Glad you are here! The garland really is easy and once you’ve got it made, you can use it again and again. I hope to put mine back up again this year.
Love it! Very helpful to see your garland laying out on the counter. I am always trying to work with mine hanging up, not as convenient. I am ready to get started!
Thanks so much for sharing about the house in the PB Catalog. I saved that picture from two years ago. This spring, I showed it to the contractor and now have a delightfully beautiful new porch to decorate this Christmas. Your own porch is wonderful! Great job!
That’s wonderful, Jeri! So much fun to decorate a porch for the holidays! 🙂
Beautiful, I have been wishing I had the bucketful of money it would take to decorate my 36 foot wide front porch. The Pottery Barn picture started alsorts of visions in my head and you have a solution to the cash shortage.
rick
ps The main purpose of the polarized plugs, is to control how the appliance is energized. Most appliances have an on/off switch connectected very closely to the “hot”, incoming electricity, so that the electronic components are not energized while the switch is off.
Rick, Wow…a 36 foot porch would be amazing decorated with garland! Thanks for the info on the polarized plugs. Interesting…I always wondered about that. 🙂
Wonderful idea!!!! Your porch is simply beautiful!!!
Love this. My wife and I moved into our first home about a month ago. We really wanted to add some nice Christmas decor to the house, being our first Christmas in the house and all. I ran across this post and I knew I had to try it. We made one 9 ft section for our mantel and I can’t tell you how many comments we’ve had about how beautiful it is. Thanks so much for this!
Thanks, Nathan. That’s makes my day hearing that. 🙂 Merry Christmas to you and your family!
Awe inspiring! You have done a great job and your porch is absolutely beautiful! Thank you for making a tutorial! Merry Christmas!
I feel the ink-ling to write you and Thank-you for the tutorial you
posted 2 years ago. You see…..I made the wreath and garland that year…
just as you posted….and wha-la it turned out absolutely beautiful….and
I’m not a practicing Crafter at all!!
I was shocked by how pretty it looked
again this year as I took it out of storage to proudly hang up once again!!!
Your tutorial is a gift that has kept on giving!!
Thank-you again…and wishing you a Very Merry Christmas!!
Amy, that is wonderful! I’ve been so shocked how well mine has held up. I’m using mine now for the third year and it still looks as good as the first year. Thanks so much for your sweet comment! Appreciate that so much! Merry Christmas to you and your family!
Susan, your front porch is both warm and welcoming! As a military spouse our family has moved around quite a bit but this year I was able to wrap lights around our front porch post and I was feeling very proud until I saw this post! 🙂 I’ll have to store this idea away, thank you!
Laura
That’s wonderful, Laura! You should feel proud about your porch…I bet it’s beautiful! Thank you for you and your husbands service (and sacrifice) for this great country. I have a big soft spot in my heart for military families. My husband was in the reserves for many years and retired ultimately with 20 years active service (JAG). Merry Christmas to you and your family!
Great job. I actually bought the Garland, Wreath and Red Lanterns from Pottery Barn. The only thing I have missing is the grande front porch that you & Pottery Barn use. I live in a regular townhouse but I did win the neighborhood decorating contest a few years back. Apparently, using Pottery Barn even makes my townhouse look like a mansion. Too bad I can’t post pictures here or I would show you. Happy Holidays!!!!!
Joe, email pics to me at betweennapsontheporchatgmaildotcom. I’d love to see them! Congrats on winning! That’s awesome!
Nice work, as I do this for several clients each year. FYI, rather than using the 3 M hooks, or hammering nails, the jumbo cable ties in clear or green work well for the poles, you can connect several together also.
I’ve never seen those. Thanks for the tip! Where’s the best place to buy them?
Susan, I love your 3 wreaths, just darling. Last year while I was shopping at hobby lobby. A lady was looking for 3 different size wreaths. She wanted to make a snowman and put it on her tree outdoors. This was an idea she saw from Pinterest. I thought, how interesting. She needed a smaller wreath for the head and I just went to Michael”s and got the size she needed and I could not use. It was not worth my gas money to return a 5.00 wreath, so I just gave it to her. I hope she loved looking at that snowman mounted on her tree last year for the holidays. I will have to see what they look like on Pinterest.
What a wonderful idea! They truly put me in the mood. Thanks so much for the inspirations in decorating for Christmas! Happy Holidays everyone!
Awe inspired! I am going to use this garland in the back of my long kitchen counter for a buffet back drop
Just what Christmas should look like- thanks. Will follow your much appreciated tutorial.
Thanks, Sheila! I know your garland will be beautiful!
Have to comment on that video–that was amazing.
Wow – what a phenomenal job! Glad we could be a part of it!
Hi Susan!
Things are looking beautiful in and around your home! I’ve been looking at your Midwest Living article over coffee many mornings. So many great ideas for cozying up the house this Christmas season…love it all!
You are amazing!!! Thank you so much for all the details.. LOVE IT
It’s 2018 & I’m just seeing this. Am I too late? Anyway, your PB inspired garland looks amazing. i didn’t have your DIY skills then (nor now) so I spent millions of dollars (not really but pretty close) on the PB garland, wreath & red lanterns. I’ve had them for about 15 years now. They still look great & I’ve won the neighborhood decorating contest several times with them. Don’t ask why I keep winning with the same decorations year after year. LOL!!!! I would have posted a picture but I didn’t see an option to do so. Merry Christmas & Happy New Year.